- Home
- Articles
- Architectural Portfolio
- Architectral Presentation
- Inspirational Stories
- Architecture News
- Visualization
- BIM Industry
- Facade Design
- Parametric Design
- Career
- Landscape Architecture
- Construction
- Artificial Intelligence
- Sketching
- Design Softwares
- Diagrams
- Writing
- Architectural Tips
- Sustainability
- Courses
- Concept
- Technology
- History & Heritage
- Future of Architecture
- Guides & How-To
- Art & Culture
- Projects
- Interior Design
- Competitions
- Jobs
- Store
- Tools
- More
How to Use CapCut Desktop Video Editor to Add Voiceovers for Educational Videos
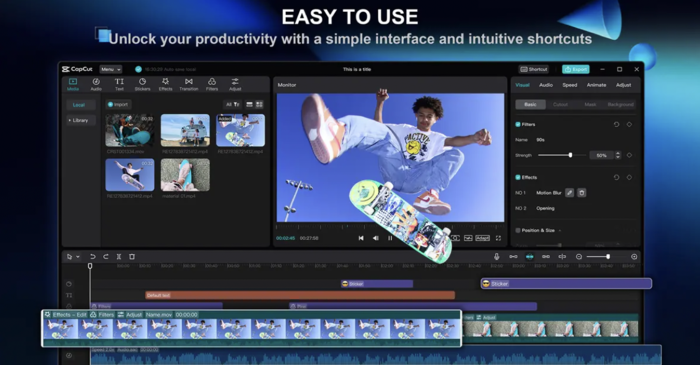
Table of Contents Show
Voiceovers are key in educational videos. They enhance understanding and keep the audience engaged. Using video editing software like CapCut makes adding voiceovers easy. CapCut is simple to use, making it ideal for educators. With its tools, you can record and edit voiceovers to match your video content perfectly. Voiceovers play a key role in every video. Whether you’re after Promotional Video Editing, or try to create an educational video or guide, voiceovers are a great way to build the connection with the viewers. They add a human touch that helps students connect with the material. Here are some ways voice-overs enrich the learning experience.
This enhances the learning experience by making it more accessible and enjoyable. If you want to improve your educational videos, explore how to use CapCut for voiceovers. Read the complete blog for detailed steps and tips to get started!

Importance of Voiceovers in Educational Videos
Voiceovers play a key role in making educational videos effective. They add a human touch that helps students connect with the material. Here are some ways voice-overs enrich the learning experience:
- Clarifying Complex Topics: When a subject is hard to grasp, a voice-over can break it down. For example, in a video about the water cycle, a narrator can explain each step clearly. This makes it easier for students to understand how water moves through the environment.
- Guiding Viewers: A good voice-over guides students through the video. It helps them know what to focus on and when to pay attention. This guidance keeps learners engaged and helps them follow along without getting lost.
- Enhancing Retention: Hearing information spoken aloud can improve memory. Students often remember facts better when they hear them rather than just reading them. A clear voice can make key points stand out.
- Creating a Connection: A cheerful and friendly tone can help make learning feel more connected. It encourages students to relax and sparks their curiosity to learn more.
In summary, clear narration is vital for engaging students. It helps explain tough ideas, guides viewers, and makes learning enjoyable. Voiceovers turn dry content into lively lessons that stick with learners long after they finish watching.
Key Features of CapCut Desktop Video Editor for Adding Voiceovers
Simple Import and Edit Interface
CapCut desktop video editor offers a user-friendly interface that makes importing videos easy. You can quickly drag and drop files into the editor, simplifying the editing process. This video editing software is designed for everyone, whether you’re a beginner or more experienced.
While it provides many free features, some advanced tools require payment. Overall, CapCut helps you create polished videos without a steep learning curve. This makes it a great choice for casual and serious editors alike.
Professional Voiceover Integration
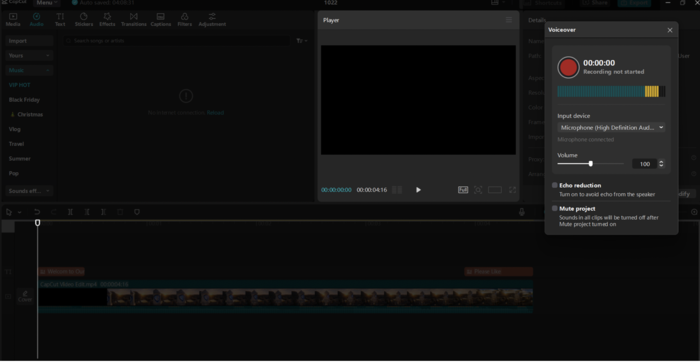
CapCut desktop video editor offers a user-friendly way to add voiceovers. To record, open CapCut, import your video, and click the microphone icon. Choose your input device and adjust settings like volume and echo reduction. Press the red button to start recording and stop when done.
You can trim and sync audio tracks by dragging them on the timeline. For advanced audio customization, such as voice effects and noise reduction, explore the paid plans. These features enhance your voiceover quality, making your videos more engaging and professional.
Background Noise Removal
CapCut desktop video editor offers a premium feature for background noise removal, enhancing audio clarity. This tool helps eliminate unwanted sounds, making voiceovers clearer. Users can easily access this feature within the audio editing options. It identifies and reduces background noise while keeping the main audio intact.
By using this function, you can focus on your content without distractions. This video editing software ensures that your audio quality meets professional standards. This makes your videos more immersive and pleasant to watch.
Text-to-speech and Multilingual Support
CapCut desktop video editor offers auto-captions for easy subtitle creation. This feature automatically generates subtitles, making video content more accessible. It helps viewers follow along without missing important details.
Additionally, CapCut supports multilingual voiceovers, which is great for educational content. This feature allows creators to reach diverse audiences by providing audio in various languages. It boosts involvement and understanding, improving learning for all. By breaking language barriers, CapCut ensures all learners can connect with the material presented.
Step-by-Step Guide to Adding Voice Overs with CapCut Desktop Video Editor
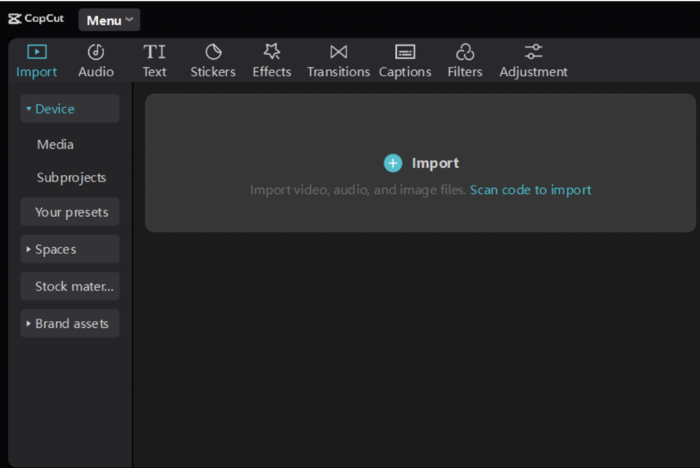
- Import Your Video
To start with CapCut, first download and install the software from its official website on your computer. Open the app and select “Create project.” This will create a workspace for your video. Next, click on “Import” to add your video clips.
You can choose multiple files at once. Once imported, drag the clips to the timeline for editing. Adjust their order and trim them as needed. This simple process makes CapCut an efficient video editing software for beginners and experienced users. Enjoy creating your videos!
- Record or Upload Voiceover
To record or upload voiceovers in CapCut, start by opening your project. Choose the microphone icon to record straight away. Speak clearly, and when done, save the recording. Select the “Import” option to upload existing audio and choose your file.
CapCut also offers auto-captions, making your videos more accessible. To use this feature, tap the “Text” button, select auto-captions, and confirm. The app will generate captions based on your audio. You can edit these captions for accuracy and style, enhancing viewer engagement while ensuring accessibility.
- Edit and Adjust Voiceover
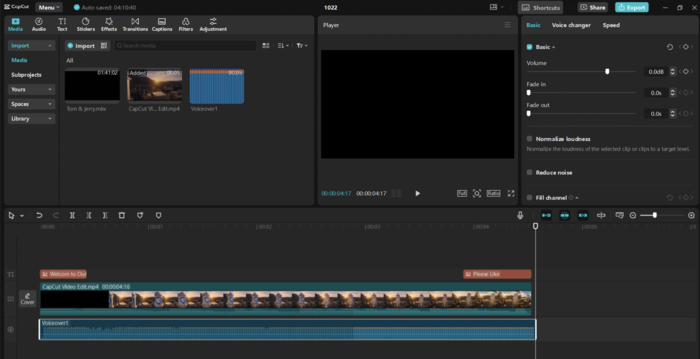
To adjust voiceover in the CapCut desktop video editor, start by importing your video. Press on the audio track to access the sound settings. Use the slider to raise or lower the volume as needed. To remove background noise, select the audio track, then click on “Audio” and choose the noise reduction option.
For effects, explore the “Effects” tab and apply desired filters to enhance your voiceover. Remember, some advanced features may require payment. Always preview your changes to ensure they enhance your video without losing clarity or quality. This will help achieve a professional outcome.
- Export and Share Your Video
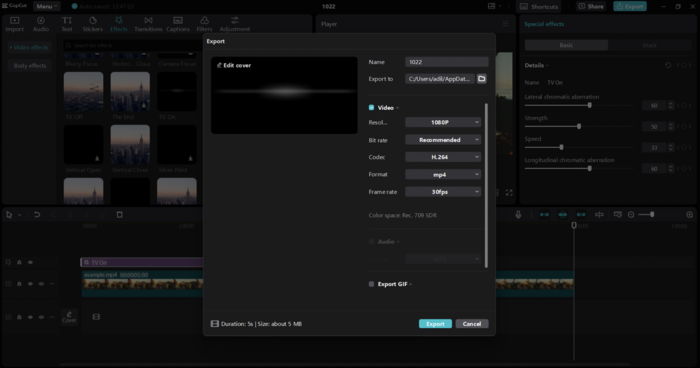
To share your video from CapCut, press the Export button at the top right. Set your video title, resolution, and frame rate. You can choose a high resolution for better quality. For a polished look, use the video background remover to enhance focus.
Once satisfied, click Export again to save your video. You can share it on social media or keep it for personal use. Follow these steps to ensure your video looks great and is ready to share.
Benefits of Using CapCut Desktop Video Editor for Educational Videos
CapCut desktop video editor offers many benefits for creating educational videos.
- Time-saving features: Tools like auto-alignment and quick export streamline the editing process.
- Video background remover: The video background remover helps eliminate distractions, keeping students engaged.
- Customizable options: Users can personalize their videos for a professional touch, although some advanced features require a premium subscription.
These features make video creation easier and more effective, allowing educators to produce high-quality content without extensive editing experience. CapCut’s user-friendly interface ensures that anyone can create compelling educational videos quickly.
Wrapping Up
CapCut makes adding voiceovers easy for teachers. This video editing software helps create engaging lessons. Features like auto-captions and a video background remover enhance videos, making them more appealing and effective for students. Educators should try it for impactful content.
illustrarch is your daily dose of architecture. Leading community designed for all lovers of illustration and #drawing.
Submit your architectural projects
Follow these steps for submission your project. Submission FormLatest Posts
Modernism vs Postmodernism: How Order and Ornament Shape Architectural Meaning
Modernism and Postmodernism represent two fundamentally different ways of understanding architecture’s role...
Tips to Keep Your Belongings Safe from Heat, Cold, and Humidity
Table of Contents Show Pack everything appropriatelyWhat to do if you plan...
8 Smart Steps to Take Before Buying a Home for Sale
Table of Contents Show 1. Assess Financial Readiness2. Research Neighborhoods Thoroughly3. Be...
10 Healthy Habits for Surviving Long Studio Hours
Long studio hours are a reality in architecture and design, but without...


Leave a comment