

3D Rendering Softwares: Enscape
Enscape is a real-time rendering plug-in that integrates with various modeling software, allowing architects to visualize designs instantly without exporting models.
 Elif Ayse Sen16 February 20223 Mins read486

Table of Contents Show
Rendering is one of the most significant presentation way for architectural project. However, architects and architecture students spend their time while waiting for rendering and working of render various software. In this article, we talk about Enscape which is more practical and time-efficiently rendering software for architects.
Enscape is a plug-in for your modeling software that allows you to create an integrated visualization and design workflow. It’s one of the simplest and quickest way to turn your models into immersive 3D experiences, as it eliminates production hassles, shortens the feedback loop, and gives you more time to design.
There is no need to export your model. Simply click “start” to view and experience your design in a new way you’ve never work before. Enscape is one of the easiest rendering plug-in to use in your design.
Designers used to hire an independent firm to do their renderings. The more basic a rendering tool is, the more easily this old technique can be eliminated.

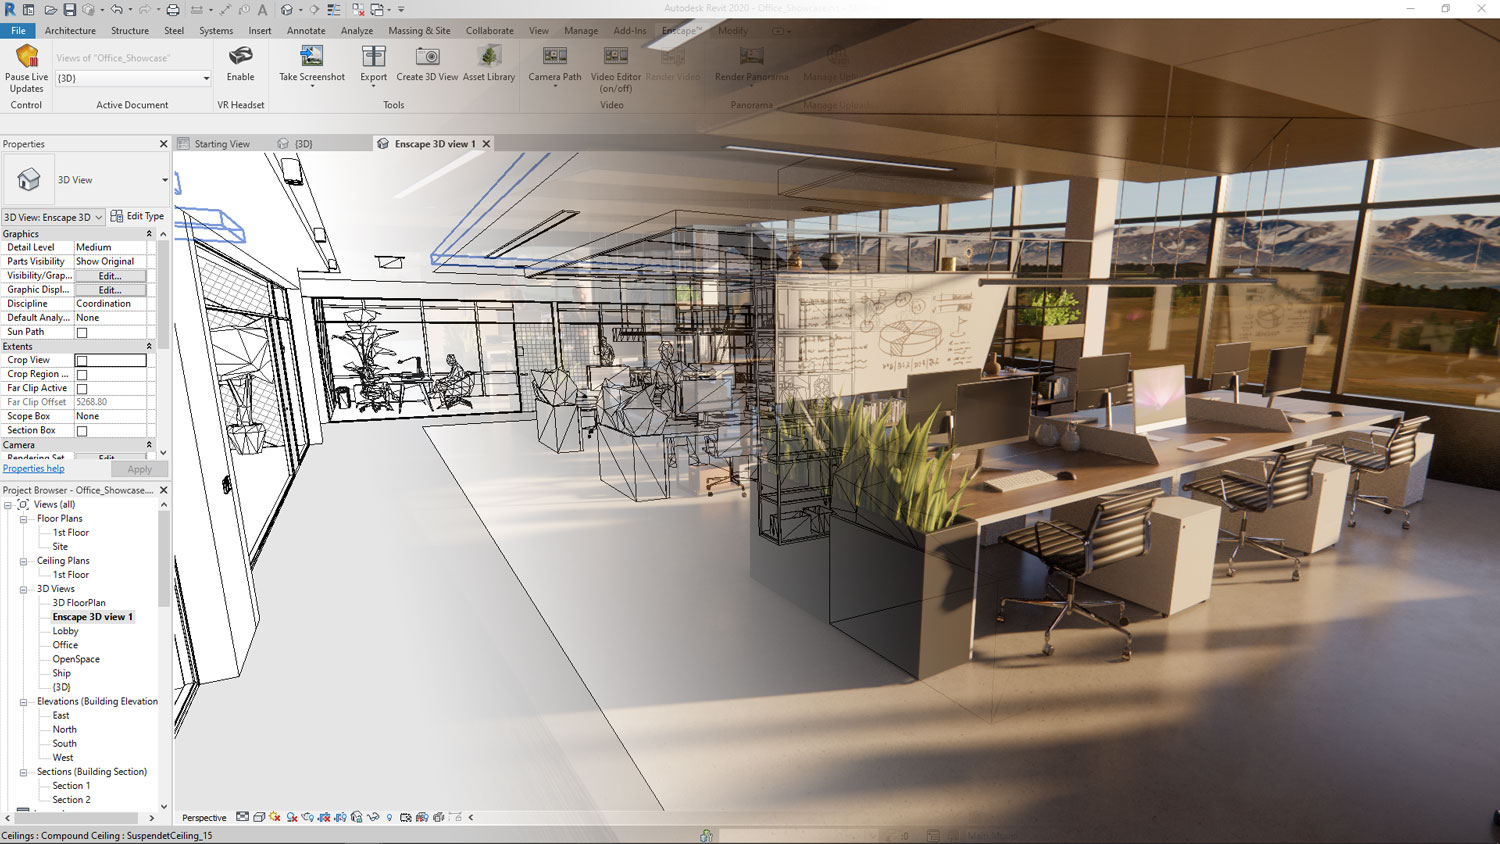
Encscape is able to work in Revit, Rhinoceros, Vertorworks, Archicad, and SketchUp. You can take screenshots and make movies using Enscape. It allows you to save the Enscape model as an.exe file.
You can work with the materials that belog your modelling software such as Revit or SkecthUp. Also, trees, people, any other objects will transform in Enscape very well.

While working on the modelling software what you prefer, your Enscape rendering will change directly. You do not need to refresh or wait constantly. The software such as Rhinoceros or Revit will sync your model in Enscape quickly.
Whether you like to download and try Enscape in your modeling software, you can access on the offical website now.
Why Real-Time Rendering Changes the Workflow
The biggest shift Enscape introduces is the move from offline rendering to real-time rendering. Traditional engines ask you to set up a scene, start a render, and then wait minutes or even hours before you can judge the result. Enscape draws the view continuously using your graphics card, so changes to geometry, materials, lighting, and the camera appear almost instantly. This tight feedback loop means design decisions can be tested live rather than guessed at, which is especially helpful during early concept stages when many options are still on the table.
Because the view updates as you model, Enscape works well as a companion window kept open beside your authoring software. Many architects place it on a second monitor so they can sketch in Revit or SketchUp on one screen while watching the rendered result evolve on the other.
Key Features Worth Knowing
Beyond live rendering, Enscape includes several tools that make presentations easier. The asset library offers ready-made trees, people, furniture, and vehicles that you can drop directly into a scene to add scale and life. Time-of-day and sun settings let you study daylight at different hours, while sky, fog, and weather controls help set mood. You can also export standalone executable files, panoramas, and walkthrough videos, which lets clients explore a project without owning the modeling software.
Virtual reality support is another strength. With a compatible headset, you can walk through a space at full scale, which gives clients a sense of proportion that flat images rarely convey.
Strengths and Limitations
Enscape is valued for its speed, short learning curve, and direct integration with popular BIM and modeling tools. For teams that need quick, attractive visuals during design, it removes much of the friction of older pipelines. The main trade-offs are that real-time results, while impressive, may not match the ultimate photorealism of dedicated offline engines for final hero shots, and that smooth performance depends on a capable graphics card. Knowing these limits helps you decide when Enscape is the right tool and when a heavier renderer is worth the extra time.
Tips for Better Enscape Results
To get the most from Enscape, keep your materials clean and consistent in the host software, since Enscape reads those material definitions directly. Use realistic reflectance and roughness values rather than overly glossy surfaces, and rely on natural daylight before adding artificial lights. Populate scenes with a few well-placed assets instead of crowding them, and adjust the field of view to avoid distortion in interior shots. Finally, save favorite settings as presets so your visual style stays consistent across a project.


Notion Alternatives for Architects: 7 Tools That Fit Studio Work
Notion works until a studio needs fee tracking, phase budgets and timesheets....
 Furkan Sen7 Mins read

Why Every Practice Ends Up With Five Versions of the Same Revit Family
Let’s learn why Revit family libraries accumulate duplicates, break schedules and slow...
 illustrarch Editoral Team5 Mins read
Visualizing Renovation Projects From Photographs: A Workflow for Existing-Building Work
Photo-based visualization turns a photograph of a building that already exists into...
illustrarch Editoral Team7 Mins read

Best Free CAD Blocks and Resources for Architects
A working guide to free CAD blocks for architects, covering ARCAT, CAD-Blocks.net,...
Furkan Sen7 Mins read


Leave a comment