

10 Adobe Illustrator Tips for Architecture Students

Table of Contents Show
Architects always use visuals and graphics to translate their ideas. As many have preferred Photoshop for graphics in architecture, Adobe Illustrator is becoming the industry standard for creating clear and neat graphics that can communicate complex ideas. Architectural drawings are often made visually appealing through Illustrator and concept diagrams are found easier to be done. Hence, the illustrator is gaining much importance among architecture students. Here are some of the tips in adobe illustrator for architecture students.
1. Use multiple artboards
The most important life saver of adobe illustrator is the multiple artboards. You can work on multiple artboards and save them as a portfolio document or save individual files as an image. The super bonus tip is that the artboards can be of different layouts or sizes and can work on all at the same time.

2. Save time with illustrator color groups
You have the full creative freedom of colors in illustrator. You can create swatches with colors of your choice and use them for later use. An advantage of illustrator is that it has a preset swatch of colors which saves time in creating swatches for portfolios and presentation boards.

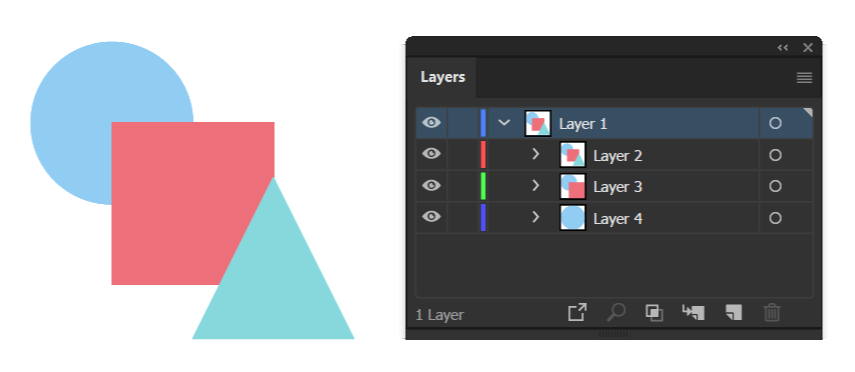
3. Maintain organized layers
As with Photoshop, you have to keep an eye on layers in illustrator. Illustrator has a detailed layer panel and so if we maintain and organize appropriate layers, it will be easier for us to navigate and make changes in the drawing. It can also be used for controlled viewing of the drawings at different stages.
4. Arrange your workspace
Adobe Illustrator has a lot of tools arranged in different tabs under the perimeter of the interface. Although it is a great advantage, it is also the biggest downfall when we spend so much time searching for a particular tool when we work. This is why it is important to arrange and organize our workspace before we start working. Find the most used tools and snap them to the side to save time.

5. Convert raster images to vector
The major objective of adobe illustrator is working with vectors. Pixels are raster images and look blurred when we use a larger layout. If you need to make changes in illustrator, you need vector graphics. This is where the Image trace option comes into play. It is when you have to change raster images to vector, go to window -> Image trace and select the preferred outcome and click expand. It converts your image to vector graphics. The accuracy of the trace depends on the quality and complexity of the image.

6. Recolor artwork
If your illustration is in progress, and you have to change or try a different color palette, the recolor tool could be your choice. The tool is used for quick, centralized control of all colors in an artwork. It becomes easier to mix and match different color combinations and make swift changes as the project progresses.

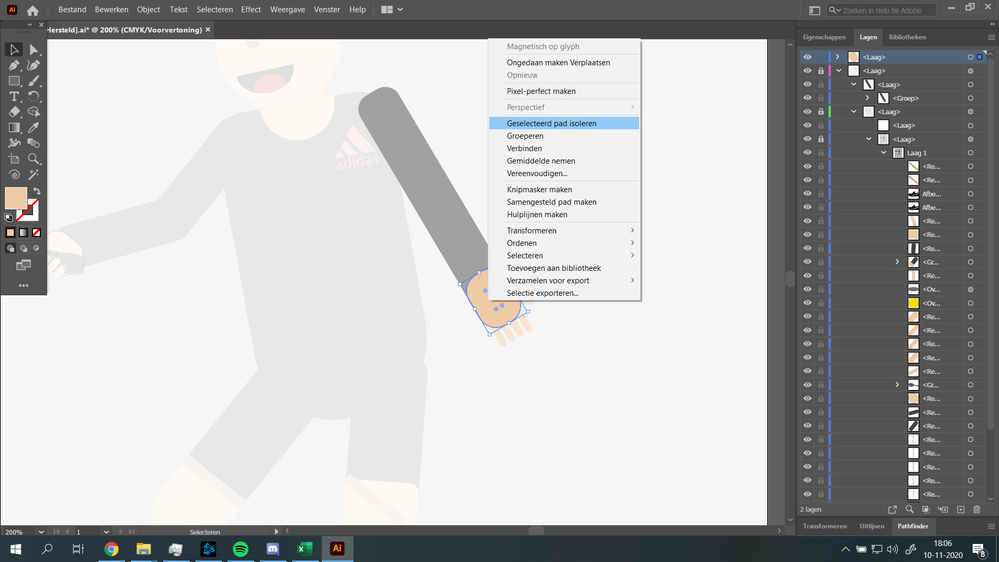
7. Isolate objects for editing
Objects are often part of larger groups and you may find it difficult to work on individual objects. Adobe Illustrator allows for the isolation of objects by a simple double click on the object. Isolating the object gives you full control of the individual object without changing the rest of the drawing. You can also use lassos to select parts of isolated objects.
8. Use drawing modes
Illustrator has three different drawing modes which can be used when we draw complex diagrams and architectural drawings. Draw normal allows you to draw usually as you would always do in illustrator. Draw behind allows drawing layers behind the diagram without disturbing it. And Draw inside is to draw inside a drawing or diagram as all other layers become locked.
9. Scribble with illustrator
Sketches are an important part of architecture. Illustrator allows you to sketch your projects with clear composition and appropriate line weights. You can also create beautiful compositions with full control over the amount, spacing, line thickness, and angles. Scribble options have three different moderations: Childlike, Snarl, Sketch, or Zig-Zag.
10. Use keyboard shortcuts
Using shortcuts is the most important time-saver tip of any software, and it becomes a crucial need in a program like the Adobe Illustrator with so many tools. Remember shortcuts and use them very often. Here are some of the keyboard shortcuts for Illustrator.
- Adobe illustrator
- Adobe Illustrator tools for architecture
- Adobe Illustrator tutorial for architects
- advanced Illustrator tips for architecture students
- Architectural drawings
- architecture portfolio
- architecture render in Illustrator
- best practices for architecture in Illustrator.
- create architecture plans in Illustrator
- Diagrams
- Illustrator efficiency tips for architecture
- Illustrator for architectural design
- illustrator for students
- Illustrator layers for architecture design
- Illustrator shortcuts for architects
- Illustrator tricks for architecture students
- Illustrator workflow for architecture drafting
- optimize Illustrator for architecture
- shortcuts for Illustrator
- tips for architecture students
- using Illustrator for architectural layouts
- using Illustrator for architecture projects
- vector architecture design in Illustrator
- vector graphics


How to Study Ancient Architecture: Tips and Resource
A practical guide to studying ancient architecture across Egyptian, Greek, and Roman...

10 Common HVAC Mistakes in Architecture to Avoid
Learn the most common HVAC mistakes in architectural design and how to...

8 Tips for Designing a Productive Garden Studio
Transform your outdoor space into a productive sanctuary. Learn essential design principles...

7 Tips for Designing a Kid-Friendly Creative Corner
Learn how to design the perfect kid-friendly creative corner with these 7...

Leave a comment