

Concept Diagrams in SketchUp
A step-by-step method for building concept diagrams in SketchUp, from organizing groups and tags to setting parallel projection, saving scenes, styling the model, and exporting clean frames you can finish in Photoshop or Illustrator.
 Elif Ayse Sen5 April 20226 Mins read1.7k
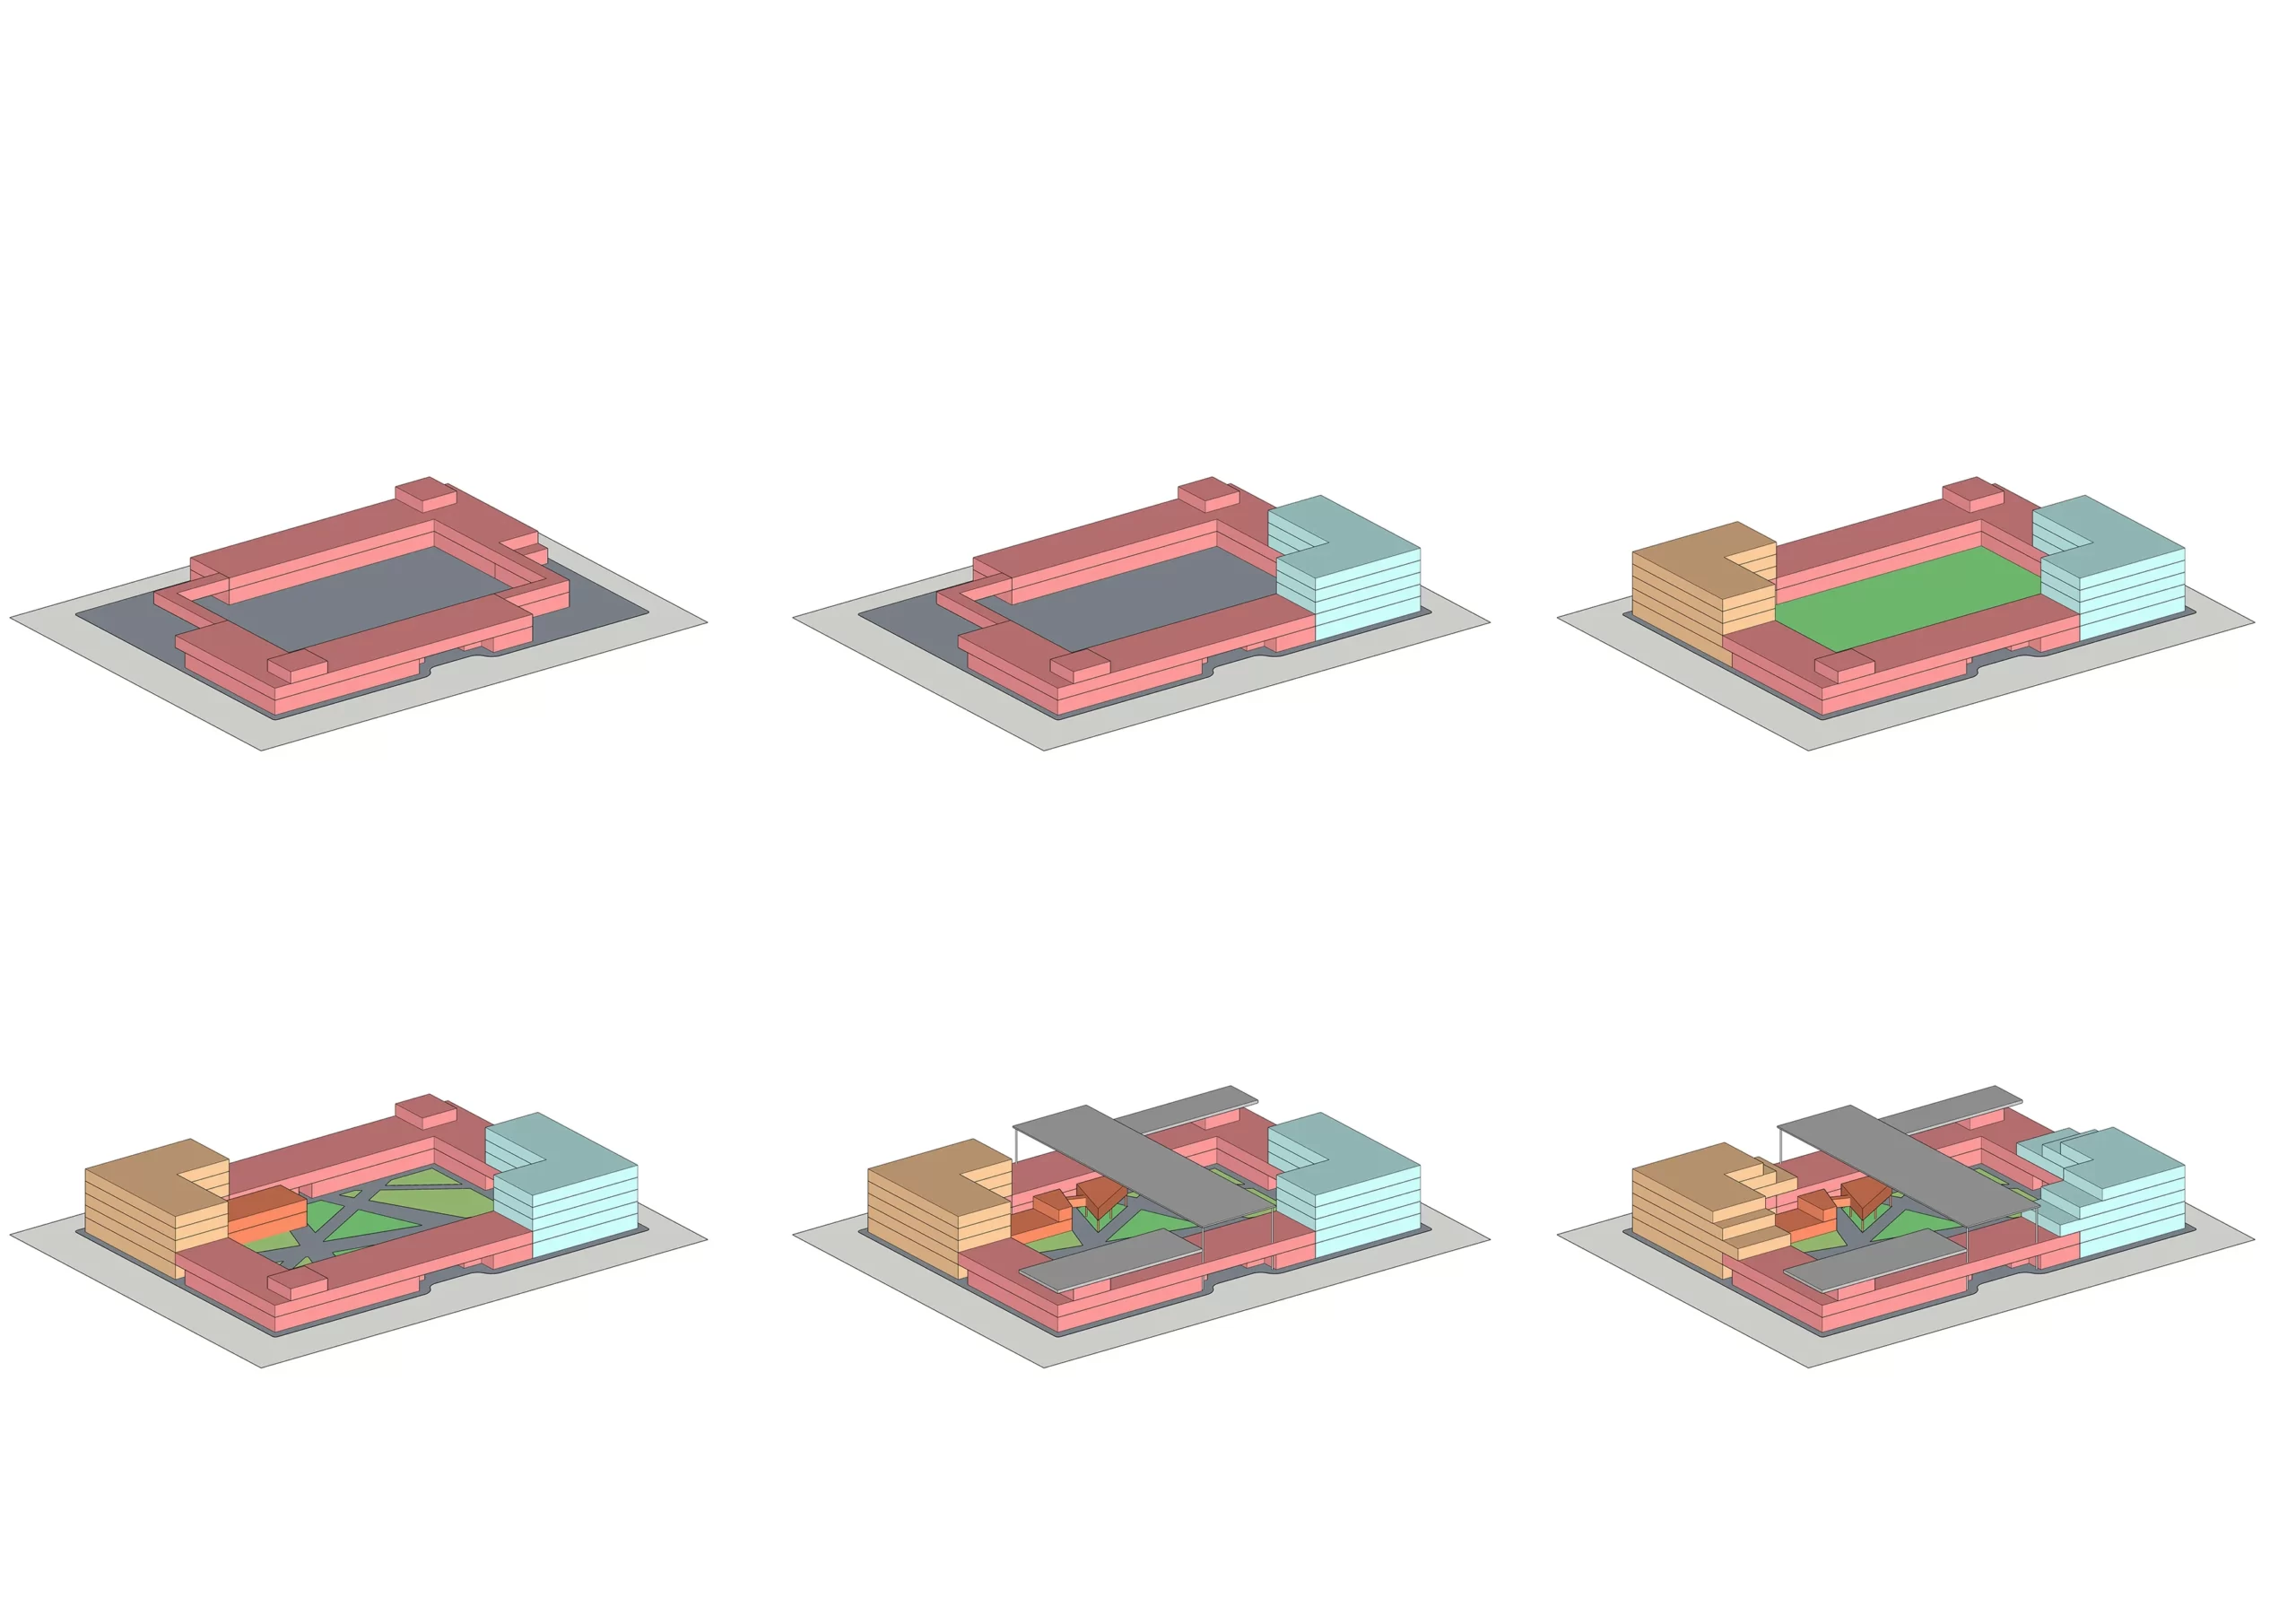
Table of Contents Show
Concept diagrams in SketchUp are simplified 3D visuals that explain how a design idea takes shape, built by grouping model elements, saving scenes, and exporting clean parallel projection views. With organized groups, tags, and consistent styles, you can turn a working model into a clear sequence that communicates your concept at a single glance.
Architectural diagrams are one of the most effective representation methods in the design process. Diagrams, which are frequently preferred by both architecture students and architectural firms, explain architectural projects in a very simple language. You can create many types of diagrams, such as concept diagrams, program diagrams, bubble diagrams, circulation diagrams, and mass diagrams. This article explains how to develop concept diagrams in SketchUp step by step, from a tidy model to a polished export.

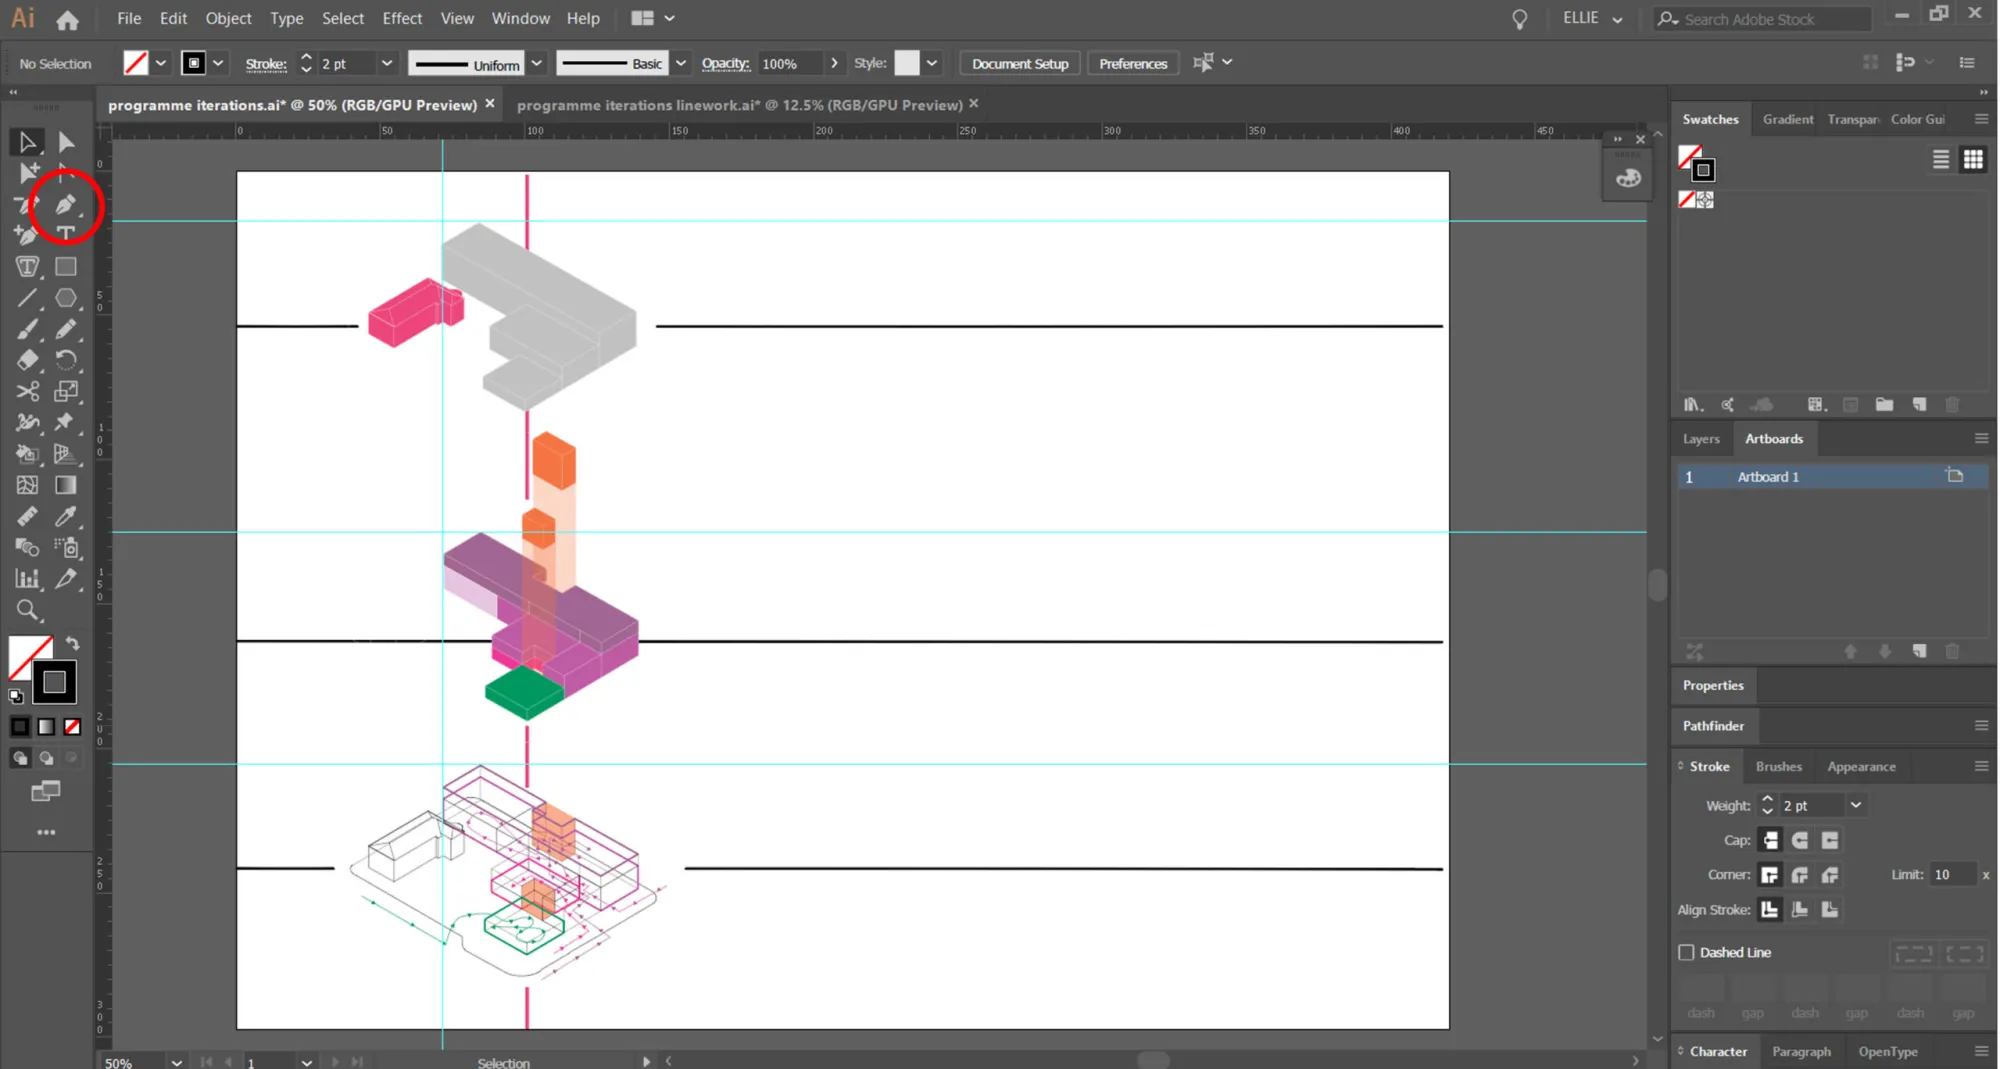
Showing how your concept idea has evolved matters whatever the subject of your architectural project. Diagrams describe how projects develop and reveal the thinking behind each move. For architects using SketchUp software, building that visual story is fairly quick once your model is organized. Many designers prepare the base geometry in SketchUp and then refine the linework and color in a program such as Adobe Photoshop or Adobe Illustrator for a more finished result.
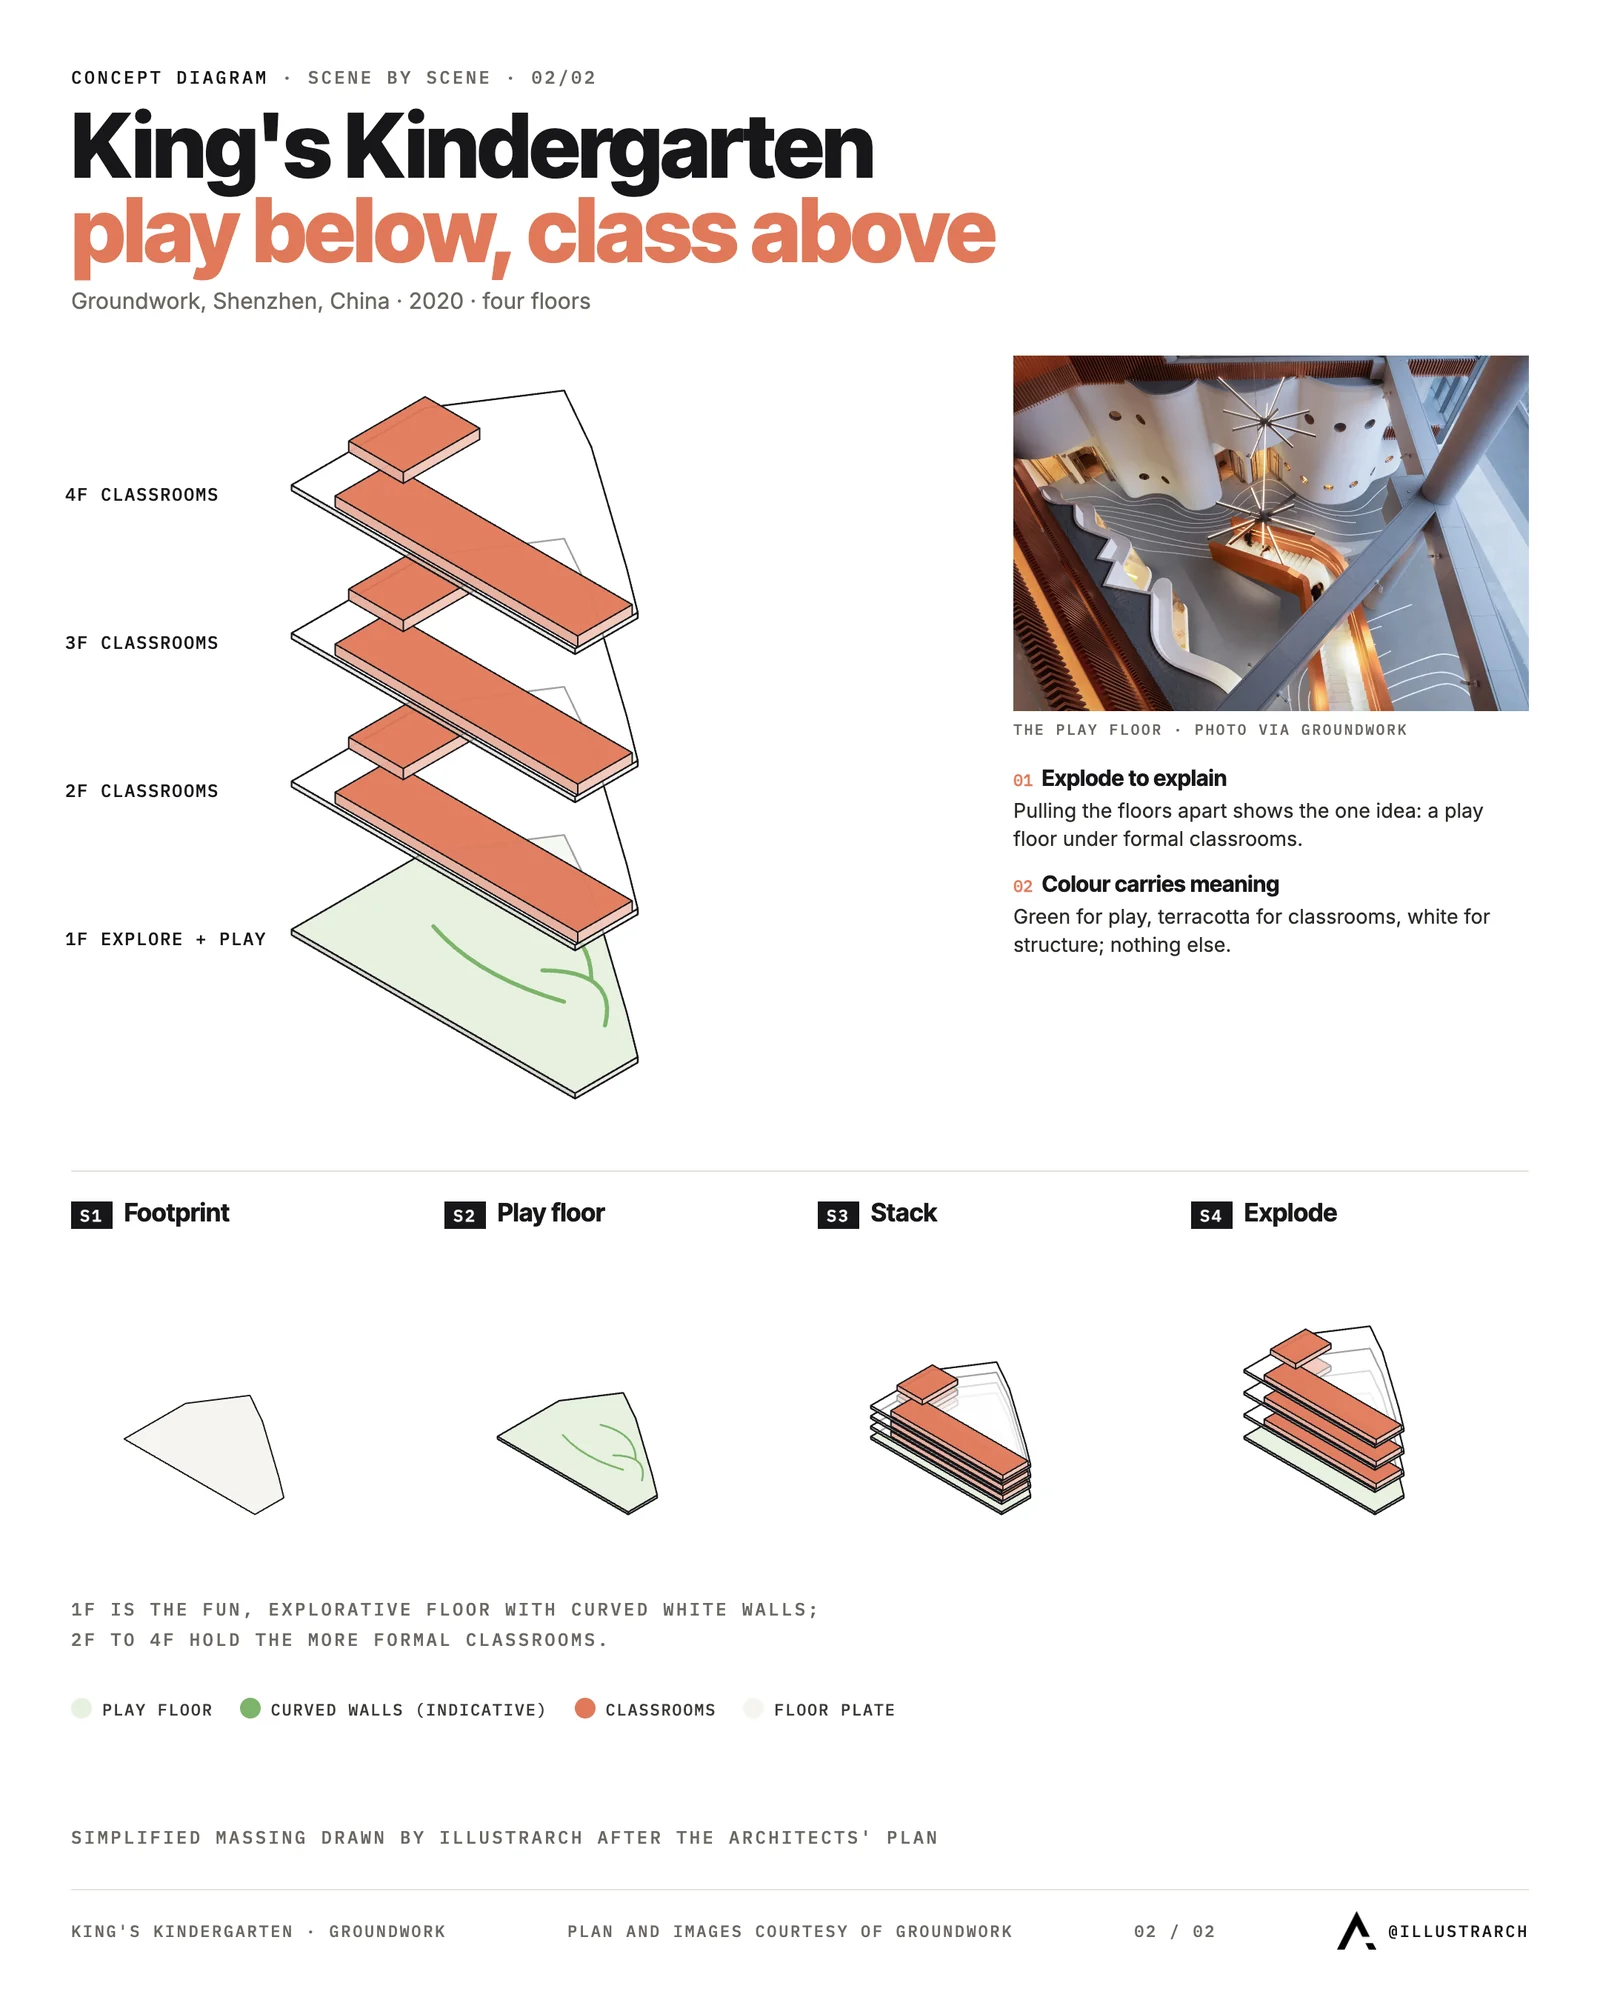
Remember that you will need diagrams in the last step of the workflow, namely the architectural presentation. Copy and save the concept phases of your project as primitive masses as you go, so nothing is lost when you rework the model. A concept diagram has to show the creation process of your design, and one of the clearest ways to do that is switching the camera from Perspective to Parallel Projection, then separating or aligning the masses to match each phase you want to communicate.
The Concept Diagram Workflow, Step by Step
Every strong diagram follows a similar path, from a clean model to a set of matched export frames. The point is not to add detail but to remove noise, so each frame carries one idea. Before looking at each stage in depth, the summary below maps the main steps to the SketchUp tools you will actually use.
Concept Diagram Steps and Tools at a Glance
This table pairs each stage of the process with its SketchUp tool, what the step communicates, and a practical tip to keep in mind.
| Step & SketchUp Tool | What It Shows | Tip |
|---|---|---|
| Organize with Groups and Components | Which parts move or hide independently | Name every group in the Outliner as you build |
| Sort by Tags (Layers) | Categories such as structure or circulation | Toggle whole systems on and off in one click |
| Set Parallel Projection (Camera menu) | Consistent, comparable masses | Use it for all axonometric and exploded views |
| Save each phase as a Scene | The sequence of your concept | Lock the same camera angle across scenes |
| Adjust Styles (edges, colors) | A clear, consistent visual language | Keep line weight and palette limited |
| Export 2D graphics at high resolution | Print-ready frames for the board | Export line and color layers separately |
Setting Up Your SketchUp File for Clean Diagrams
Good diagrams start before you draw anything, with a tidy file structure. Place each distinct element of your design into its own group or component so you can isolate, hide, or move parts without affecting the rest of the model. Naming those groups in the Outliner makes the later stages far quicker, because you can toggle visibility to build each frame of a sequence. Layers, called Tags in newer versions, give you a second axis of control, letting you switch whole categories such as structure, circulation, or context on and off in a single click. You can read more about the full toolset on the official SketchUp website.
💡 Pro Tip
Duplicate your model into a separate diagram file before you start hiding and exploding parts. Working on a copy keeps your production model intact, so you never lose geometry while pulling masses apart, and you can rebuild any frame later without redrawing the design.
Using Scenes to Tell a Story
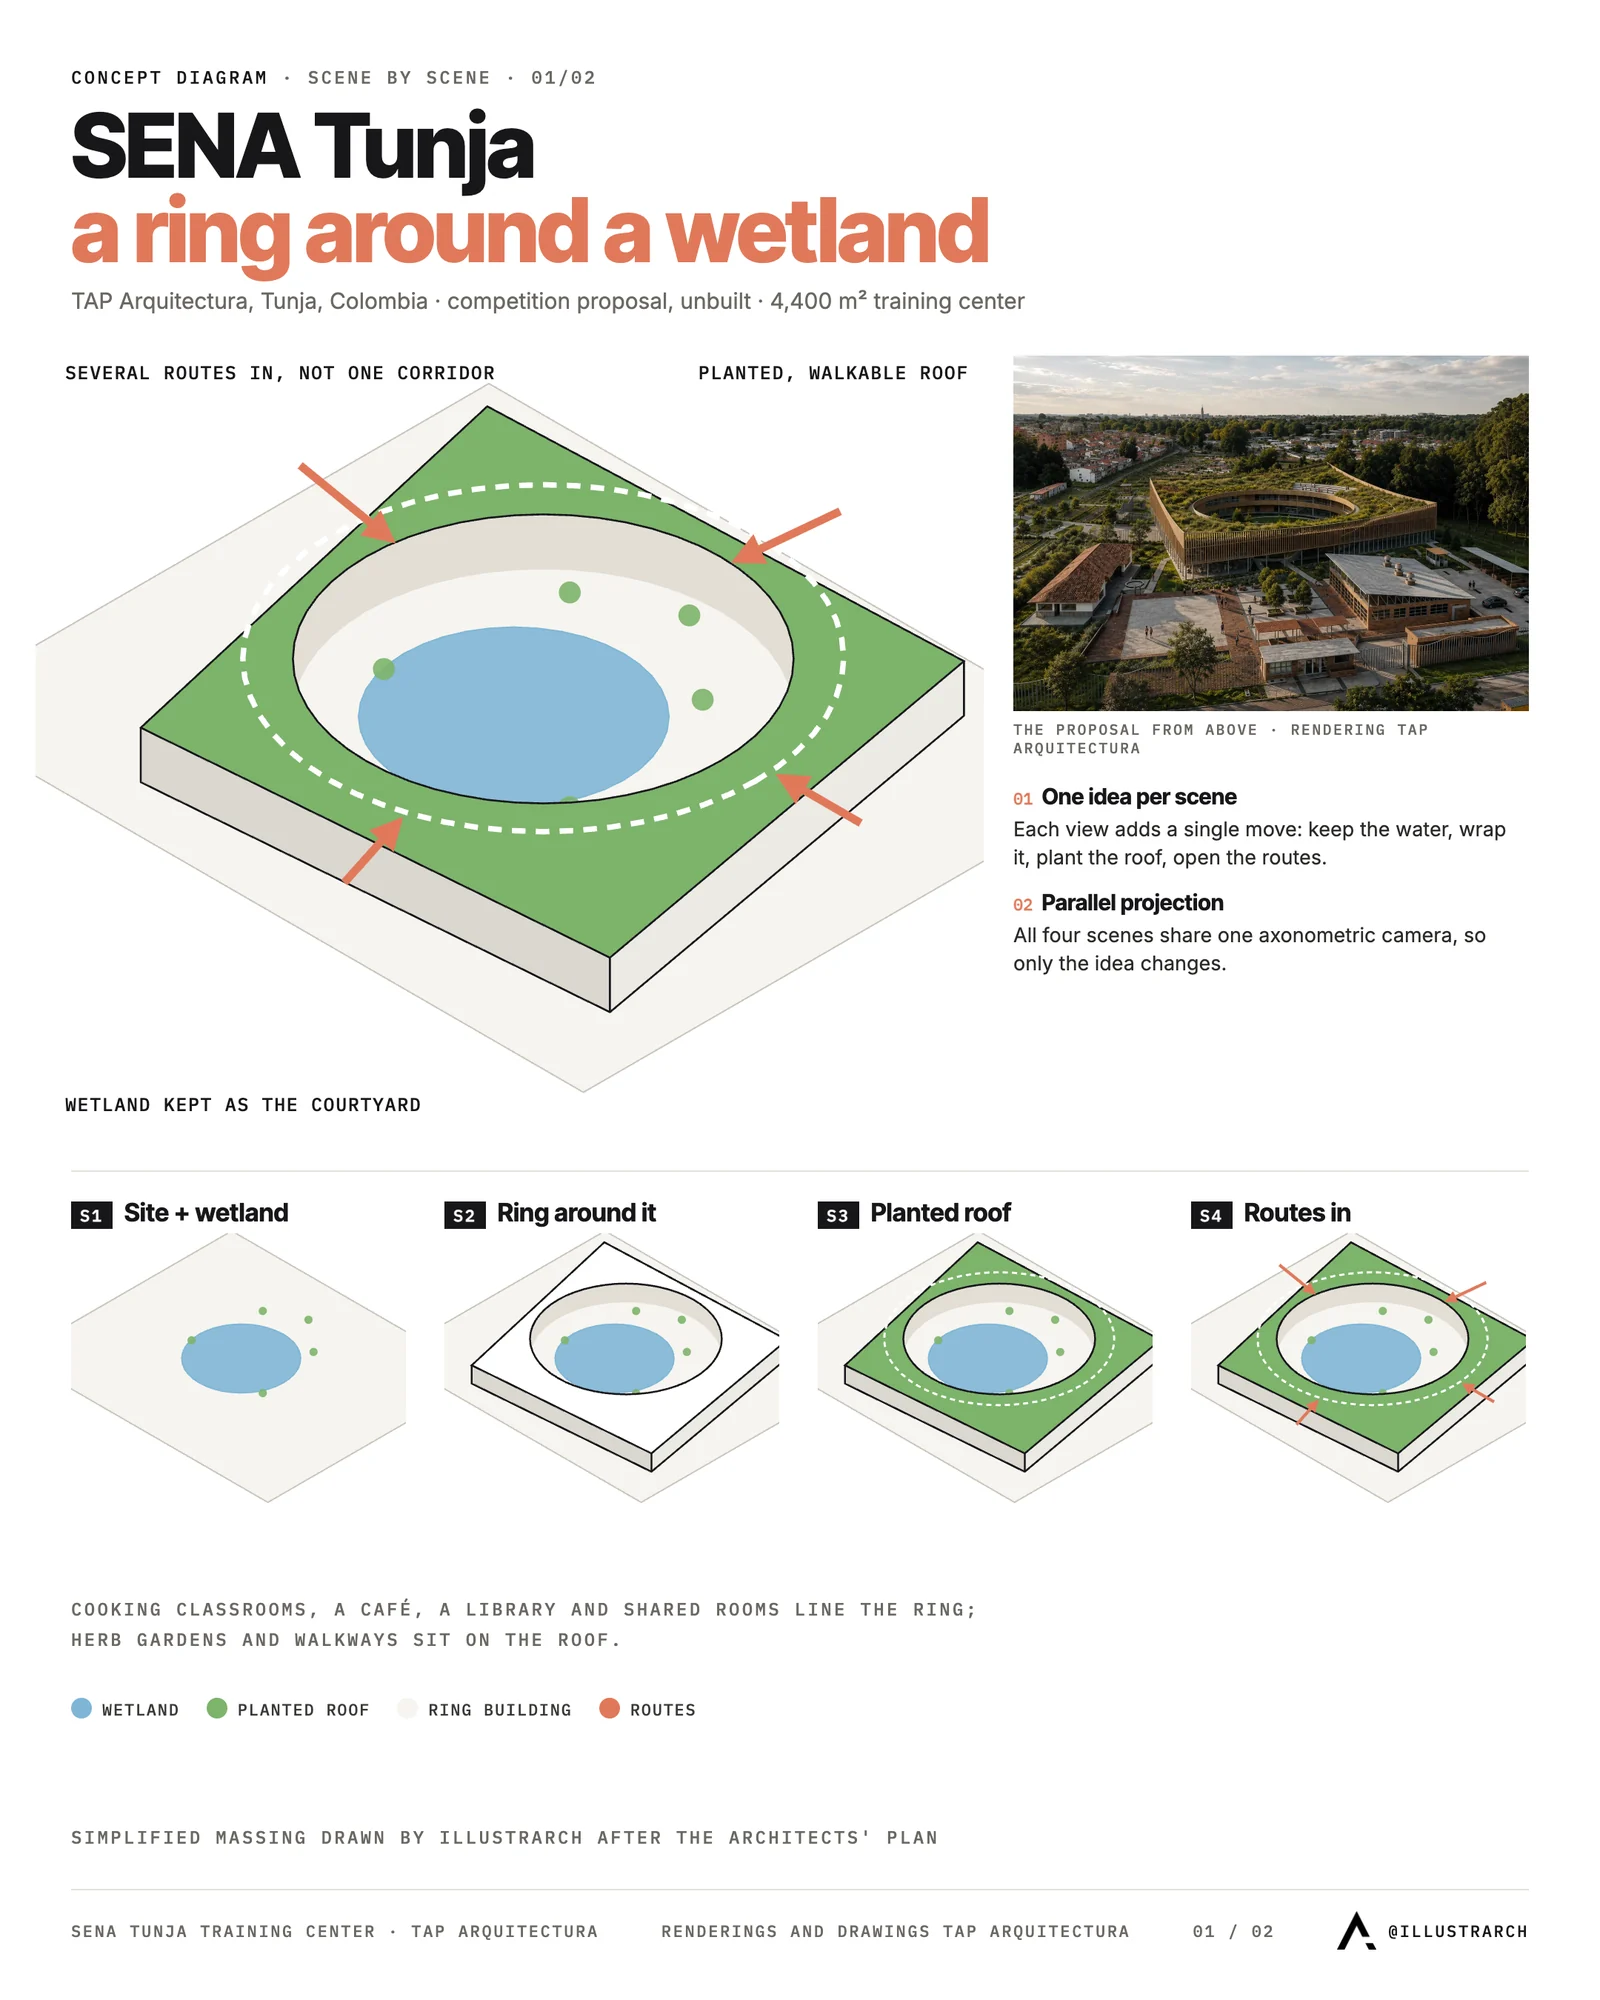
The Scenes feature is one of the most useful tools for diagram work and is often overlooked. A scene saves a camera angle along with the current visibility of your groups and tags, so you can capture each step of your concept as its own saved view. Walk through your design logic, save a scene at every stage, and you have a ready sequence that shows how the massing grows, how a void is carved out, or how circulation threads through the plan. Exporting each scene as an image gives you a consistent set of frames with identical framing, which looks far more professional than hand-positioned screenshots. Trimble documents the full process on the SketchUp Help page for scenes.
📌 Did You Know?
SketchUp was first released in 2000 by @Last Software, then acquired by Google in 2006, and has been owned by Trimble since 2012. Its long history as an accessible modeler is a big reason it became a standard tool for quick concept and massing studies in architecture schools.
Why Parallel Projection Matters
Switching from Perspective to Parallel Projection is more than a stylistic choice. In perspective, lines converge and identical masses appear at different sizes depending on their distance from the camera, which undermines the clarity a diagram needs. Parallel projection keeps all parallel edges parallel, so dimensions read consistently across the image and the viewer can compare elements fairly. For axonometric and exploded views this mode is essential, since it lets stacked layers separate cleanly along a single axis without distortion. Creating axonometric diagrams this way is a clear method to show structural elements, interior circulation, or the layers of a design.
📐 Technical Note
Parallel projection in SketchUp is the basis for true axonometric drawings, where the scale stays uniform along each axis. You can set it under the Camera menu, then pick a standard view such as Iso from the Views toolbar to lock a repeatable 30 degree style angle across every exported scene.

Styling Diagrams for a Consistent Visual Language
Once the geometry and views are ready, the Styles panel controls how the model reads as a diagram. Change the background color and the color of the elements to suit the language you want, and adjust edges and line weights so the drawing feels deliberate rather than accidental. A single, calm style applied across every scene ties the whole set together, which is what makes a sequence look like one project instead of a folder of unrelated images. The SketchUp Styles documentation covers each setting in detail. For inspiration on how finished diagrams communicate, ArchDaily has collected 50 diagrams that explain architecture and an ongoing archive of architectural diagrams worth studying before you settle on a style.

Refining the Export and Finishing in Post
When you export, use the largest resolution your machine handles comfortably, since a high pixel count gives you room to crop and to keep edges sharp once placed on a presentation board. Exporting a separate version with only line work, and another with flat color fills, makes the next stage in Photoshop or Illustrator much easier because you can recolor and layer them independently. A consistent line weight, a limited color palette, and generous white space will do more for legibility than any extra detail. The goal of a concept diagram is to communicate one clear idea, so resist the urge to crowd the frame and let each step in the sequence carry a single point.
⚠️ Common Mistake to Avoid
Many students export small screen captures and only notice the soft, pixelated edges after the sheet is laid out. Always export from the File menu at a set pixel width rather than screenshotting the viewport, and keep the camera angle identical across scenes so the frames line up as a real sequence.
Download Architectural Diagrams eBook
Frequently Asked Questions
How do you make a concept diagram in SketchUp?
Start by sorting your model into named groups and tags, then switch the camera to Parallel Projection. Save a scene for each phase of the idea, apply a clean style with consistent edges and colors, and export every scene at high resolution. From there you can finish the frames in Photoshop or Illustrator.
Should you use parallel projection or perspective for diagrams?
Use parallel projection for concept and analytical diagrams. It keeps parallel edges parallel and holds a uniform scale, so masses stay comparable and exploded layers separate along one clean axis. Perspective is better kept for atmospheric renders where depth and eye level are the point.
Can you finish SketchUp diagrams without Photoshop or Illustrator?
Yes. With careful styles, limited colors, and well managed scenes you can produce clean diagrams straight out of SketchUp. Photoshop and Illustrator simply give you more control over line weight, layering, and typography when you assemble the frames onto a presentation board.
How many scenes should a concept diagram sequence have?
Three to six scenes usually tell the story without losing the reader. Each scene should add one clear move, such as a site response, a subtraction, a shift, or a circulation path, so the viewer can follow the logic step by step rather than decoding a single crowded image.
Where to Go From Here
Your Next Step: Open a copy of your current model, name every group in the Outliner, then save one scene for each stage of your idea before you touch the Styles panel. That single habit turns a static model into a working concept sequence and makes every later export far easier to control.








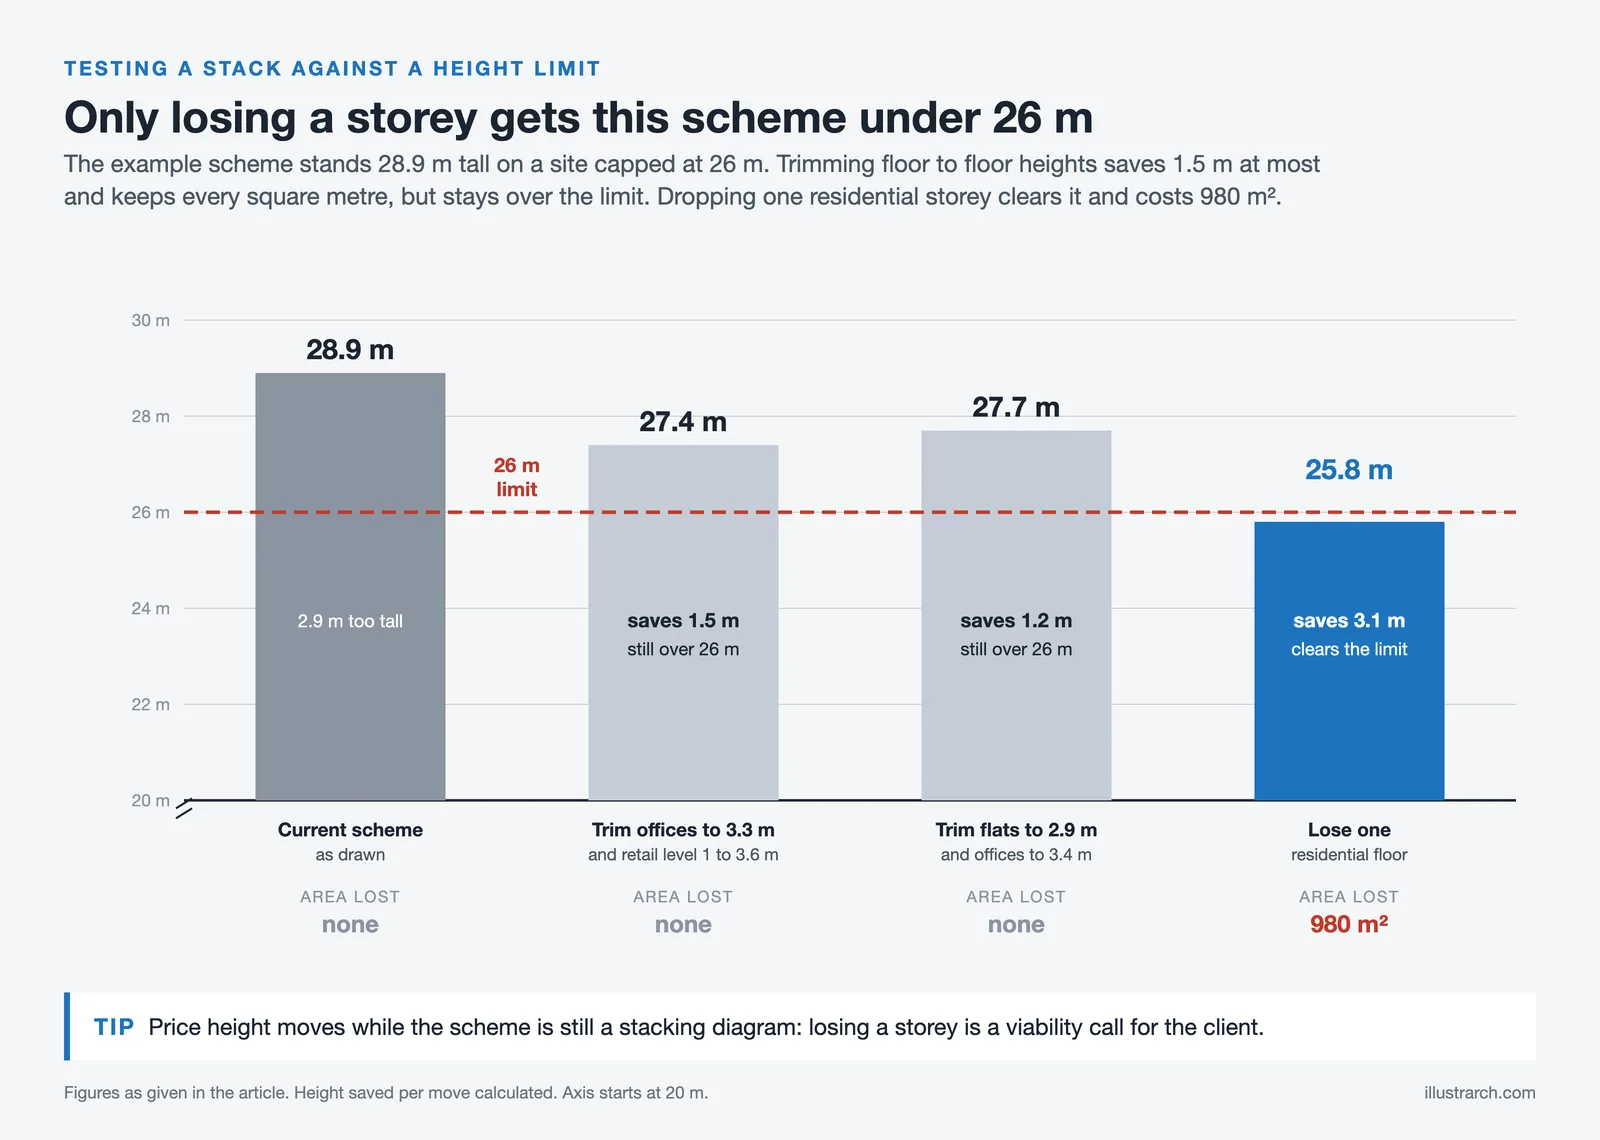
Stacking Diagram: How to Allocate Uses Floor by Floor
A stacking diagram assigns each use in a brief to a level,...
 Sinan Ozen7 Mins read

Figure-Ground Diagram: How to Draw and Read Urban Fabric
A figure-ground diagram reduces a city to built mass against open space....
Sinan Ozen7 Mins read
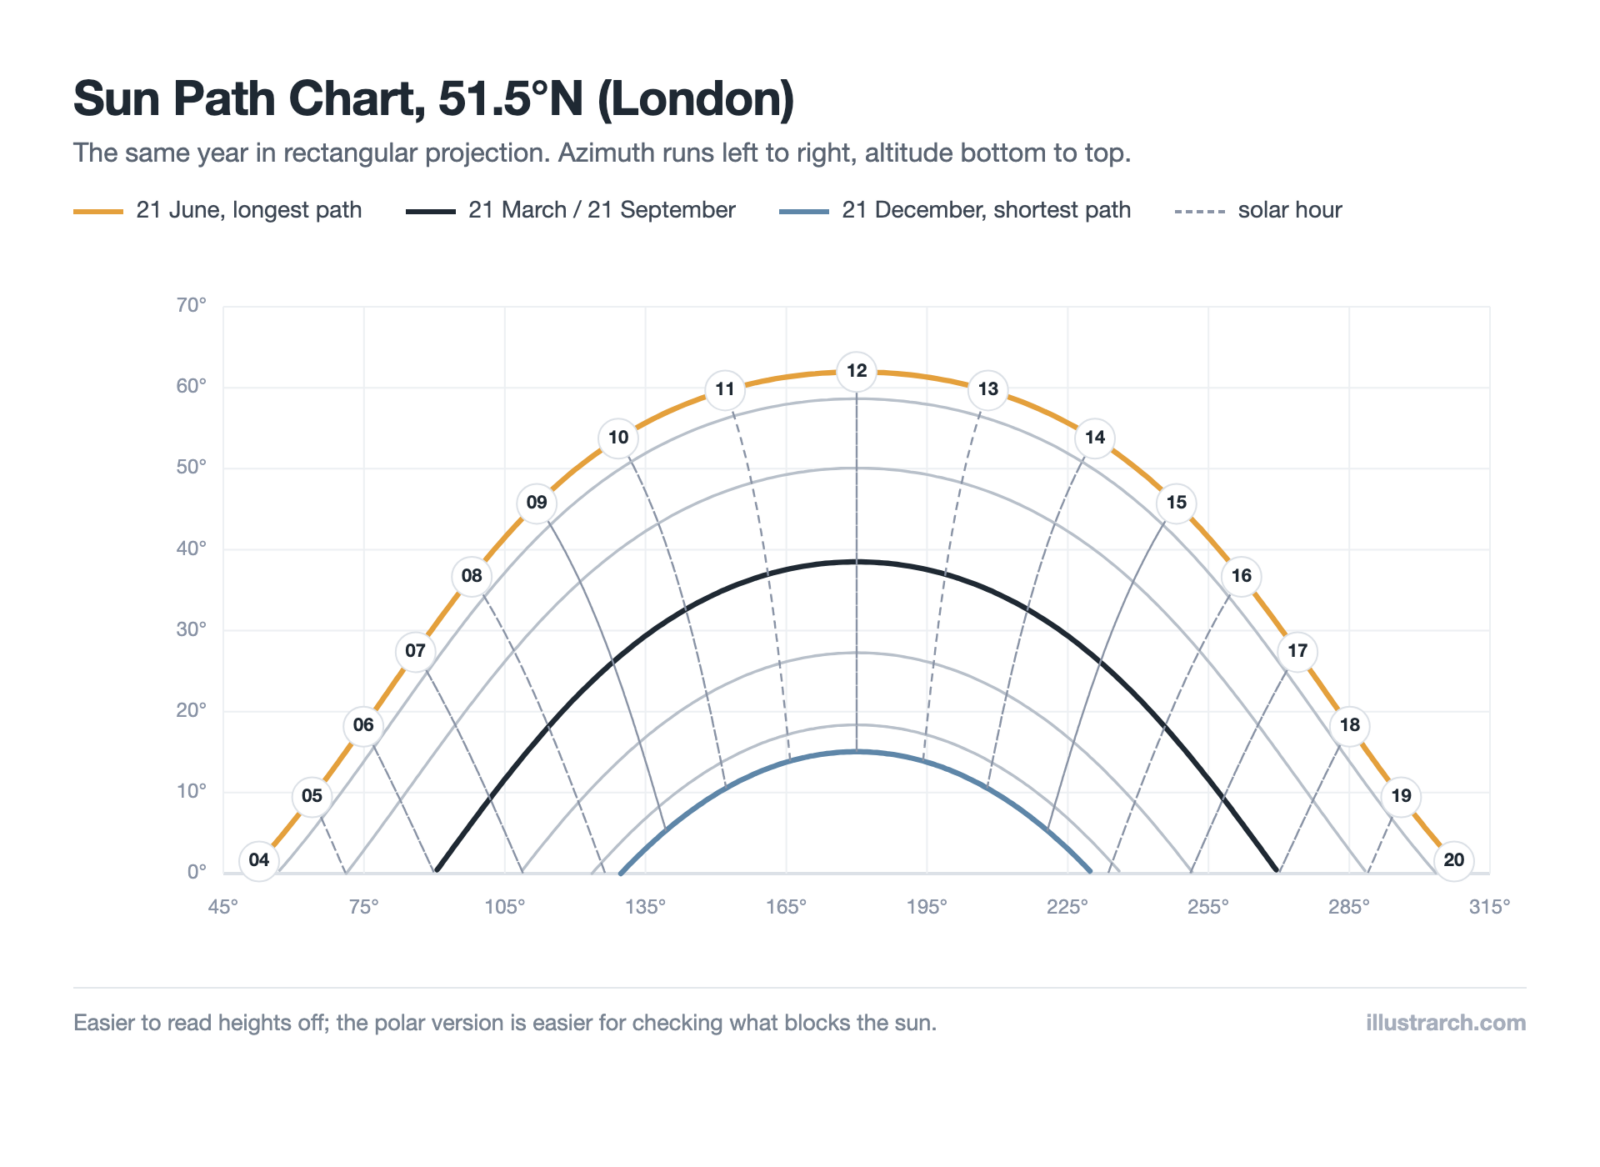
Sun Path Diagram: How to Read One and Use It in Design
A sun path diagram shows where the sun sits all year for...
Sinan Ozen8 Mins read
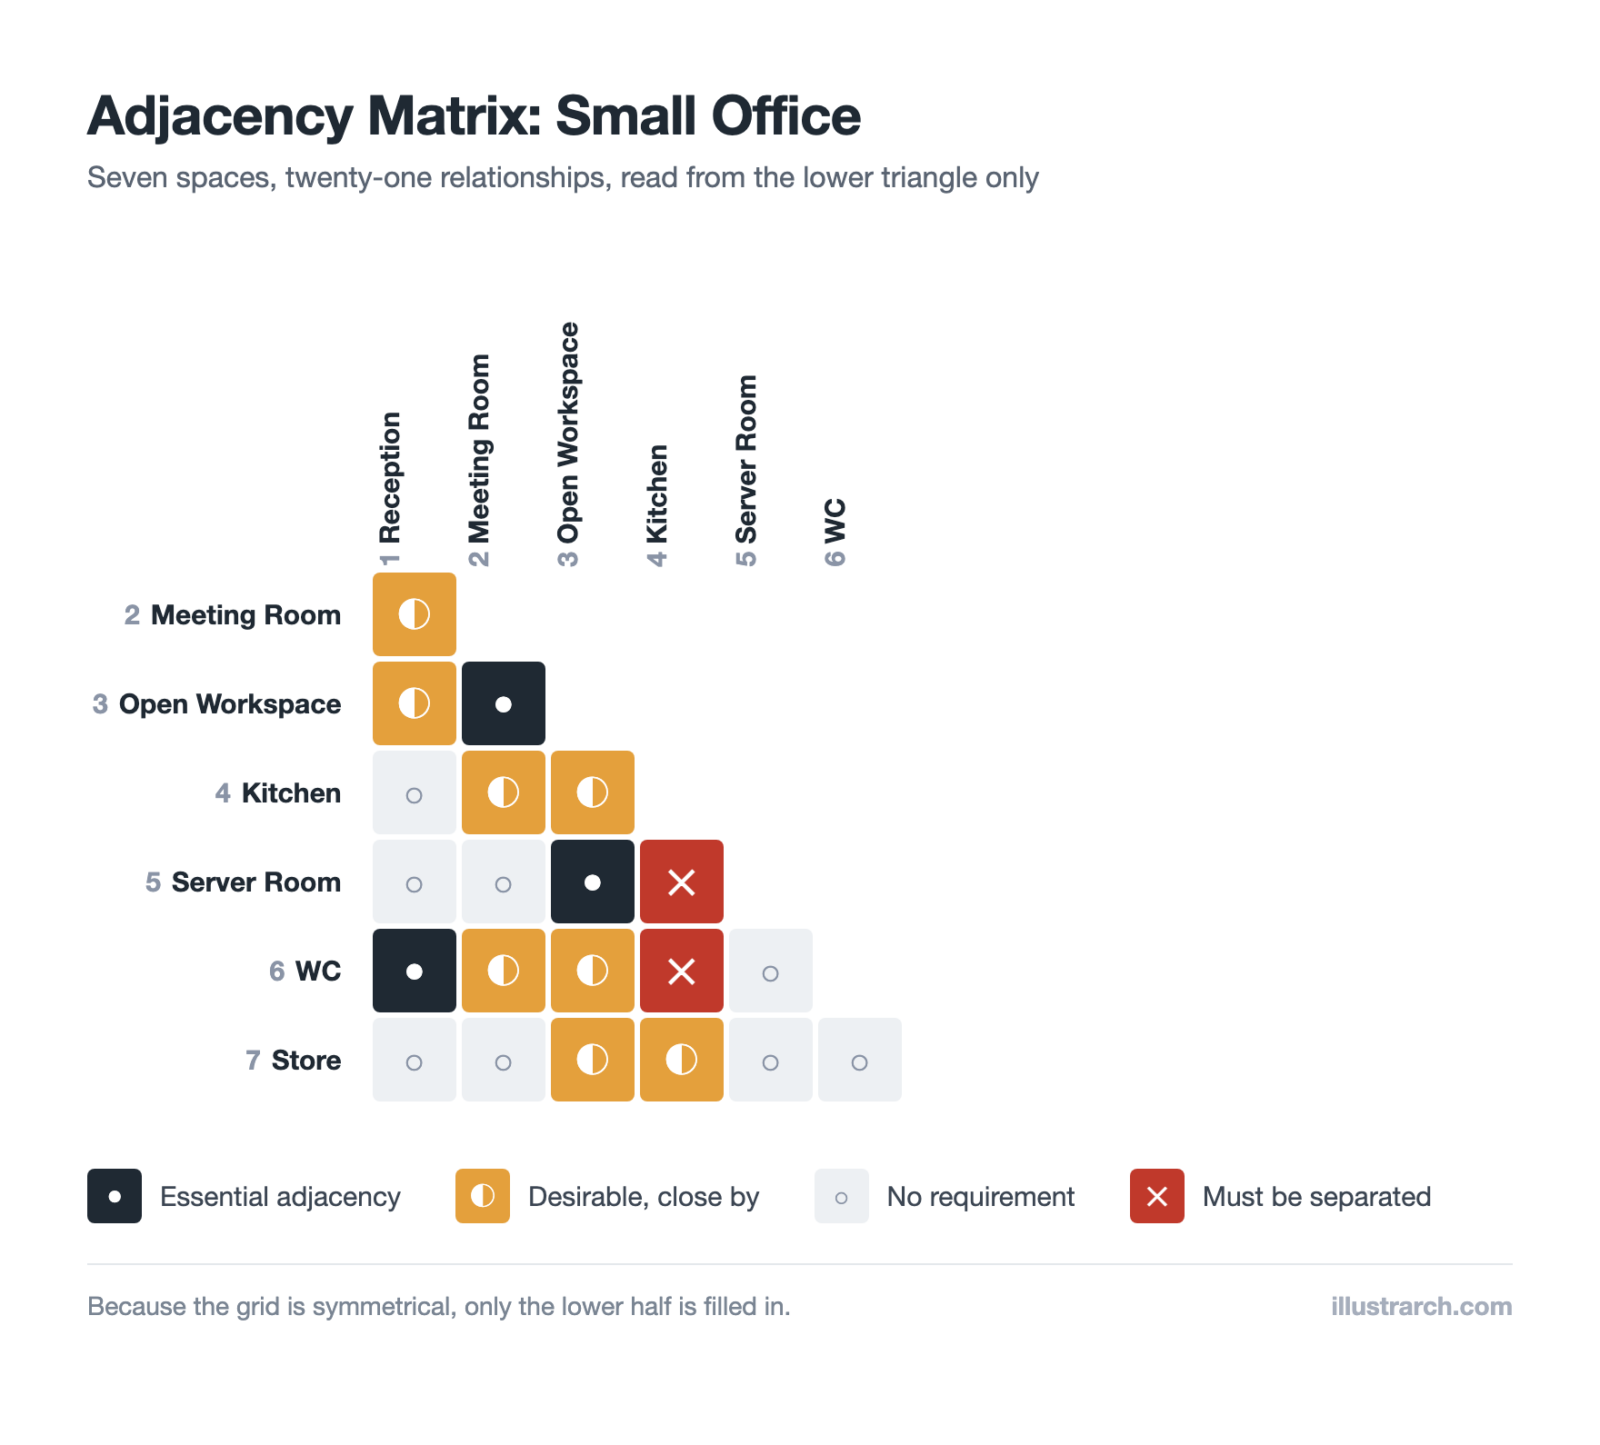
Matrix Diagram in Architecture: How to Map Space Adjacencies
A matrix diagram, or adjacency matrix, maps how every space in a...
Sinan Ozen8 Mins read


Leave a comment