

How to Use CapCut Desktop Video Editor to Add Voiceovers for Educational Videos
CapCut Desktop Video Editor lets educators record and edit voiceovers directly within the timeline, with built-in noise reduction, auto-captions, and multilingual text-to-speech. This guide walks through each step, from import to final export.

Table of Contents Show
CapCut Desktop Video Editor is a free, beginner-friendly video editing tool that lets educators record voiceovers, reduce background noise, generate auto-captions, and export polished educational videos without any prior production experience. Its timeline-based interface keeps audio and video tracks synchronized, making it one of the most practical options for teachers who create instructional content on a regular basis.
CapCut Desktop Video Editor provides educators with a single workspace to record voiceovers, apply noise reduction, generate auto-captions in multiple languages, and export classroom-ready videos. The free tier covers most needs for tutorial and lecture content, while advanced voice effects and higher-quality audio processing require a paid plan.
Why Are Voiceovers Important in Educational Videos?
Voiceovers play a key role in making educational videos effective. They add a human touch that helps students connect with the material. A well-recorded narration turns passive viewing into active listening, which directly supports how students process and retain new information.
Clarifying Complex Topics
When a subject is hard to grasp, a voice-over can break it down. For example, in a video about the water cycle, a narrator can explain each step clearly. This makes it easier for students to understand how water moves through the environment.
Guiding Viewers
A good voice-over guides students through the video. It helps them know what to focus on and when to pay attention. This guidance keeps learners engaged and helps them follow along without getting lost.
Enhancing Retention
Hearing information spoken aloud can improve memory. Students often remember facts better when they hear them rather than just reading them. A clear voice can make key points stand out.
Creating a Connection
A warm, consistent tone helps make learning feel more personal. It encourages students to relax and stay curious about the subject.
Clear narration is vital for engaging students. It helps explain tough ideas, guides viewers, and makes learning enjoyable. Voiceovers turn dry content into lively lessons that stick with learners long after they finish watching. The combination of video editing and spoken narration remains one of the most effective formats for online education.
💡 Pro Tip
Before hitting record, write a short script or talking points for each section of the video. Educators who script even loosely tend to produce cleaner first takes, which cuts down post-production time significantly. A two-minute narration typically needs only one or two retakes when you know roughly what you want to say.
Key Features of CapCut Desktop Video Editor for Adding Voiceovers
Simple Import and Edit Interface
CapCut Desktop Video Editor offers a user-friendly interface that makes importing videos easy. You can quickly drag and drop files into the editor, simplifying the editing process. This video editing software is designed for everyone, whether you are a beginner or more experienced.
While it provides many free features, some advanced tools require a paid subscription. Overall, CapCut helps you create polished videos without a steep learning curve, making it a solid choice for both casual creators and educators producing structured course content.
Professional Voiceover Integration
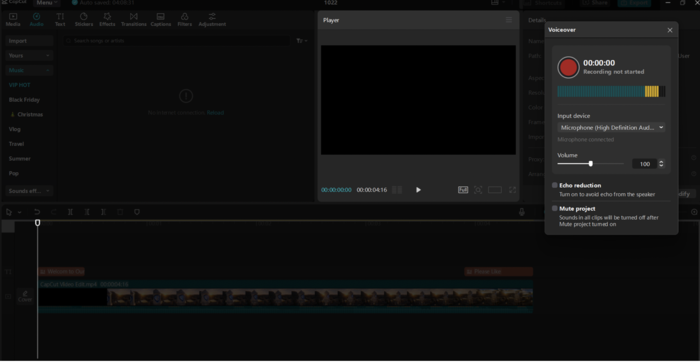
CapCut Desktop Video Editor offers a direct way to add voiceovers. To record, open CapCut, import your video, and click the microphone icon. Choose your input device and adjust settings like volume and echo reduction. Press the red button to start recording and stop when done.
You can trim and sync audio tracks by dragging them on the timeline. For advanced audio customization, such as voice effects and noise reduction, some options are available in the free tier while others require an upgraded plan. These features enhance your voiceover quality, making your videos more engaging for students.
Background Noise Removal
CapCut Desktop Video Editor includes a background noise removal feature that helps eliminate unwanted sounds, making voiceovers clearer. Users can access this feature within the audio editing options. The tool identifies and reduces ambient noise while preserving the main vocal track.
For educators recording at home or in noisy classrooms, this is one of the most useful features available. It keeps your audio sounding consistent regardless of recording environment.
Text-to-Speech and Multilingual Support
CapCut Desktop Video Editor includes AI text-to-speech that converts written scripts into natural-sounding narration across multiple languages and voice styles. This is particularly useful for educators who need to reach multilingual learners or who prefer not to record their own voice.
The auto-captions feature automatically generates subtitles, improving accessibility for students with hearing difficulties or those who learn better when reading along. According to the W3C Web Accessibility Initiative, captions and transcripts are among the most effective tools for making video content accessible to all learners.
⚠️ Common Mistake to Avoid
Many educators record voiceovers in rooms with hard surfaces (tile, glass, bare walls) and wonder why the audio sounds echoey even after noise reduction. Background noise removal targets ambient sounds like fans or traffic but cannot fix room echo. Record in a small room with soft furnishings, carpet, or hang a blanket behind you. Treating the recording environment before you hit record will always outperform fixing it in post-production.
What Microphone Setup Works Best for Educational Voiceovers?
The microphone you use has a bigger effect on audio quality than any post-production filter. You do not need expensive studio gear, but choosing the right type of mic and placing it correctly will save hours of editing.
USB condenser microphones (such as the Blue Yeti or Audio-Technica AT2020 USB+) connect directly to your computer and produce clear, broadcast-quality audio. They pick up detail well in quiet rooms. If your recording space is noisy, a dynamic USB microphone (like the Samson Q2U) rejects more background sound and forgives imperfect room acoustics.
Place the microphone 15 to 20 centimeters from your mouth, slightly off-axis to reduce plosive sounds (“p” and “b” pops). A simple pop filter or even a folded tissue taped over the mic grille can reduce plosives further. For educators using a laptop’s built-in microphone as a starting point, sitting in a small, carpeted room with the laptop on a stable surface (not your lap) will produce noticeably better results than recording in a large, tiled space.
Free recording alternatives like OBS Studio can also capture high-quality audio separately if you prefer to record outside of CapCut and import the file afterward.
📌 Did You Know?
According to a 2023 report by Kaltura, over 80% of higher education institutions now use video as a regular part of their teaching. The same report found that students rated instructor-narrated videos as the most engaging format compared to text-based slides or screen recordings without voice. Even a basic voiceover recorded with a USB microphone can raise student satisfaction scores for course content.
How to Add Voiceovers with CapCut Desktop Video Editor: Step-by-Step
Step 1 — Import Your Video
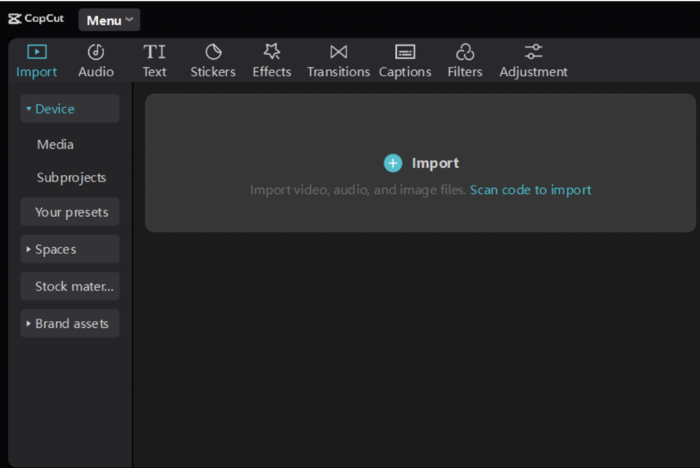
To start with CapCut, first download and install the software from its official website on your computer. Open the app and select “Create project.” This will create a workspace for your video. Next, click on “Import” to add your video clips.
You can choose multiple files at once. Once imported, drag the clips to the timeline for editing. Adjust their order and trim them as needed. This simple process makes CapCut an efficient video editing software for beginners and experienced users alike.
Step 2 — Record or Upload Your Voiceover
To record or upload voiceovers in CapCut, open your project and choose the microphone icon to record directly. Speak clearly and save the recording when finished. Select the “Import” option to upload existing audio and choose your file.
CapCut also offers auto-captions, making your videos more accessible. To use this feature, tap the “Text” button, select auto-captions, and confirm. The app generates captions based on your audio. You can edit these captions for accuracy and style, improving viewer engagement while ensuring accessibility.
Step 3 — Edit and Adjust the Voiceover
To adjust voiceover in the CapCut Desktop Video Editor, press on the audio track to access the sound settings. Use the slider to raise or lower the volume as needed. To remove background noise, select the audio track, then click on “Audio” and choose the noise reduction option.
For effects, explore the “Effects” tab and apply desired filters to enhance your voiceover. Always preview your changes to ensure they improve the video without sacrificing clarity or quality. Some advanced features may require a paid plan.

Step 4 — Export and Share Your Video
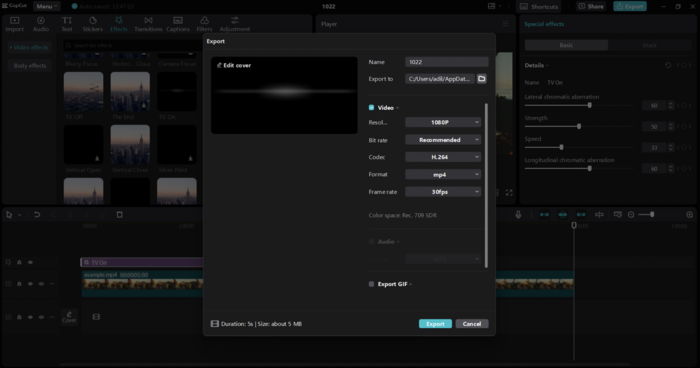
To share your video from CapCut, press the Export button at the top right. Set your video title, resolution, and frame rate. You can choose a high resolution for better quality. For a polished look, use the video background remover to keep student focus on the content.
Once satisfied, click Export again to save your video. You can then upload it to a learning management system, share it on a class page, or distribute it via social media.
💡 Pro Tip
Export your educational videos at 1080p rather than the default 720p. Most learning management systems and YouTube compress video on upload, so starting with higher resolution preserves more detail in diagrams, text overlays, and architectural drawings that students need to read clearly. CapCut Desktop lets you set this in the Export dialog before saving.
How Does CapCut Desktop Video Editor Compare to Other Tools?
Educators often ask how CapCut stacks up against other free or low-cost audio and video tools. The table below compares the most common options:
| Feature | CapCut Desktop | Audacity | Adobe Premiere Rush |
|---|---|---|---|
| In-app voiceover recording | Yes | Audio only, no video | Yes |
| Background noise removal | Yes (some features paid) | Yes (free) | Limited |
| Auto-captions | Yes | No | Yes (paid) |
| Text-to-speech | Yes | No | No |
| Multilingual support | Yes | No | Limited |
| Free tier | Yes (feature limits apply) | Fully free, open-source | Limited free, subscription required |
| Learning curve | Low | Medium | Medium to high |
For educators who need a single tool that handles video editing, voiceover recording, captioning, and export in one workflow, CapCut Desktop Video Editor is the most practical starting point. Users who only need audio work (for podcasts or standalone narrations) may find Audacity sufficient, since it is fully open-source and free.
⚖️ Pros & Cons at a Glance
Pros: All-in-one workflow, no separate audio editor needed; auto-captions save significant time; AI text-to-speech removes recording barriers; low learning curve for non-technical educators
Cons: Some advanced features (voice effects, high-quality noise reduction) require a paid plan; less granular audio control than dedicated tools like Audacity; cloud sync features depend on account login
Benefits of Using CapCut Desktop Video Editor for Educational Videos
CapCut Desktop Video Editor offers several concrete benefits for educators producing video content regularly:
- Time-saving features: Tools like auto-alignment and quick export keep the production cycle short, which matters for teachers creating content alongside a full teaching schedule.
- Video background remover: The video background remover eliminates visual distractions behind the presenter, keeping student focus on the speaker and the content.
- AI-powered features: The AI-powered desktop suite includes Script to Video, Remove Filler Words, and Auto Reframe, all of which reduce the manual effort involved in producing clean educational content.
- Customizable options: Users can personalize font styles, caption placement, and audio levels to match different subject areas and audience age groups, though some advanced options require a paid subscription.
These features make video creation faster and more consistent, allowing educators to focus on instructional quality rather than technical production details. Architects and design educators who regularly produce tutorial content can pair video tools with essential digital tools for architects to build a complete content creation workflow.
For educators already working on online courses or architecture-related instructional content, pairing CapCut with dedicated online learning platforms can extend the reach of each video significantly. Similarly, those using AI tools for visual content creation alongside video may find value in exploring AI tools for visual storytelling to complement their video workflow.
Which File Formats and Settings Should Educators Use?
Choosing the right export settings prevents quality loss and keeps file sizes manageable for learning management systems (LMS) like Moodle, Canvas, or Google Classroom.
Resolution: Export at 1080p (1920 x 1080) for most platforms. This gives enough detail for students to read on-screen text, diagrams, and annotations after the platform compresses the upload. If your source footage is 4K, CapCut can export at that resolution too, but 1080p is sufficient for the majority of educational contexts.
Frame rate: 30 fps works well for talking-head and screen-capture lectures. Use 24 fps if you want a slightly softer, cinematic look. Avoid 60 fps for standard lecture content because it doubles the file size without meaningful quality improvement for static or slow-moving visuals.
Format: MP4 with H.264 encoding is the most widely supported format across LMS platforms, YouTube, and social media. CapCut exports to MP4 by default, so you generally do not need to change this setting.
Audio: Set audio bitrate to at least 128 kbps. For voiceover-heavy content, 192 kbps provides noticeably cleaner audio, especially when students listen through earbuds or laptop speakers. Educators who produce presentation-style content can also explore software tools for architectural presentations to pair video narration with visual design workflows.
✅ Key Takeaways
- CapCut Desktop Video Editor handles voiceover recording, noise reduction, auto-captioning, and export inside a single workflow.
- The microphone icon in the timeline lets you record directly against your footage without switching to a separate audio tool.
- Auto-captions and multilingual text-to-speech improve accessibility for diverse learner groups.
- Recording in a soft-furnished room matters more than any post-production noise reduction setting.
- A USB condenser or dynamic microphone placed 15 to 20 cm from your mouth produces the clearest results for educational narration.
- Export at 1080p with H.264 encoding and at least 128 kbps audio for the best balance of quality and file size.
- For audio-only work, Audacity remains a fully free open-source alternative worth knowing.
Frequently Asked Questions
Is CapCut Desktop Video Editor free for educators?
CapCut offers a free tier that includes voiceover recording, basic noise reduction, auto-captions, and standard export options. Advanced features such as premium voice effects, higher-quality noise reduction algorithms, and certain AI tools require a paid subscription. For most classroom or tutorial video needs, the free plan is sufficient.
Can I use CapCut to add voiceovers to existing recorded lectures?
Yes. You can import any existing video file into CapCut Desktop, place it on the timeline, and record a voiceover directly against the footage using the microphone icon. You can also import pre-recorded audio files if you prefer to record separately and sync afterward.
How do I reduce echo and background noise in CapCut Desktop?
Select the audio track on the timeline, click the “Audio” settings panel, and choose the noise reduction option. For echo specifically, the most effective approach is treating the recording environment before capture: record in a smaller room with soft furnishings, carpets, or fabric behind the speaker.
Does CapCut support subtitle generation in multiple languages?
Yes. The auto-captions feature generates subtitles automatically from spoken audio. The text-to-speech tool supports multiple languages and voice styles, making it useful for educators creating multilingual instructional content or reaching international student audiences.
What video resolution should I use when exporting educational videos?
Export at 1080p (1920 x 1080) for most educational platforms. This provides enough resolution to keep diagrams, annotations, and text overlays readable after platform compression. If your footage was recorded at 4K, CapCut Desktop can export at that resolution as well, though 1080p is sufficient for most LMS and YouTube delivery scenarios.
Can I use CapCut Desktop Video Editor on both Windows and Mac?
Yes. CapCut Desktop Video Editor is available for both Windows and macOS. The interface and features are consistent across both operating systems, so educators can switch between devices without relearning the tool.
Final Thoughts
CapCut Desktop Video Editor gives educators a practical, low-friction path to creating narrated instructional videos. The combination of in-app voiceover recording, automated captioning, and noise reduction means fewer tools to learn and less time spent in post-production. For anyone producing educational video content regularly, whether for online courses, classroom flipped learning, or tutorial series, building a consistent workflow around a single tool like CapCut makes the process sustainable over time.
If you also work with promotional video content, exploring how Promotional Video Editing differs from educational narration styles can sharpen your approach across both formats.


Sydney’s Buildings Are Ageing Faster Than Most Owners Realise
There is a wave of building deterioration moving through Sydney's property stock...

Famous Buildings in Asia: 6 Imperial Palaces That Shaped a Continent
A focused look at six iconic buildings in Asia, each an imperial...

10 Signs It’s Time to Upgrade Your Property Fence
Table of Contents Show Repairs Keep Piling UpPosts Are LeaningBoards Are Cracked...

Walt Disney Concert Hall: Frank Gehry’s Stainless Steel Symphony in Los Angeles
Frank Gehry's Walt Disney Concert Hall took 16 years from initial design...

Leave a comment