

Enscape Architectural Render: Faster Workflow Using Built-In Assets and PBR Materials
A practical breakdown of how to cut Enscape render time using its built-in PBR materials and asset library. Covers smart material editor use, asset placement, quality settings, BIM workflow tips, and common mistakes that slow architects down during real-time visualization.

Table of Contents Show
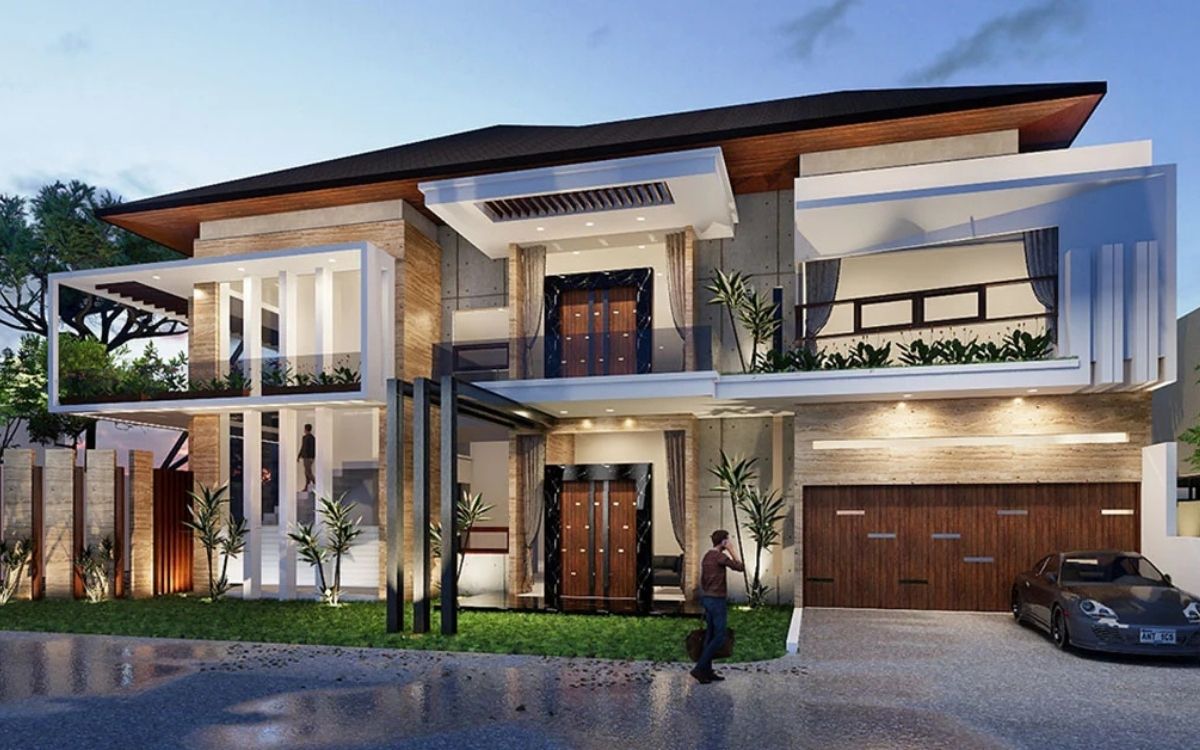
An Enscape architectural render is a real-time 3D visualization produced directly inside your CAD or BIM software using Enscape’s built-in PBR materials and asset library. By relying on native assets instead of external textures, architects can cut scene setup time by 40 to 60 percent and produce client-ready images in minutes rather than hours.
Most architects treat Enscape as a quick preview tool and then switch to heavier engines for final images. That habit is the main reason render pipelines stay slow. Enscape ships with over 4,000 render-ready assets and a growing Physically Based Rendering material library, and when you use them well, you can skip the export step entirely for design-phase deliverables. This guide covers the exact workflow, settings, and common traps that separate a 2-hour render session from a 20-minute one.
What Is an Enscape Architectural Render?
Enscape is a real-time rendering plugin developed by Chaos that runs inside Revit, SketchUp, Rhino, ArchiCAD, and Vectorworks. An Enscape architectural render is produced without exporting your model: you click Start, and a live 3D window opens beside your CAD viewport. Every geometry, material, or lighting change in the modeling software appears in the Enscape window immediately, which is why the tool is used by 85 of the top 100 architecture firms globally.
The software operates as a plugin rather than a standalone application. This matters because the single biggest time cost in traditional rendering is the file handoff: exporting the model, re-linking materials, rebuilding lights, and waiting for the engine to prepare the scene. Enscape removes all of that. For a more detailed look at how this plugin-based approach compares to other real-time options, see our Enscape review covering performance, workflow, and pricing.
💡 Pro Tip
Run Enscape in Medium quality during design iteration and reserve Ultra for the final export. Switching to Ultra only when capturing keeps your viewport responsive through dozens of daily model changes, which is where most of the hidden time waste in a render project actually sits.
Why Built-In PBR Materials Are Faster Than External Libraries
Enscape’s native Material Library contains pre-made Physically Based Rendering materials that can be imported into the Enscape Material Editor with one click. These are not placeholder textures. Each material includes properly calibrated albedo, roughness, normal, and displacement maps, so the shading response under Enscape’s lighting is predictable from the start.
The speed advantage is simple. When you pull a material from an external texture site, you download four or five maps, open the Material Editor, assign each map to the correct slot, set the tiling, and adjust reflectivity by eye. With Enscape’s native library, all of that is already done. The AI Material Generator inside the Material Editor can also create a custom PBR material from any uploaded image in seconds, which closes the gap for cases where the native library does not cover your exact surface.
📌 Did You Know?
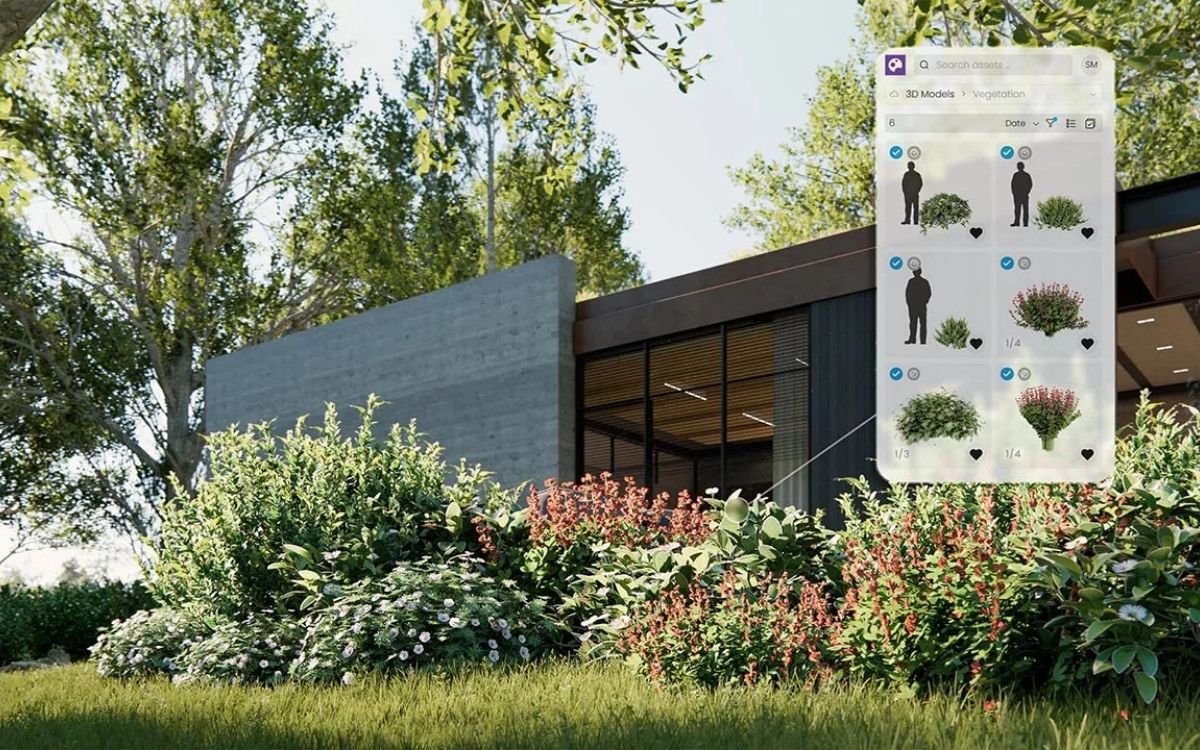
The Enscape Asset Library holds over 4,000 ready-to-use 3D assets, and since version 3.5, more than 1,000 of these assets are fully customizable, meaning you can adjust materials, colors, and variants without leaving the Enscape window. The library is delivered through Chaos Cosmos, giving Enscape and V-Ray users a shared asset pool.
How PBR Materials Improve Render Realism
PBR stands for Physically Based Rendering, a shading model that simulates how light actually behaves on real surfaces. Instead of faking reflections with a single shiny parameter, PBR uses separate maps for roughness, metalness, and normal detail. The result is that a brushed aluminum panel reflects differently at grazing angles than it does head-on, which is how real aluminum behaves.
Enscape’s real-time ray tracing combined with its native PBR library produces particularly clean interior renders. Daylight reflects off glass and polished floors with the correct falloff, and indirect lighting from a window behaves plausibly on a neutral wall. This is why Enscape realistic render output holds up well for interior client presentations even at Medium quality.
Using the Enscape Asset Library for Faster Architecture Render Setup

The Asset Library is accessible either from the CAD toolbar or from the Enscape viewport itself. Assets use simplified white placeholders in the CAD window to keep file sizes low, but they appear fully textured in Enscape the moment you start the viewport. You can browse, place, and edit assets directly from the Enscape window and the placements sync back to your CAD model automatically.
For speed, the workflow that works best is to block out your scene with low-detail placeholders in CAD first, then populate the Enscape viewport with library assets using the Multi-Asset Placement tool. Trees, furniture, vehicles, and people can all be dropped in seconds, and animated vegetation is already configured to respond to the Wind Settings in the Atmosphere tab.
📐 Technical Note
Enscape’s Asset Library runs online by default, but you can enable Offline Mode by checking “Offline Enscape Assets” in the Asset Library window. You will need to define a dedicated folder for the downloaded files, as any existing content in that folder will be deleted. Offline mode is important for render stations without stable internet and for meeting client confidentiality requirements.
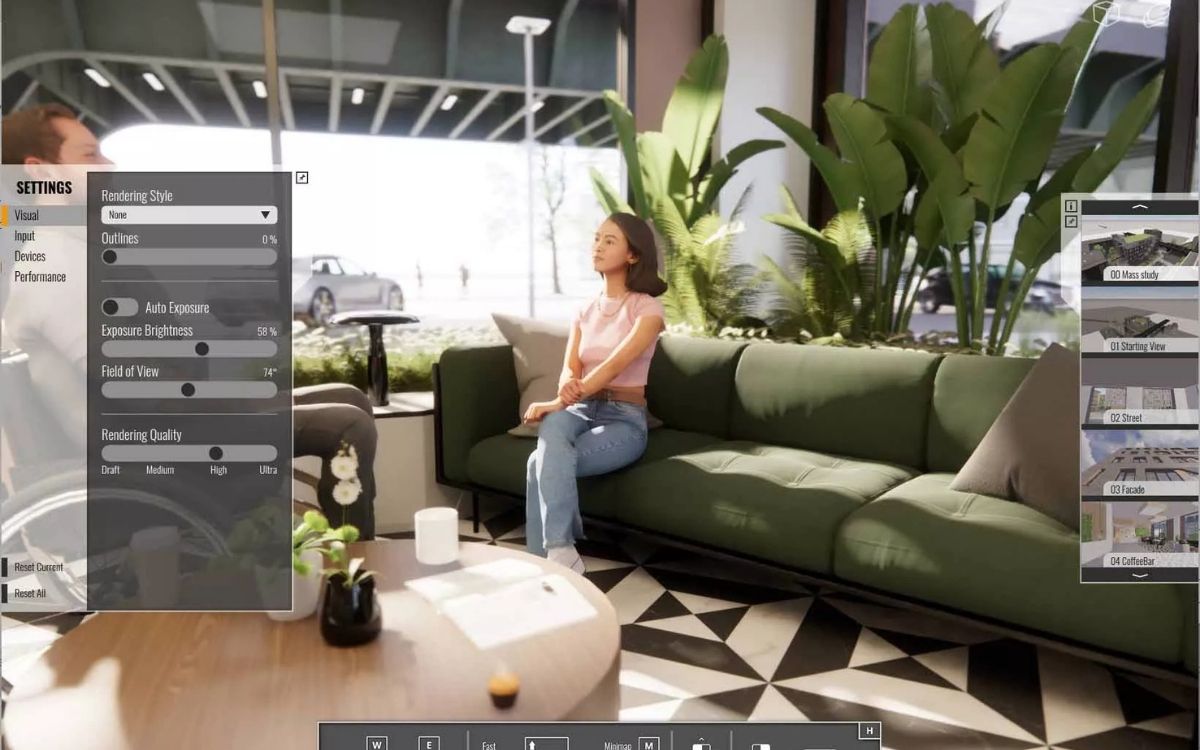
What Are the Best Enscape Render Settings for Architecture?
The best Enscape render settings depend on whether you are iterating or exporting. For daily design work, keep the Rendering Quality at Medium, Sharpness between 50 and 65, and enable DLSS if you are on an NVIDIA RTX card. This delivers a smooth viewport on most workstations and renders a 1080p still in under 30 seconds.
For final exports, switch to Ultra, set Output Resolution to 3840×2160, increase Auto Exposure sensitivity slightly for interior scenes, and enable Ray Traced Sun Shadows. For exterior scenes, enable Ambient Occlusion and raise Atmosphere Fog Intensity to around 20 percent for depth. Leave Color Grading neutral in Enscape and do final color correction in Photoshop or Lightroom, which gives you non-destructive control over the look.
How to Make Realistic Render in Enscape: Lighting Setup
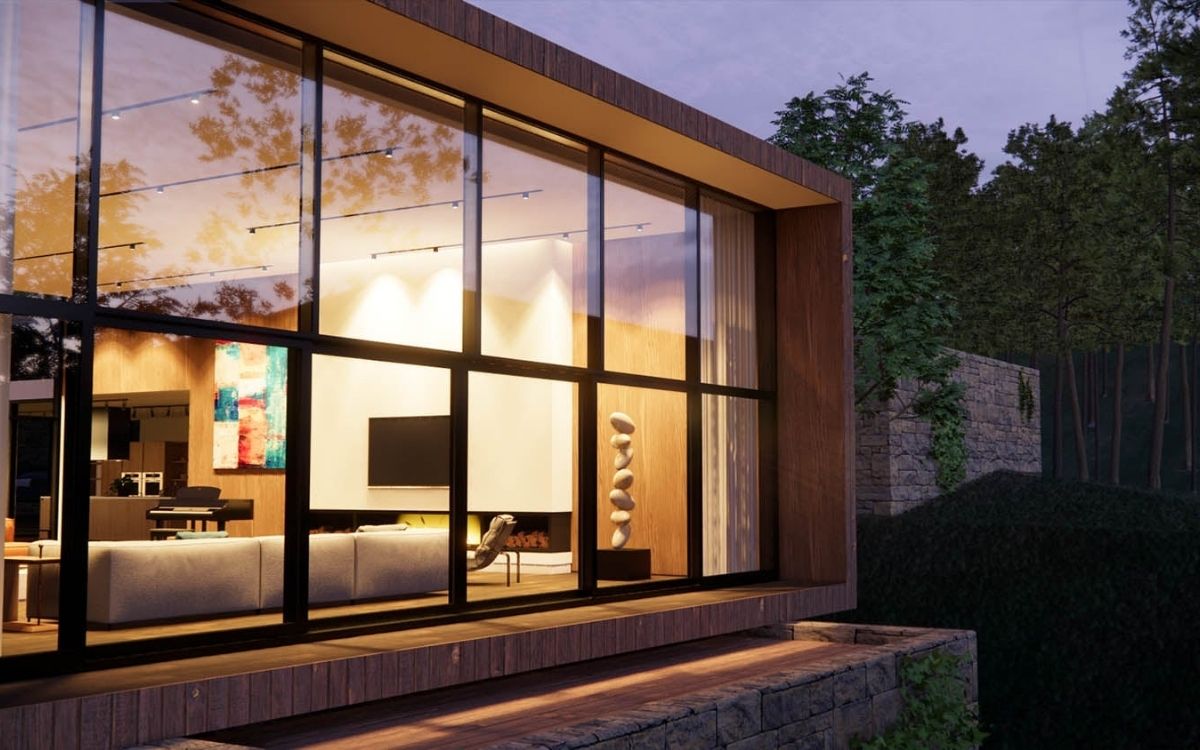
Lighting is where most Enscape 3D render projects lose realism. The default sun position rarely matches the architectural intent, and interior lights tend to look either too hot or too flat. The fix is a three-step setup that takes roughly five minutes.
First, set the geographic location of your project in the CAD software so the sun angle is accurate. In Revit this is under Manage > Location. In SketchUp it is under Window > Model Info > Geolocation. Enscape reads this automatically. Second, adjust the time of day in the Atmosphere panel to a low sun angle, typically between 8-10 AM or 4-6 PM, which produces longer shadows and more dimensional facades. Third, for interiors, place a few artificial lights with warm color temperatures around 2700K-3000K to balance the cooler daylight coming through windows.
💡 Pro Tip
For interior shots where a window dominates the frame, set the sun angle to around 30 degrees above the horizon rather than directly overhead. A high sun creates harsh top-down shadows that make rooms look flat. A 30-degree angle pushes light deeper into the space and picks up surface texture on floors and walls, which is usually what clients expect from a quality interior render.
Enscape Revit Render vs Enscape SketchUp Render: Workflow Differences
Enscape Revit render workflows benefit from the deep BIM integration. Revit families carry material assignments that Enscape reads directly, and the plugin respects Work Planes during asset placement. If you select “Place asset on active work plane” from the Asset Library menu, library furniture snaps to floors at the correct elevation across multi-story projects, which saves significant positioning time.
Enscape SketchUp render workflows are faster to set up but less structured. SketchUp’s simpler material system means you assign Enscape materials through the Enscape Material Editor rather than SketchUp’s own material panel. Batch rendering up to 8192×8192 pixels is built in, and proxies for high-poly vegetation are handled automatically, converting placeholder geometry into detailed assets at render time. For a broader view of which plugins suit different SketchUp workflows, see our guide to top SketchUp render plugins.
Feature Comparison: Enscape Across CAD Platforms
The following table summarizes what to expect from Enscape when used with each supported host application:
| CAD Host | Live Sync | Material System | Best Suited For |
|---|---|---|---|
| Revit | Full BIM sync | Native Revit + Enscape | Large multi-story projects |
| SketchUp | Live geometry sync | Enscape Material Editor | Concept and interior design |
| Rhino | Full sync + work plane | Enscape Material Editor | Complex geometry, facades |
| ArchiCAD | BIM sync | Native ArchiCAD + Enscape | Documentation-heavy projects |
| Vectorworks | Live sync | Native + Enscape | Landscape and urban design |
D5 Render vs Enscape: When to Use Which
D5 Render and Enscape are both real-time ray tracing engines, but they target different parts of the workflow. D5 is a standalone application that you import models into, while Enscape runs as a plugin inside your CAD software. This single architectural difference determines which tool fits which project phase.
Enscape is usually the better choice during active design, when the model changes daily and you need rendered feedback immediately. D5 Render is stronger for final presentation images because it offers deeper atmospheric controls, a larger scattered vegetation system, and output up to 16K resolution. Many firms run both tools together, using Enscape for client reviews during design development and D5 Render for marketing-grade final images. For deeper context on when to choose each type of tool, our comparison of AI and traditional rendering workflows covers the economics in detail.
⚖️ Pros & Cons at a Glance
✔️ Enscape Pros: Live BIM sync, no file export, fast iteration, strong interior lighting, 4,000+ native assets
✖️ Enscape Cons: Limited post-processing, weaker atmospheric effects than Lumion, Windows-focused for Revit users, subscription licensing only
For a three-way breakdown including Lumion, our Lumion vs Enscape vs Twinmotion comparison for 2026 covers rendering quality, BIM integration, and pricing across all three real-time engines.
How to Render Enscape Output for Client Presentations
The final Enscape render step is where many architects overprocess. Enscape includes a built-in Image Editor with exposure, contrast, and tone mapping, and it is tempting to apply all of it. In practice, a flat, well-exposed image from Enscape responds much better to external editing in Photoshop or Lightroom than one that has been heavily graded inside Enscape.
For marketing output, render stills at 3840×2160 in Ultra quality with DLSS disabled. For walkthroughs, use the built-in video editor with a 60 fps target, which produces smooth playback even on modest client hardware. Panoramic 360-degree views can be exported and shared via Enscape’s web link system, which lets clients without VR hardware navigate the scene in a browser. VR deployment itself works with one click through Meta Quest, HTC Vive, and Windows Mixed Reality headsets.
⚠️ Common Mistake to Avoid
Many architects crank Enscape’s Saturation and Contrast sliders to make renders “pop” during client meetings. This almost always backfires. Oversaturated greens and pushed contrast make the image read as a video game rather than architecture. Leave Enscape’s color settings near neutral and do any stylistic grading in post-processing where you can revert changes.
Combining Enscape With Other Tools in Your Architecture Render Pipeline
Enscape sits inside a larger architectural visualization ecosystem. Since Enscape’s 2022 merger with Chaos, the maker of V-Ray, integration between real-time and offline rendering has deepened considerably. After Service Pack 4.1.1, Enscape connects with Chaos Cloud for cloud-based final output, which is useful when you want to render a high-resolution still without tying up your workstation.
For firms exploring AI-based rendering as part of their pipeline, Chaos Veras is available on Enscape’s Premium tier and transforms sketches and screenshots into styled visualizations inside the same environment. AI tools are increasingly being used for early concept iteration, with traditional engines like Enscape or V-Ray handling the production-quality output. Our roundup of 25 best AI architectural rendering tools for 2026 covers how these tools complement real-time renderers.
Cost-wise, this split pipeline matters. Local rendering keeps ongoing costs near zero but requires capable hardware, while cloud rendering shifts the cost model toward pay-as-you-go. For a breakdown of the economics, see our guide on cloud rendering vs local rendering costs for architects.
Key Workflow Recommendations

A fast Enscape architectural render workflow is less about any single setting and more about using what Enscape gives you out of the box. The built-in asset library, the native PBR material collection, and the live CAD sync are designed to work together, and the moment you start pulling materials from external sites or exporting models to other tools during design, you lose most of the speed advantage.
✅ Key Takeaways
- Enscape’s plugin architecture removes the export step, which is where most render time is actually lost, so keep your design work inside the host CAD rather than switching tools.
- Use the native PBR Material Library and Asset Library as your default source, and only pull from external texture sites when the native options genuinely miss a specific surface.
- Run Medium quality for daily iteration and switch to Ultra only for final exports, which keeps your viewport responsive through the many small design changes.
- Set geographic location in the CAD software and use low sun angles between 8-10 AM or 4-6 PM for more dimensional facades and richer interior light.
- Treat Enscape output as a flat starting point and handle serious color grading in Photoshop or Lightroom, which gives you non-destructive control and avoids overprocessed renders.
- Combine Enscape with D5 Render, V-Ray, or Chaos Cloud for final marketing images, using Enscape for the design-phase iteration where real-time feedback matters most.
Frequently Asked Questions
How do I make a realistic render in Enscape quickly?
Start with Medium quality settings, use the native PBR Material Library for all surfaces, set the correct geographic location in your CAD software, and pick a low sun angle between 8-10 AM or 4-6 PM. For final output, switch to Ultra quality at 3840×2160 resolution with Ray Traced Sun Shadows enabled. This approach delivers convincing realism in under 30 seconds per still during iteration and under five minutes for final export on a modern workstation.
What are the best Enscape render settings for interior scenes?
For interior renders, set Rendering Quality to Ultra, Auto Exposure to High, and Sharpness between 50 and 65. Enable Ray Traced Sun Shadows and add interior lights with 2700K-3000K color temperature to balance daylight entering through windows. Keep Saturation and Contrast near neutral and push the sun angle to around 30 degrees above the horizon for deeper light penetration and richer surface texture on floors and walls.
How does Enscape compare to D5 Render for architecture?
Enscape runs as a plugin inside your CAD software with live BIM sync, while D5 Render is a standalone application with no plugin dependency. Enscape is faster for iterative design work where the model changes frequently, and D5 Render offers stronger atmospheric effects and higher maximum output resolution up to 16K for final marketing images. Many architects use both together, with Enscape handling design phases and D5 producing the final deliverables.
Can I use Enscape for VR presentations?
Yes. Enscape supports one-click VR deployment and auto-detects Meta Quest, HTC Vive, and Windows Mixed Reality headsets. For clients without VR hardware, you can export panoramic 360-degree views and share them as web links through Enscape’s cloud system, which lets users navigate the scene in a browser without any software installation.
What computer do I need to run Enscape smoothly?
Enscape runs on Windows computers with dedicated GPUs and also supports Intel and AMD integrated graphics, making it accessible on lower-spec machines than most real-time engines. For comfortable real-time work at Medium quality, an NVIDIA RTX 3060 or equivalent is sufficient. For Ultra quality final renders at 4K resolution, an RTX 4070 or better is recommended. Mac support is available for SketchUp, Rhino, ArchiCAD, and Vectorworks, but Revit on Mac is not supported.
Note: Software pricing, feature availability, and hardware recommendations referenced in this article reflect conditions as of early 2026 and are subject to change. Always verify current specifications directly with Chaos before making purchasing decisions.
External Resources for Further Reading
For deeper technical reference on Enscape, the official Chaos Enscape product page and the Enscape feature documentation cover current version capabilities. The Chaos blog guide to the Asset Library provides detailed best practices for asset placement and custom library management. For texture sources that pair well with Enscape’s Material Editor, the Chaos guide to free rendering textures lists vetted PBR-ready libraries. Architects using Enscape for SketchUp will find workflow-specific guidance on the Enscape SketchUp rendering page. For broader context on how Enscape fits alongside other architectural modeling tools, see our guide to Blender alternatives for architects in 2026.


Concepts App Review: The Infinite Canvas Architects Actually Use
A practical Concepts App review for architects, looking at the infinite canvas,...

Keynote vs PowerPoint on iPad for Architecture Presentations
A practical comparison of Keynote and PowerPoint on iPad for architecture presentations,...

GoodNotes vs Notability: Which Is Better for Architecture Students?
Choosing between GoodNotes and Notability as an architecture student depends on your...

Picsart for Architects: A Quick Image Editing Review
A hands-on Picsart review for architects covering background removal, AI generation, fonts,...

Leave a comment