

Tips for Build a Physical Model
Physical models are crucial for architectural presentations, requiring careful attention to aesthetics, scale, and material choice to effectively represent design concepts.
 Elif Ayse Sen15 April 20224 Mins read664
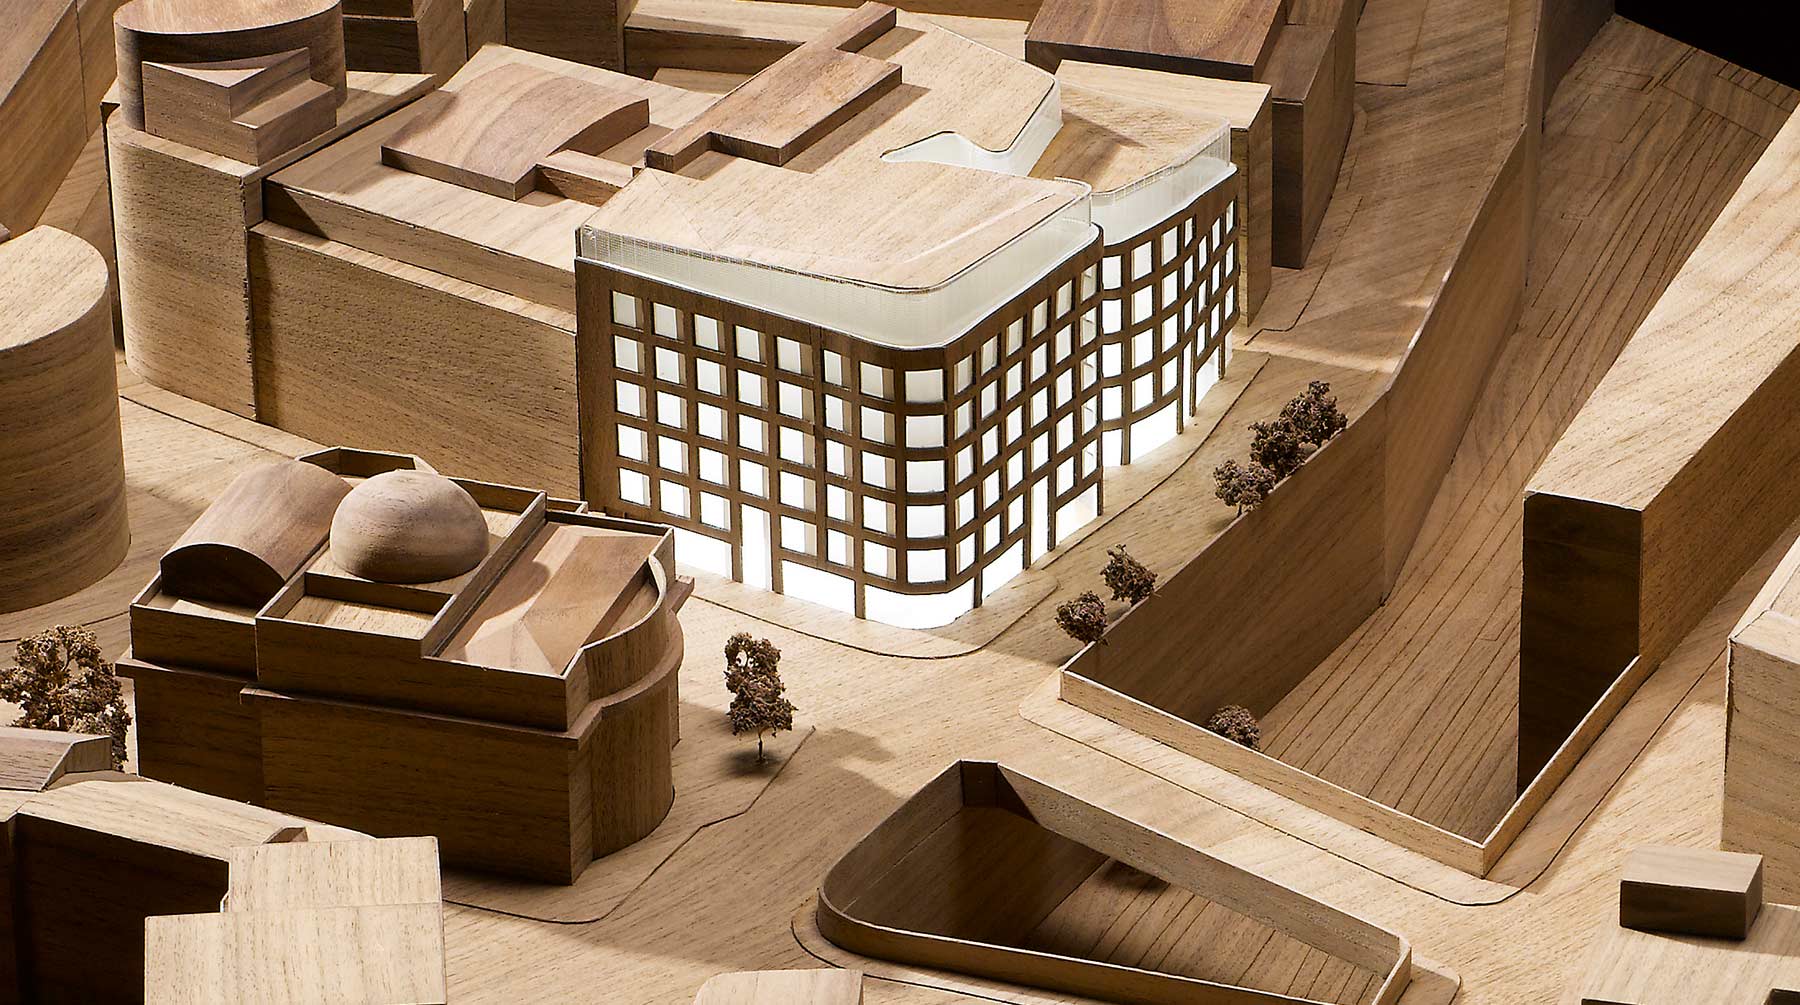
Table of Contents Show
Making physical model is significant for working on your project and architectural presentations. Architectural representation is one of the way that refers your design. If you want to improve your physical model making skills, follow these steps that we recommend. It is important that physical models are adequate in terms of aesthetics, proportion and scale, both to enhance your presentations and to improve your 3D representation abilities.
Draft Models

Working with draft models allows you to think in 3D conceptually while developing your project. With conceptual models, you can study all kinds of approaches in an abstract and concrete way. You can get better results in the final by identifying the deficiencies and approaches of your project on your draft models.
You can work with waste and recyclable materials in draft models without worrying about aesthetics.
Materials

The material is the element that will best display your project model. The most successful physical models are those made from a single material and a single color. Depending on your façade material and site context, we generally recommend making models with organic materials. Making a physical model with aesthetically qualified materials also better represents your project ratio and design. For a solid physical model, you can use balsa, wooden sticks, plexiglass or aluminum sheets.
Cutting Tools

One of the most important issues in the physical model is to cut and combine quality materials with quality. It is important that both opaque and transparent materials look and have a clean finish. We recommend that you make models with laser cutting machine as much as possible. One of the most important issues in the physical model is to cut and combine quality materials with quality. It is important that both opaque and transparent materials look and have a clean finish. We recommend that you make models with laser cutting as much as possible.
Choosing the Right Scale
Scale decisions shape what your model communicates. Larger scales such as 1:50 or 1:20 suit detail studies, interior layouts, and facade articulation, while smaller scales like 1:200 or 1:500 are better for massing studies and site relationships. Pick a scale that fits both your message and the physical space you have for display. A consistent scale across all elements keeps proportions honest and prevents the model from reading as visually confused. When in doubt, build a small test piece first to confirm that windows, stairs, and structural members will remain legible once cut.
Building the Base and Context
A strong base anchors the model and tells the story of the surrounding environment. Use a rigid material such as MDF, foam board, or layered cardboard so the base does not warp under the weight of the building. Topography can be shown with stacked contour layers, and adding simple massing blocks for neighboring structures helps viewers read the site context. Keep the base finish neutral so it does not compete with the building itself. Leave a clear margin around the design so the eye has room to settle on the main subject.
Lighting and Presentation
How you present a finished model matters as much as how you build it. Natural side lighting reveals depth, casts useful shadows, and emphasizes the relief of facades and roof forms. If you photograph the model for a portfolio, shoot at eye level with a plain backdrop to mimic how a person would experience the building. Small details such as a consistent entourage of trees or scale figures give viewers an immediate sense of size. Avoid over decorating; restraint usually reads as more professional and keeps attention on the architecture.
Common Mistakes to Avoid
Several recurring errors weaken physical models. Mixing too many materials and colors makes the design look busy rather than resolved. Rushing cuts leaves rough or angled edges that undermine an otherwise careful build. Using too much glue creates visible smears and warps thin sheets. Skipping a draft model often leads to costly mistakes in the final version. Finally, ignoring scale figures and context can leave a model feeling abstract. Working slowly, testing joints before committing, and keeping spare material on hand will save time and protect the quality of your final result.
Frequently Asked Questions
What is the best material for beginners? Cardboard and foam board are forgiving, affordable, and easy to cut by hand, making them ideal while you build skill before moving to balsa or plexiglass. How long does a physical model take? It depends on scale and complexity, but allowing several days for a detailed presentation model is realistic once you include drafting, cutting, and assembly. Do digital renders replace physical models? They complement rather than replace them, since a physical model offers tactile understanding of form and space that screens cannot fully convey.





How to Write a Planning Statement for a Residential Project
A planning statement ties a residential scheme to local and national planning...
 Sinan Ozen6 Mins read

How to Improve Architectural Design Skills With Digital Tools
A practical breakdown of how to improve architectural design skills using digital...
Elif Ayse Sen6 Mins read

Architecture Design Brief: What to Include and Examples
A design brief turns a client's goals into clear instructions a design...
Elif Ayse Sen10 Mins read
Architecture Precedent Study: How to Analyze a Building Step by Step
Learn how to conduct an architecture precedent study with a structured, step-by-step...
Elif Ayse Sen13 Mins read


Leave a comment