

Tiny House Water Systems: Your Complete Guide to Plumbing, Rainwater Harvesting and Off-Grid Solutions
A practical guide to designing a tiny house water system, covering PEX plumbing, on-grid and off-grid setups, rainwater harvesting calculations, composting toilet options, greywater recycling, and freeze protection strategies for year-round comfort.

Table of Contents Show
A reliable tiny house water system is what separates a cozy, functional home from an expensive camping trip. Whether you plan to hook up to municipal water, collect rainwater off your roof, or haul water to a remote property, every decision you make about pipes, tanks, pumps, and filtration shapes your daily comfort. The good news? Tiny house plumbing is far simpler than most people expect, and you have more options than ever to build a system that fits your lifestyle and budget.
The average American household uses about 82 gallons of water per person each day, according to the U.S. Environmental Protection Agency (EPA). Tiny house dwellers, by contrast, typically consume just 10 to 35 gallons per day by combining compact fixtures, low-flow hardware, and smarter habits. That dramatic reduction is possible because a well-planned tiny house water system puts every drop to work.
This guide walks you through the core components of tiny house plumbing, explains how to set up off-grid water collection, covers composting toilet basics, and helps you choose between on-grid and off-grid setups. By the end, you will have a clear roadmap for designing the water system your tiny home actually needs.
How Tiny House Plumbing Works: On-Grid vs. Off-Grid Systems

Tiny house plumbing follows the same basic logic as conventional residential plumbing: fresh water enters through a supply line, travels to fixtures like sinks and showers, and wastewater exits through drain lines. The key difference is scale. Shorter pipe runs, smaller tanks, and compact fixtures mean fewer materials, lower costs, and simpler installation. Two main approaches define how water reaches your tiny house.
On-Grid Water Connection
An on-grid setup connects your tiny home directly to a municipal water supply or to an existing house’s plumbing. This is the most straightforward option for stationary tiny houses parked in backyards, on private land with utility access, or in tiny house communities. You run a potable water hose from an outdoor spigot or frost-proof hydrant to the home’s water inlet. A pressure regulator at the connection point protects interior pipes and the water heater from pressure spikes. City water pressure typically ranges from 40 to 80 PSI, but many tankless water heaters require a narrower band, so installing a gauge alongside the regulator is a wise move.
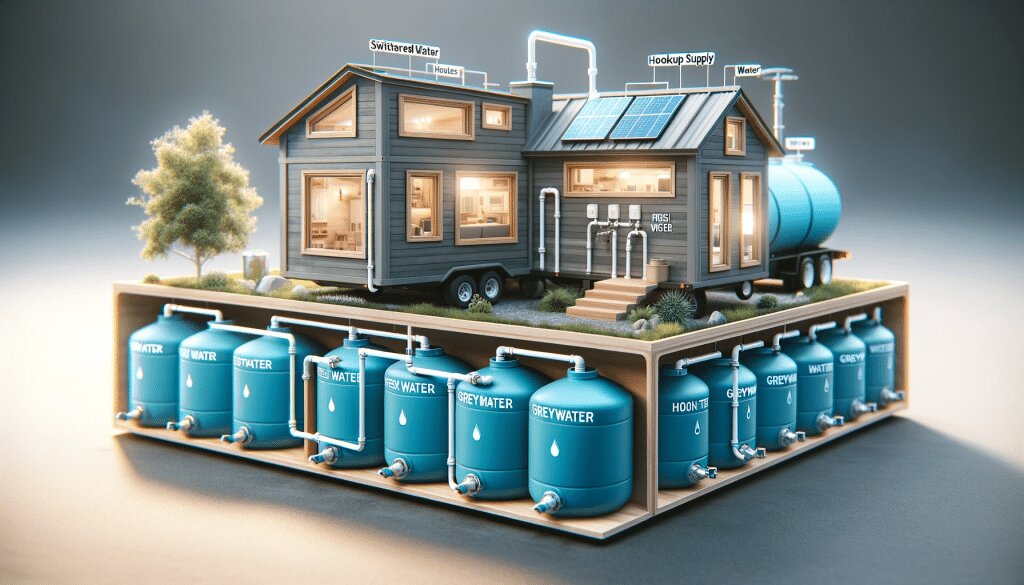
Off-Grid Water Supply
Off-grid systems rely on onboard storage tanks, wells, springs, or rainwater catchment instead of municipal lines. A freshwater tank (commonly 20 to 100 gallons for a tiny house on wheels) stores clean water, and a 12-volt RV-style pump delivers it to fixtures at consistent pressure. Many builders install a Shurflo or Flojet diaphragm pump rated at 3 to 4 gallons per minute, which automatically activates when you open a faucet. When designing an off-grid layout, place the storage tank close to the pump and water heater to minimize pipe runs and reduce the wait time for hot water.
Water Supply Options at a Glance
The following table compares the three most common water source configurations for tiny homes.
| Feature | Municipal (On-Grid) | Onboard Tank (Off-Grid) | Rainwater Harvesting |
|---|---|---|---|
| Water Pressure | 40-80 PSI (city supply) | 30-55 PSI (12V pump) | 30-55 PSI (12V pump) |
| Typical Capacity | Unlimited (metered) | 20-100 gallons | 200-1,500 gallons (cistern) |
| Setup Cost | $200-$500 | $300-$800 | $500-$3,000+ |
| Mobility | Stationary only | Fully mobile | Stationary or semi-permanent |
| Filtration Needed | Optional (inline filter) | Recommended | Required (multi-stage) |
| Best For | Backyard or community parking | Frequent movers, dry campers | Rural or off-grid homesteads |
Essential Tiny House Plumbing Components and Materials

Choosing the right pipes, fittings, and fixtures makes the difference between a reliable plumbing system and one that leaks at every connection. Fortunately, tiny house plumbing has become far more accessible thanks to modern materials that are lightweight, freeze-resistant, and DIY-friendly.
PEX Tubing: The Standard for Tiny Homes
Cross-linked polyethylene (PEX) tubing has replaced copper and PVC as the go-to piping material in the tiny house world. PEX is flexible enough to bend around corners without elbows, tolerant of freezing temperatures, and easy to join with push-fit (SharkBite) or crimp fittings. Use 3/4-inch PEX for the main supply line from the water inlet to the water heater, then branch out with 1/2-inch lines to individual fixtures. Color-coding your lines (red for hot, blue for cold) keeps things organized and simplifies future troubleshooting.
Tankless Water Heaters
Space is precious in a tiny home, so a tankless (on-demand) water heater is a natural fit. Propane-powered models like the Eccotemp or Rinnai line mount on a wall or inside a cabinet and heat water only when a faucet is open. Electric tankless units work well for on-grid homes but draw significant amperage, which can be a challenge for solar-powered setups. Place the heater as close to fixtures as possible; even a few extra feet of pipe means waiting longer for hot water and wasting more of it.
Drain Lines and Venting
Wastewater exits through 1-1/2 inch or 2-inch PVC drain lines that slope downward at roughly 1/4 inch per foot. Every drain needs a P-trap to prevent sewer gases from entering the living space, and the entire drain system needs proper venting, either through a traditional vent pipe through the roof or with an air admittance valve (AAV). Skipping the vent is one of the most common DIY mistakes; without it, drains gurgle, flow slowly, and can push sewer gas past the P-traps.
Freeze Protection Strategies
Frozen pipes are a serious risk for tiny homes, which often have thinner walls and exposed undercarriages compared to conventional houses. Keep all supply lines on interior walls whenever possible. If pipes must run through exterior cavities, wrap them with thermostat-controlled heat tape and insulate generously. For the water inlet connection on the exterior, use a heated hose or insulated hose enclosure during winter months. A manual drain valve at the lowest point of the system lets you winterize quickly if you plan to leave the house unoccupied in freezing weather.
Rainwater Harvesting for Tiny Houses
Collecting and storing rainwater is one of the most empowering steps you can take toward water independence. A rainwater harvesting tiny house setup captures precipitation from the roof, filters it, stores it in a tank, and feeds it to your plumbing system through a pump. For tiny homes parked on rural land or in areas with reliable rainfall, this approach can cover a significant portion of daily water needs, or even all of them.
Calculating Your Collection Potential
The formula is straightforward: roof area (square feet) multiplied by rainfall depth (inches) multiplied by 0.623 gives you the harvest in gallons. A typical tiny house with a 200-square-foot roof footprint in a region receiving 40 inches of annual rainfall can capture roughly 4,984 gallons per year. That works out to about 13.6 gallons per day, which is enough for a single person using water-conserving fixtures. In wetter climates, a small roof can yield far more.
Key Components of a Rainwater System
A functional rainwater harvesting tiny house system includes five main elements. First, gutters and downspouts channel water from the roof to the storage tank. Metal roofing is ideal because it sheds water efficiently and does not leach chemicals. Second, a first flush diverter routes the initial flow of dirty rainwater (carrying dust, pollen, and bird droppings) away from the tank. Third, a storage tank or cistern holds collected water; slimline tanks designed to fit through standard doorways work well for tiny house sites where space is tight. Fourth, a pump (identical to the 12V diaphragm pumps used in off-grid tank systems) pressurizes the water for household use. Fifth, a multi-stage filtration system that includes sediment filters, activated carbon, and ultraviolet (UV) sterilization makes the water safe for drinking and cooking.
Legal Considerations
Rainwater harvesting is legal in most U.S. states, but regulations vary. Some states, like Texas, actively encourage rainwater collection with tax exemptions on harvesting equipment. Others require permits or restrict collection volumes. Colorado, for example, historically limited residential collection to two 55-gallon rain barrels, though laws have gradually loosened. Always check your local regulations before investing in a catchment system.
Composting Toilets: Eliminating Blackwater From Your System

One of the smartest decisions you can make when planning a tiny house water system is to eliminate blackwater entirely. A composting toilet replaces the conventional flush toilet, removing the need for a blackwater holding tank, a septic connection, or thousands of gallons of flushing water each year. Standard flush toilets use about 1.6 gallons per flush according to the EPA. Over a year, that adds up to roughly 2,920 gallons for a single person flushing five times daily. A composting toilet uses zero water for waste processing.
How Composting Toilets Work
Modern composting toilets separate liquid waste from solid waste using a built-in urine diverter. Solids drop into a composting chamber where they mix with a carbon-rich bulking agent like coconut coir, peat moss, or fine wood shavings. Aerobic bacteria break the material down over time. A small fan (typically drawing 2 to 17 watts) ventilates the chamber through a pipe to the outside, which controls odor and accelerates decomposition. The urine is diverted to a separate container or piped to a greywater system. When properly maintained, a composting toilet produces virtually no odor inside the home.
Popular Models for Tiny Houses
The Separett Villa 9210, made in Sweden, is widely regarded as one of the best composting toilets available. It uses a rotating trap door that opens only when you sit down, keeping odors sealed when not in use. The Nature’s Head composting toilet is a more affordable alternative that uses a hand-crank agitator to mix solids with bulking material, accelerating decomposition. Both models require a small exterior vent hole and a low-wattage fan. For two people living full-time in a tiny house, expect to empty the solids bin roughly every three to six weeks. The urine container needs emptying every two to four days.
Benefits Beyond Water Savings
Beyond eliminating water waste, a composting toilet simplifies your entire plumbing layout. Without a flush toilet, you have no blackwater tank to empty, no sewer hookup to arrange, and no risk of a sewage leak inside a living space that might be only 200 square feet. It also frees you from the requirement of connecting to a septic system, which can be prohibitively expensive or simply unavailable on remote land. For off-grid tiny house communities, composting toilets are becoming the standard rather than the exception.
Greywater Management and Recycling

Greywater is the lightly used water that flows from your sinks, shower, and washing machine. Unlike blackwater from a flush toilet, greywater can be treated and reused for irrigation, dramatically stretching your water supply. In a tiny house, greywater typically accounts for all of your wastewater if you use a composting toilet.
Simple Greywater Disposal
The most basic approach is to route greywater through a drain hose to a gravel-filled trench or French drain on your property. Use only biodegradable, plant-safe soaps and cleaning products so the water does not harm soil biology. If your tiny house is mobile, a portable greywater tank (10 to 40 gallons) mounted under the trailer collects wastewater for later disposal at an RV dump station.
Greywater Recycling for Irrigation
A step up from simple disposal, a greywater recycling system filters the water through a basic sand or gravel filter and distributes it through subsurface drip irrigation to a garden or landscape. This closed-loop approach is especially valuable for off-grid desert properties where every gallon counts. As rainwater harvesting expert Brad Lancaster emphasizes, cycling water multiple times through greywater reuse reduces your total water demand far more effectively than simply collecting more rainwater.
Local regulations on greywater disposal vary widely. Some jurisdictions treat greywater the same as blackwater, requiring a septic system or sewer connection. Others, particularly in arid western states, have adopted permissive greywater codes that allow direct landscape irrigation. Research your county’s rules before committing to a specific design.
Designing Your Tiny House Water System: Step-by-Step Planning

A well-designed tiny house water system starts on paper long before you buy a single fitting. Here is a practical sequence for planning your setup.
Step 1: Define Your Water Source
Decide whether you will connect to city water, rely on a well or spring, haul water to a tank, or harvest rainwater. Your choice drives every subsequent decision about tank size, pump selection, and filtration requirements. Many builders opt for a hybrid approach: a dual-hookup system that accepts city water when available and switches to onboard storage when parked off-grid.
Step 2: Map Your Fixture Layout
Sketch the locations of your kitchen sink, bathroom sink, shower, water heater, and toilet. Place water-using fixtures as close together as possible, ideally sharing a common wet wall. This minimizes pipe runs, reduces material costs, and gets hot water to your faucet faster. Clustering fixtures on one interior wall also simplifies drain plumbing and venting.
Step 3: Size Your Storage and Pumps
If you are going off-grid, calculate your daily water consumption and multiply by the number of days between refills you want. A solo person using 10 to 15 gallons per day who refills every four days needs at least a 60-gallon freshwater tank. Remember that water weighs 8.3 pounds per gallon; a full 60-gallon tank adds nearly 500 pounds, so position it over the trailer axles for proper weight distribution. Select a pump that delivers at least 3 GPM at 40-55 PSI for comfortable fixture operation.
Step 4: Plan Your Waste Stream
Choose between a composting toilet (no blackwater) and a flush toilet (requires a blackwater tank or sewer hookup). Then decide how greywater will be handled: direct drain to sewer, a holding tank, or landscape irrigation. Route all drain lines with proper slope and venting to prevent backups and odors.
Step 5: Select Filtration
At a minimum, install an inline sediment filter on your supply line to protect the water heater from debris. If you are using rainwater or well water for drinking, add a multi-stage system: a 5-micron sediment pre-filter, a 1-micron carbon block filter, and a UV sterilizer. Test your water source periodically to confirm the filtration is performing correctly.
Water Conservation Tips for Tiny Living
Even with a well-designed system, conscious water use habits make tiny living more sustainable and reduce the frequency of tank refills. Low-flow showerheads rated at 1.5 GPM or less deliver a satisfying shower while using roughly half the water of a standard 2.5 GPM head. Aerators on kitchen and bathroom faucets cut flow to 1.0 GPM without noticeably affecting performance. Washing dishes in a basin rather than under a running tap saves several gallons per meal.
If your tiny house includes a washing machine, choose a compact, high-efficiency model that uses 13 gallons per load or less. Line-drying clothes in warmer months saves both water (no extra rinse cycle) and energy. Monitoring your water meter or tank level daily builds awareness of where your water goes, and awareness is the first step toward genuine conservation.
Common Tiny House Plumbing Mistakes to Avoid
Learning from other builders’ errors saves you time, money, and frustration. Here are pitfalls that come up repeatedly in the tiny house community.
Routing pipes through exterior walls or under the trailer without adequate insulation invites freeze damage. Even PEX, which is more freeze-tolerant than copper, will eventually burst if water inside it freezes solid and has no room to expand. Run supply lines inside interior walls and insulate any exposed sections thoroughly.
Skipping the plumbing vent is another frequent error. Without venting, drains empty slowly, gurgle, and can siphon water out of P-traps, allowing sewer gas into your living space. An air admittance valve is a space-saving alternative to a full vent stack and works well in most tiny house applications.
Overlooking a main shut-off valve inside the home is a third common oversight. If a fitting fails and water starts spraying, you do not want to sprint outside to the spigot or crawl under the trailer. An accessible interior ball valve on the main supply line lets you stop the flow in seconds.
Finally, many first-time builders forget to account for the weight of water when placing tanks. A 100-gallon tank weighs over 830 pounds when full. Position it directly over or between the axles, not at the tongue or tail of the trailer, to maintain safe towing balance.
Frequently Asked Questions
How much does it cost to plumb a tiny house?
A basic DIY tiny house plumbing setup using PEX tubing, a tankless water heater, and standard fixtures typically costs between $500 and $2,500 in materials. Hiring a professional plumber adds $100 to $200 per hour in labor. Off-grid additions like a water pump, storage tank, and filtration system can add another $300 to $1,500 depending on capacity and filtration quality.
Can you use a regular toilet in a tiny house?
Yes, you can install a standard flush toilet if your tiny house connects to a sewer line or septic system. However, many tiny house owners prefer a composting toilet because it eliminates the need for a blackwater tank, saves significant water, and simplifies the overall plumbing layout. For mobile tiny homes that frequently change locations, a composting toilet is often the most practical choice.
How long does a composting toilet last before it needs emptying?
For two full-time residents, the solids bin of most composting toilets needs emptying every three to six weeks. The urine container is smaller and typically requires emptying every two to four days. Frequency depends on usage patterns and the type of bulking agent you use. Coconut coir tends to absorb moisture more efficiently than peat moss, extending the time between changes.
Is it legal to collect rainwater for a tiny house?
Rainwater collection is legal in most U.S. states, though rules and limitations vary. States like Texas and Oregon encourage rainwater harvesting with tax incentives, while others may require permits or limit collection volumes. Always check your state and county regulations before installing a catchment system, especially if you plan to use rainwater as your primary drinking water source.
How do you prevent pipes from freezing in a tiny house?
Keep all plumbing on interior walls, insulate exposed pipe runs with foam sleeves, and use thermostat-controlled heat tape in vulnerable areas. For the exterior water inlet, a heated hose enclosure prevents freeze-ups. If you leave the house unoccupied in winter, drain the system completely using a low-point drain valve and blow out remaining water with compressed air.
Cost figures mentioned in this article are approximate and vary by region, material supplier, and project scope. Building codes and regulations, including those governing rainwater collection and greywater disposal, vary by jurisdiction. Always consult local authorities and, where relevant, a licensed plumber before finalizing your system design.


Off-Grid Tiny House Living: Complete Setup Guide for Beginners
This guide walks you through every stage of setting up an off-grid...

Tiny House with Loft: Design Ideas, Plans and Building Tips for Vertical Living
A complete guide to designing and building a tiny house with loft,...

8+ Best Tiny Home Communities in Michigan: Great Lakes Tiny Living Guide
Explore tiny home communities in Michigan. Great Lakes lifestyle, affordable land, and...

8+ Best Tiny Home Communities in South Carolina
Find tiny home communities in South Carolina. Affordable living, coastal charm, and...

Leave a comment