

Designing Exterior Concrete That Survives Freeze-Thaw Winters
Freeze-thaw cycles, not one long cold spell, are what break exterior concrete. A guide to the mix, base, drainage, joints and curing decisions that keep driveways and patios intact through Upper Midwest winters.
 illustrarch Editoral Team7 October 20269 Mins read2

Table of Contents Show
In western Wisconsin, winter is not one long freeze. It is a season of repeated swings: a sunny February afternoon that melts snow on a south-facing patio, followed by a single-digit night that refreezes every drop of that meltwater. Each swing is a small stress test for exterior concrete, and a driveway might face dozens of them a year.
Concrete that looks identical on installation day can perform very differently after five winters. The difference usually isn’t luck. It comes from decisions made on paper and on site: the mix, the base, the slope, the joint layout, and how the slab was cured and protected in its first season. For architects and designers, these are specification choices. For homeowners, they are the right questions to ask before anyone pours.
What Freeze-Thaw Actually Does to Concrete
Hardened concrete looks solid, but it is porous. A network of capillary pores runs through the cement paste, and on exterior flatwork those pores readily absorb rain, snowmelt, and slush.

When water freezes, it expands by roughly 9 percent. Inside a saturated pore there is nowhere for that expansion to go, so it generates internal pressure, along with hydraulic pressure as unfrozen water is pushed through the paste. One cycle rarely causes visible harm. Hundreds of cycles accumulate microcracking until the material gives way.
The damage shows up in a few recognizable forms:
- Scaling: flaking or peeling of the top layer, often starting as small patches and spreading across the surface.
- Spalling: deeper chips or fragments breaking away, frequently at edges, joints, or over corroding reinforcement.
- Popouts: small conical pits where a porous, absorptive aggregate particle near the surface has expanded and fractured.
- Cracking: from internal deterioration, but also from frost heave in the soil beneath.
Why De-Icing Salts Make It Worse
De-icers lower the freezing point of water, which sounds helpful but often increases the number of freeze-thaw cycles at the surface, since melted water refreezes repeatedly. Salts also raise the degree of saturation near the surface and create layers with different freezing behavior, which encourages scaling. Some chemicals do more than that. Ammonium-based products (ammonium nitrate and ammonium sulfate) chemically attack cement paste, and magnesium and calcium chlorides at high concentrations can contribute to paste deterioration over time.
The practical takeaway: a slab in a severe freeze-thaw climate that will see de-icers needs to be designed for that exposure from the start.
Mix Design: The First Line of Defense
Exposure Classes
ACI 318, the American Concrete Institute’s building code for structural concrete, groups freeze-thaw exposure into classes F0 through F3. F0 covers concrete not exposed to freezing, while F3 covers concrete exposed to freezing and thawing, frequent moisture, and de-icing chemicals. Exterior residential flatwork in the Upper Midwest generally falls into the most severe category in practice, even though residential slabs-on-ground are often governed by local codes or ACI 332 rather than ACI 318 directly. Specifying with the severe class in mind is a sensible baseline.
Air Entrainment
Air entrainment is the single most important freeze-thaw protection. An admixture creates billions of microscopic, well-distributed air bubbles in the paste. These voids act as relief chambers: when pore water freezes and expands, it has somewhere nearby to go.
For exposed exterior flatwork in severe conditions, total air content typically targets roughly 5 to 8 percent, with the exact figure depending on maximum aggregate size (smaller aggregate generally calls for more air). What matters is not just total air but bubble spacing, so the air must come from a proper air-entraining admixture, not entrapped pockets from poor consolidation. Specifications should call for air testing at the truck, since air content can shift with temperature, mixing time, and other admixtures.
Water-to-Cementitious Ratio and Strength
A lower water-to-cementitious (w/cm) ratio produces denser paste with fewer and less connected capillary pores, which means less water gets in. For severe exposure, a maximum w/cm of about 0.45 is commonly specified, and ACI 318’s most severe class goes lower. Compressive strength for exterior flatwork in these conditions is commonly 4,000 to 4,500 psi, with some specifications going higher.
Strength alone doesn’t guarantee durability. A 5,000 psi mix without entrained air can still scale badly. Treat air content, w/cm, and strength as a package.
One field issue undermines all of it: adding water at the truck to make placement easier. It raises the w/cm ratio and weakens the surface. Specifications should prohibit unauthorized water additions, and homeowners are within their rights to ask about it.
Supplementary Cementitious Materials
Fly ash, slag cement, and silica fume can reduce permeability and improve long-term durability. The trade-off is surface behavior. High replacement levels, especially of fly ash, can slow strength gain and early surface maturity, which may increase scaling risk when de-icers are applied in the first winter. Codes cap SCM percentages for concrete exposed to de-icing chemicals. Moderate, code-compliant SCM use is generally fine; aggressive replacement on a late-season pour deserves caution. A ready-mix supplier familiar with regional exposure can recommend appropriate proportions.
Site and Base: Managing What Happens Below
Frost Heave and Frost Depth
When fine-grained, moisture-holding soils freeze, ice lenses form and grow, lifting whatever sits above. This is frost heave, and it can crack or tilt a slab regardless of how good the concrete is.
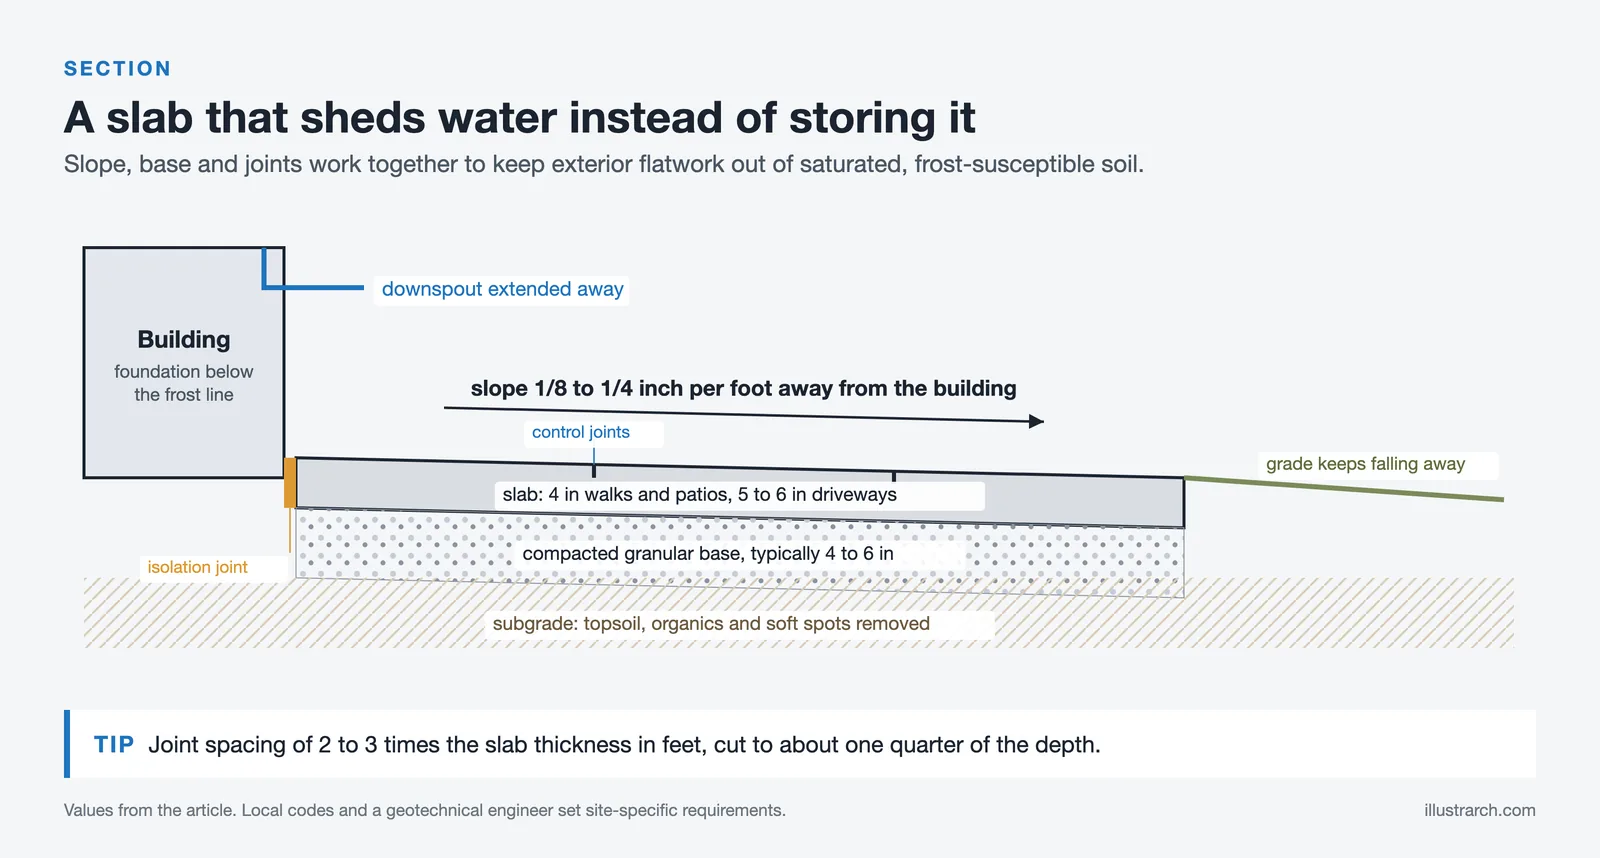
Foundations in much of Wisconsin are typically required to extend roughly 4 to 5 feet below grade to get beneath the frost line, though local codes set the actual requirement. Flatwork doesn’t go that deep. Driveways, patios, and walks float on the ground, so the strategy is to control moisture and soil type beneath them rather than bypass the frost entirely.
A Draining Granular Base
The standard approach is a compacted granular base, commonly 4 to 6 inches of crushed stone or gravel, sometimes more over clay or poorly draining soils. The base provides uniform support and, critically, lets water move away from the underside of the slab rather than sitting in frost-susceptible soil.
Key points for specifications:
- Remove topsoil, organics, and soft spots before placing base.
- Compact subgrade and base in lifts to a specified density.
- Avoid placing concrete on frozen ground or frozen base.
- Consider how water will exit the base; a base that sits in a clay “bathtub” will hold water.
Where soils are particularly problematic, a geotechnical engineer can advise on base depth, geotextiles, or subsurface drainage.
Drainage and Slope as a Design Tool
Standing water is the raw material of freeze-thaw damage, so slope is not an afterthought. Exterior slabs should typically slope about 1/8 to 1/4 inch per foot away from buildings. The higher end sheds water faster and tolerates minor settlement; the lower end is gentler underfoot and may suit accessible routes, where maximum cross slopes are regulated.
Good drainage design looks beyond the slab itself:
- Downspouts: Don’t discharge roof water onto patios or walks, where it refreezes into ice sheets and keeps the slab saturated. Extend or redirect them.
- Landscape grading: Surrounding soil should sit slightly below the slab edge and continue sloping away, so water leaving the concrete doesn’t pool at its perimeter.
- Low points: Large patios or courtyards may need trench drains or area drains rather than relying on one long slope.
- Snow storage: Plan where plowed or shoveled snow will pile, so meltwater doesn’t drain back across the pavement.
Jointing as Architecture
Concrete shrinks as it cures and moves with temperature. It will crack; joints decide where.

Control Joints
A common rule of thumb sets maximum control joint spacing at 2 to 3 times the slab thickness in feet. A 4-inch slab would have joints roughly every 8 to 12 feet, and a 5- or 6-inch driveway somewhat farther apart. Joints should be cut or tooled to about one-quarter of the slab thickness. Panels should be as close to square as practical, ideally with a length-to-width ratio not exceeding about 1.5 to 1, and re-entrant corners should get a joint to relieve stress.
Saw-cut timing matters. Cuts made too late let random cracks form first; in cold weather, slower setting can shift that window.
Joints as a Design Pattern
Rather than letting the contractor place joints by default, designers can treat the joint layout as a deliberate pattern: aligning joints with window mullions, door centerlines, or the module of adjacent paving, or using them to frame a seating area. A well-drawn joint plan reads as intentional geometry and does its structural job at the same time.
Isolation Joints
Isolation joints fully separate the slab from fixed elements: foundations, columns, steps, light pole bases, and existing slabs. They use a compressible filler and let each element move independently. Without them, a heaving driveway can push against a garage foundation or bind against stoop steps. Sealing joints with a flexible sealant also reduces water entry into the base.
Thickness and Reinforcement
Typical residential thicknesses are about 4 inches for walks and patios and 5 to 6 inches for driveways, with thicker sections where heavier vehicles or turning loads are expected.
Reinforcement controls cracks; it doesn’t prevent them:
- Rebar holds crack faces tightly together and helps transfer load across them. It must sit in the middle-to-upper portion of the slab on chairs, not on the base.
- Welded wire mesh serves a similar crack-width role but is only effective if properly supported; mesh stepped into the base during the pour does little.
- Synthetic or steel fibers mainly reduce early plastic shrinkage cracking and can improve surface toughness, but they are not a substitute for structural reinforcement where it’s needed.
Adequate cover over steel is important in salt exposure, since chloride-driven corrosion leads to spalling.
Placement and Curing in Cold Weather
Protecting Fresh Concrete
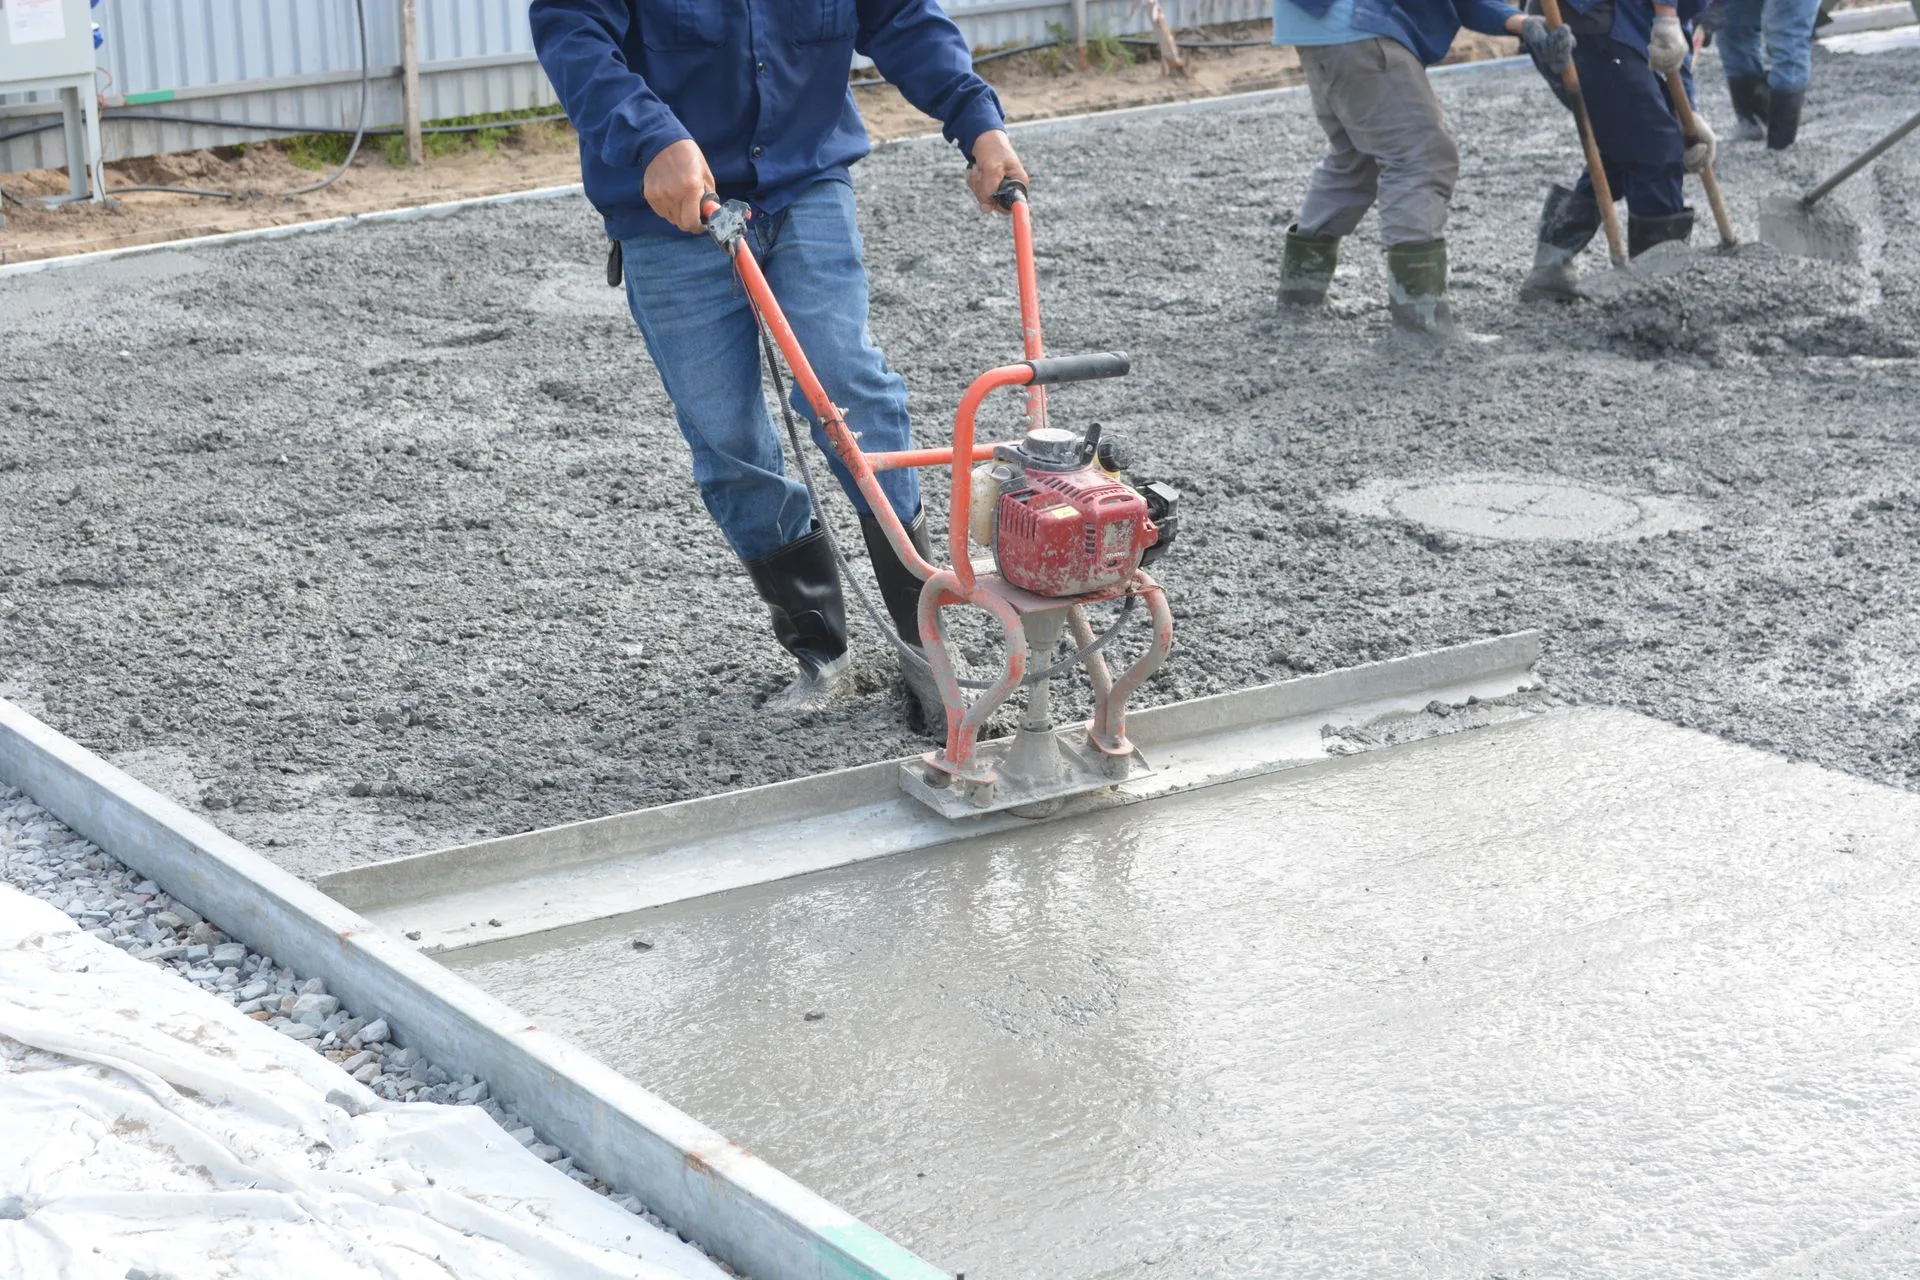
Fresh concrete that freezes before it gains early strength can suffer permanent damage. Industry guidance commonly holds that concrete should reach about 500 psi before its first freeze, which may take a couple of days at moderate temperatures and much longer in the cold. Insulated curing blankets, heated enclosures, and accelerating admixtures (non-chloride types where steel is present) help. Never place on frozen subgrade.
Why the First Winter Matters Most
Even after concrete survives the pour, young concrete is vulnerable. It needs time to gain strength and, importantly, a period of air drying before it is saturated and exposed to freezing and de-icers. A frequently cited guideline is at least about 30 days of drying after curing before the first freeze-thaw exposure.
That’s why timing matters in the Upper Midwest. A late-October or November pour may technically survive placement but enter winter saturated and immature. Spring through early fall is generally the safer window for exterior flatwork. Working with a concrete contractor in Eau Claire or another installer who has seen how slabs behave through regional winters can help a project team judge when a pour is worth scheduling and when it should wait until spring.
Finishing Discipline
Bleed water rises to the surface after placement. Finishing while it is still present, or sprinkling water to make troweling easier, works excess water into the top layer, creating a weak, high-w/cm skin that scales readily. Finishers should wait for bleed water to evaporate. Exterior air-entrained flatwork should also not be hard steel-troweled; a broom finish gives traction and keeps the surface paste intact.
Decorative and Stamped Concrete in Cold Climates
Stamped and colored concrete can perform well in freeze-thaw climates, but it leaves less margin for error.
- Color hardeners broadcast onto the surface increase surface density and wear resistance, a benefit in severe exposure.
- Release agents, powdered or liquid, prevent stamps from sticking. Residue must be properly cleaned before sealing, or adhesion problems follow.
- Texture and drainage: Deep textures can hold water and ice. Choose patterns with adequate slope and avoid very deep relief in areas that stay wet.
- Joints: Stamping can mask joint lines, but joints still need proper depth and spacing. Patterns with built-in grout lines can disguise them.
Stamped concrete is typically sealed shortly after curing and resealed periodically, often every two to three years depending on traffic and sun exposure.
Maintenance and Long-Term Performance
Choosing a Sealer
Penetrating sealers, such as silanes and siloxanes, soak into the surface and repel water while letting vapor escape. They don’t change appearance much and are well suited to broom-finished flatwork; reapplication intervals of several years are common. Film-forming sealers, such as acrylics, enhance color and are standard on stamped work, but they need breathable formulations and regular maintenance, since trapped moisture can cause whitening or delamination.
De-Icing Practices
- Avoid all de-icers on concrete during its first winter; use sand for traction instead.
- Never use ammonium nitrate or ammonium sulfate products.
- After the first year, use de-icers sparingly and shovel promptly, so melt doesn’t sit and refreeze.
- Reseal when water stops beading on the surface.
A Practical Checklist for Specifications and Contractor Briefings
- Air-entrained concrete, typically 5 to 8 percent air, verified by field testing
- Maximum w/cm of about 0.45, with strength commonly 4,000 to 4,500 psi
- Code-compliant limits on supplementary cementitious materials
- No water added at the site without approval
- Compacted, well-draining granular base, typically 4 to 6 inches or more
- Slope of about 1/8 to 1/4 inch per foot away from buildings
- Downspouts and grading coordinated with the paving plan
- Drawn joint layout: spacing 2 to 3 times thickness in feet, depth one-quarter of thickness
- Isolation joints at foundations, columns, steps, and fixed objects
- Thickness of 4 inches for walks and patios, 5 to 6 inches for driveways
- Reinforcement properly supported, with adequate cover
- Cold-weather protection plan and a pour schedule that allows drying before the first freeze
- No finishing in bleed water; broom finish on plain exterior flatwork
- Sealer type and resealing schedule specified
- Owner guidance: no de-icers in the first winter, no ammonium-based products ever
Freeze-thaw durability isn’t a single product or additive. It comes from a chain of decisions that run from the soil to the sealer, and every link is something a designer can draw, specify, or ask about. Treat the climate as a design constraint as real as load or code, and exterior concrete in the Upper Midwest can look as good after its twentieth winter as it did after its first.






Groupwork Completes 10-Storey Loadbearing Granite Flats in London
Groupwork's Petra Heights on Finchley Road is a 10-storey block of 22...
illustrarch Editoral Team2 Mins read

What Architecture Students Should Know About Structural Glass and Guardrail Code
Glass guards look minimal, but structural behavior, safety glazing, connections and guardrail...
illustrarch Editoral Team6 Mins read

LTL Architects Builds a Compressed Straw House in New York
LTL Architects built a New York prototype house from 16 compressed straw...
illustrarch Editoral Team2 Mins read

Manipal University Team Turns Treated Sewage Into Stronger Biochar Concrete
Manipal University Jaipur researchers find biochar from treated sewage can strengthen concrete,...
illustrarch Editoral Team3 Mins read


Leave a comment