

Designing an Off-Grid Cabin: How to Plan for Solar Power From the First Sketch
Solar works best when it shapes an off-grid cabin from the first sketch: orientation, a south-facing shed roof, a modest energy budget and a warm room for the batteries and inverter.
 illustrarch Editoral Team6 October 20264 Mins read2

Table of Contents Show
Off-grid cabins are having a moment. Remote work, rising land prices near cities and a growing interest in self-reliant living have pushed more clients toward small retreats far from the utility lines. For architects and owner-builders, that shift changes the design brief: the building itself now has to produce, store and manage its own electricity.
The most common mistake is treating solar as an add-on, something bolted to the roof after the drawings are finished. The cabins that work best are the ones where energy shapes the design from the first sketch. Orientation, roof form, floor plan and even material choices all decide how much power the cabin can make and how much it needs.
This guide walks through the key design decisions, from site and roof to the room where the batteries live.
1. Start with the site and orientation
In the Northern Hemisphere, a solar array produces the most energy facing true south, and winter output is what you design for, because that is when days are shortest and loads are highest. Before you commit to a footprint, walk the site with a sun path tool and note:
- Winter shading from trees, ridgelines and neighboring structures between roughly 9 am and 3 pm
- A clear south-facing roof plane or ground area large enough for the array
- Snow load and prevailing wind, which affect pitch, racking and where drifts collect
Orienting the long axis of the cabin east-west gives you a broad south-facing roof and lets you use the same orientation for passive solar glazing, so one decision serves both heat and power.
2. Let the roof do double duty
A simple shed roof is the most solar-friendly form an architect can draw. One uninterrupted plane, facing south, with no dormers, vents or chimneys breaking up the surface, can hold a surprisingly large array on a small cabin.
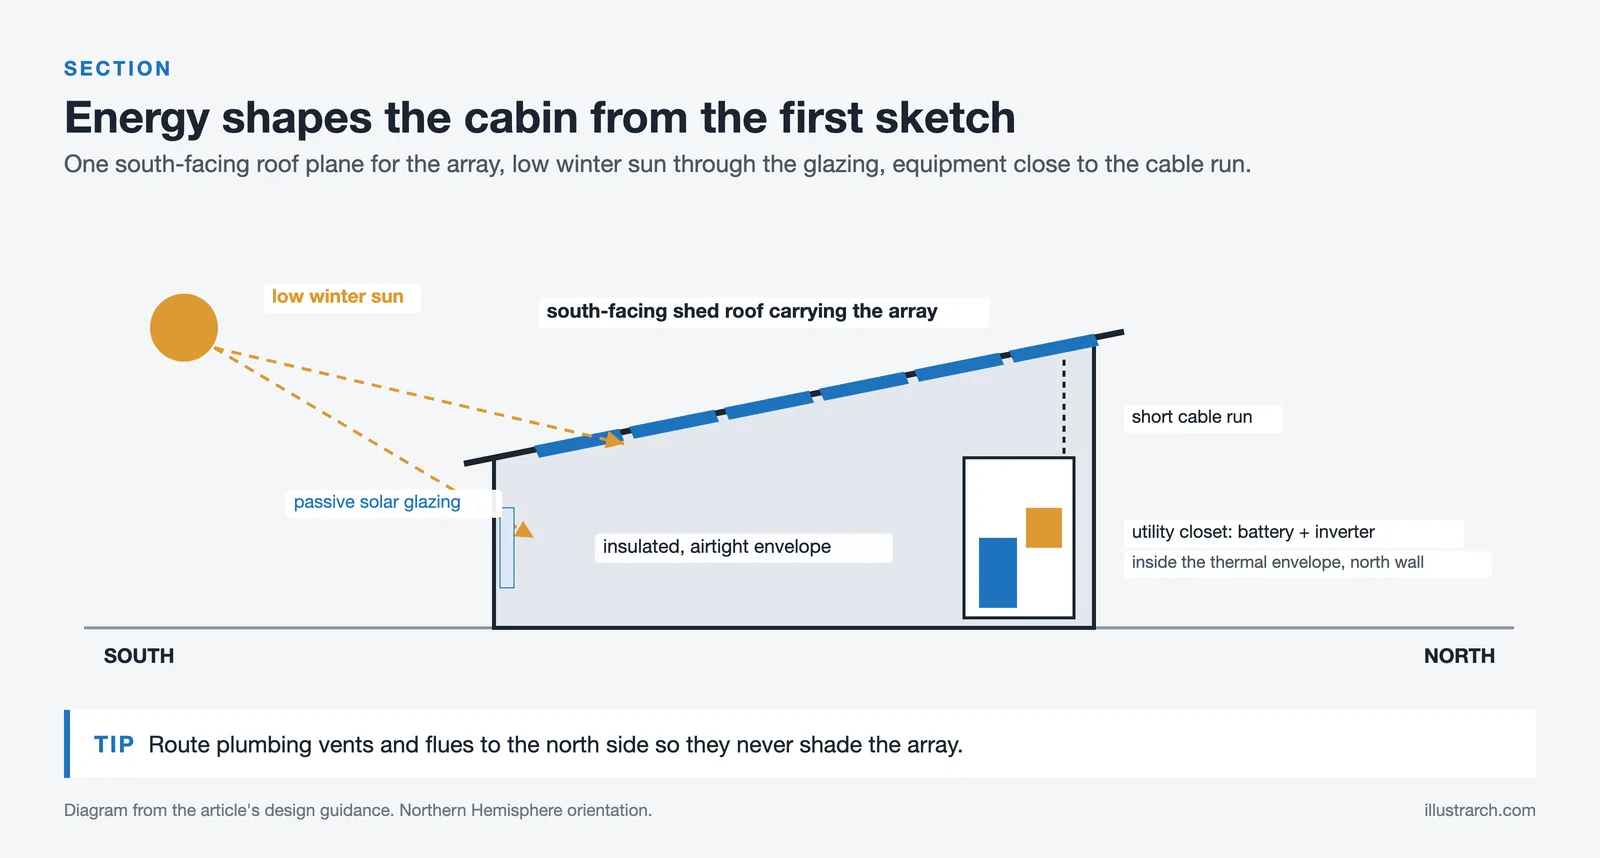
A few rules of thumb for the roof:
- Pitch: a steeper roof, closer to the site’s latitude, improves winter output and helps snow slide off. Low-slope roofs gain summer production but lose it when you need it most.
- Clear zones: route plumbing vents and flues to the north side so they never shade the array.
- Structure: panels and racking add roughly 3-4 pounds per square foot. Size rafters for that load plus local snow load from the start.
- Alternative: if the roof faces the wrong way or sits under trees, plan a ground mount and show it on the site plan, with a trench route for the cable.
3. Design the energy budget before the floor plan is final
Every appliance choice is an energy choice. A small, well-insulated cabin with efficient equipment can run comfortably on 6-7 kWh a day. The same cabin with electric resistance heat or an old chest freezer can need three times that, which means a much larger, more expensive system.
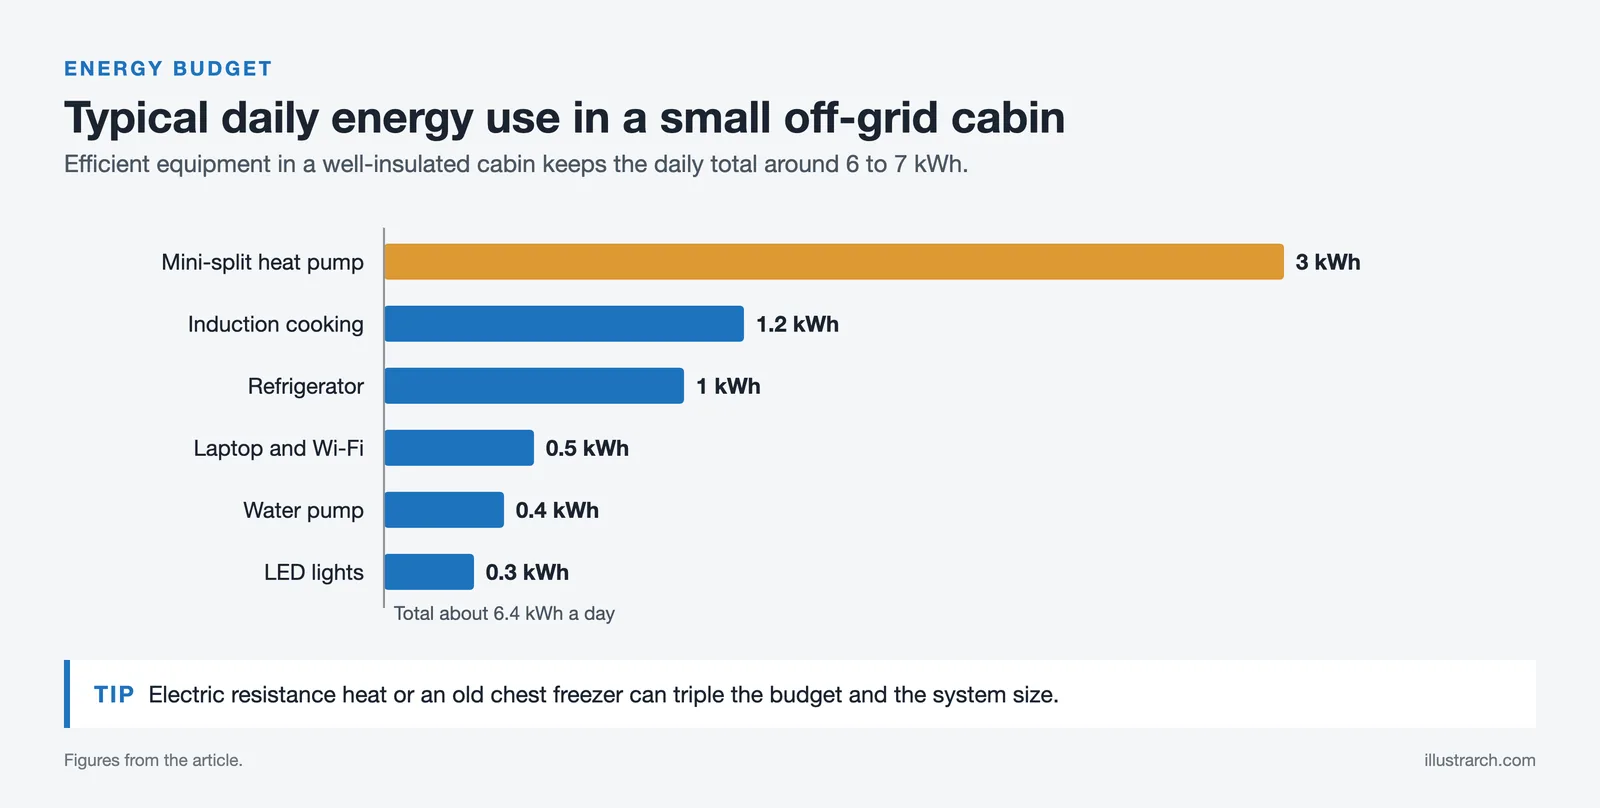
Design decisions that shrink the budget:
- Envelope first. Extra insulation, airtight construction and high-performance windows are cheaper than extra batteries.
- Heat with a wood stove or propane, and use a small mini-split heat pump for shoulder seasons and cooling.
- Choose efficient appliances: a compact DC or Energy Star refrigerator, induction cooktop used sparingly, LED lighting throughout.
- Daylight the plan so lights stay off during the day.
4. Size the system to the design
Once the energy budget is known, the system follows from simple math. For a cabin that uses about 6 kWh a day:
- Battery: two to three days of storage, roughly 12-18 kWh of lithium iron phosphate (LiFePO4), covers cloudy stretches.
- Solar array: with 3 peak sun hours in winter, about 2.5-3 kW of panels replaces a day’s use with margin for losses.
- Inverter: sized for the biggest simultaneous loads plus the start-up surge of pumps and compressors, usually 3-6 kW for a small cabin.
For clients who want a predictable budget, pre-matched cabin solar kits pair the panels, inverter and battery bank so the components are sized to work together, which simplifies both the specification and the installer’s job.
5. Give the equipment a real room
Batteries and inverters are often squeezed into a crawlspace or an unheated shed. That is a design failure. LiFePO4 batteries should not charge below freezing, inverters need ventilation, and everything needs service clearance.
- Plan a conditioned utility closet inside the thermal envelope, ideally on the north wall, close to where the array cables come down.
- Keep cable runs short between array, inverter and battery to reduce losses and cost.
- Allow clearances required by code and the manufacturer, usually 36 inches in front of electrical equipment.
- Add a generator inlet as a backup for long dark spells, even if it is rarely used.
6. Think about water, heat and future growth
An off-grid cabin is a system, not a building with panels. Gravity-fed water storage reduces pump run time. A wood stove with thermal mass carries heat through the night. Conduit sized for extra circuits and a roof with spare area make it easy to add panels or batteries if the cabin grows into a full-time home.
Frequently asked questions
How much roof area does a small off-grid cabin need? A 3 kW array of modern 400-watt panels needs roughly 160-180 square feet of clear, south-facing roof.
Can an off-grid cabin run a heat pump? Yes, for moderate climates and shoulder seasons. In cold climates most designers pair a small heat pump with a wood or propane stove for the coldest weeks.
Do off-grid cabins need permits? In most counties, yes. Electrical permits and inspections apply to off-grid systems just as they do to grid-tied ones, so involve a licensed electrician early.
Conclusion
The best off-grid cabins look effortless because the hard decisions were made early. Orient the building to the sun, give it a simple south-facing roof, design the envelope and appliances around a modest energy budget, and plan a warm, accessible room for the equipment. Do that, and the solar system stops being an afterthought and becomes part of the architecture.



Passive House vs LEED Certification: Which Green Standard Should You Pursue?
Passive House focuses on strict energy performance and airtightness, while LEED scores...
 Sinan Ozen8 Mins read
The Honest Guide to Powering and Furnishing a Home Far From the Grid
A functional off-grid home requires reliable power generation, storage, water supply, and...
 Furkan Sen6 Mins read
Solar Generators and Off-Grid Inverters in Resilient Architecture
Solar generators and off-grid inverters are essential components in resilient architecture, influencing...
 Bahattin Duran4 Mins read
Sustainable Solutions in Contemporary Architecture: From Passive Design to Clean Energy
Sustainable solutions in contemporary architecture: a practical playbook to hit net-zero, cut...
Sinan Ozen5 Mins read


Leave a comment