

Floorplanner Review: Easy 2D to 3D Floor Plan Creation for Non-Designers
Floorplanner turns a 2D layout into a 3D render in the browser with no CAD training. This review breaks down the free tier caps, the credit system behind every export, the drawing workflow, and where the tool stops being enough.
 Elif Ayse Sen14 August 20269 Mins read239
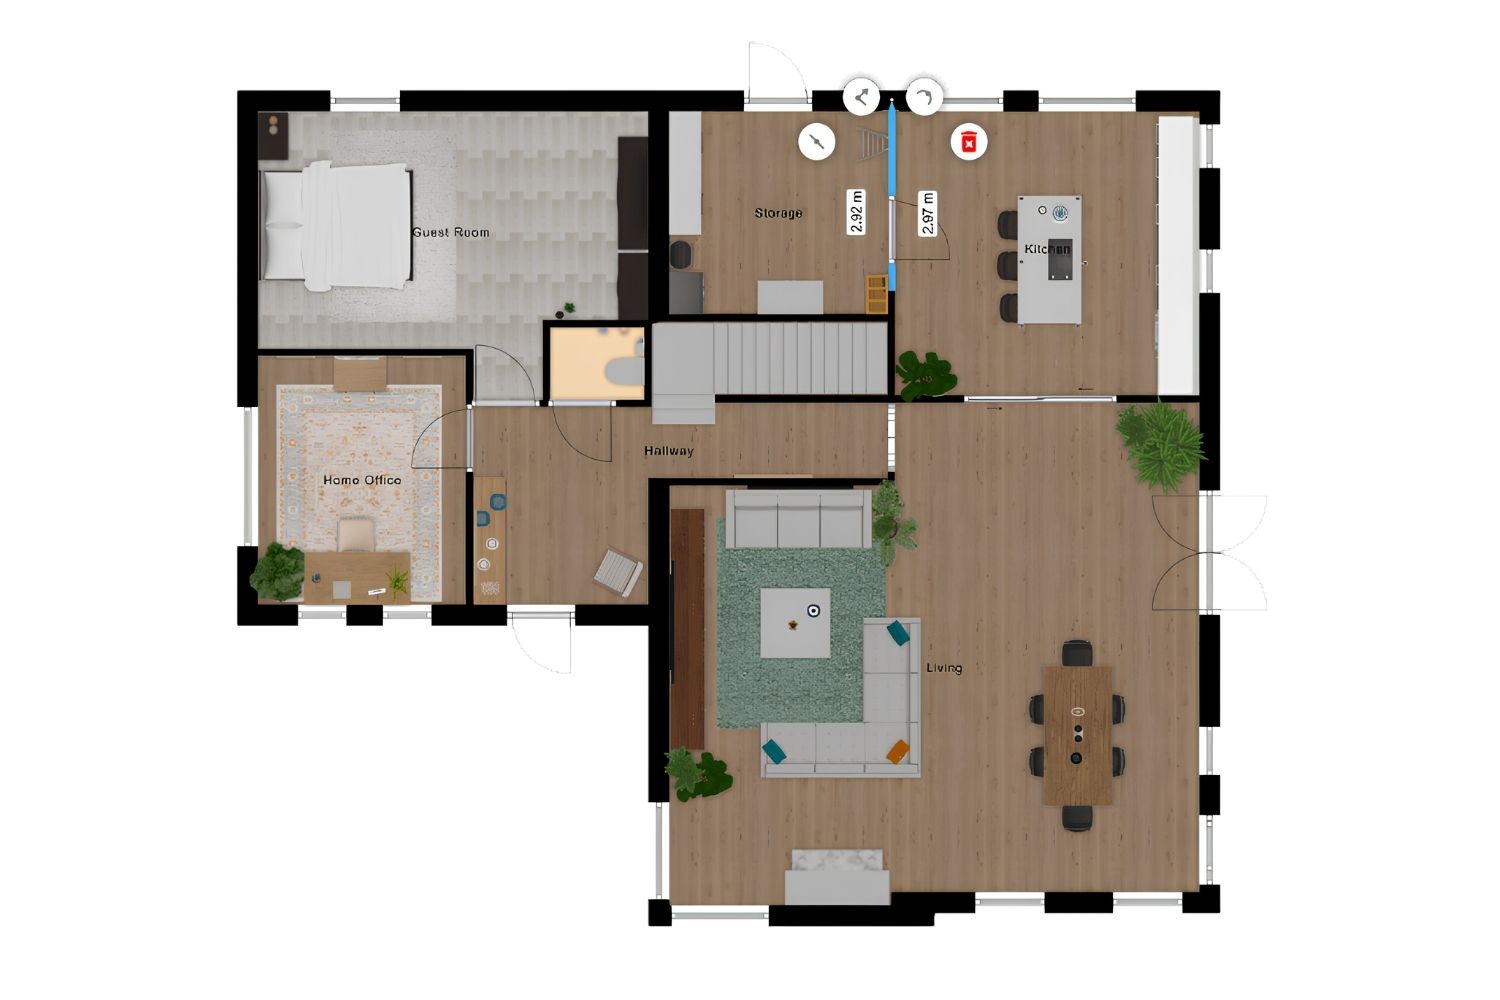
Table of Contents Show
Floorplanner is a browser based floor plan editor that turns a flat 2D layout into a 3D render without any CAD training. This Floorplanner review covers what the free tier actually allows, how the credit system prices exports, where the editor speeds up client work, and the point at which it stops being enough.
Most people who need a floor plan are not draftspeople. They are homeowners moving furniture, agents preparing a listing, retail staff laying out a showroom, or students who need a clean plan for a board by Friday. Floorplanner has aimed at exactly that group since 2007, and the trade-offs it makes are visible the moment you open a project.
What Is Floorplanner and Who Is It For?

Floorplanner is an online 2D and 3D planning tool run from Rotterdam, built around a lightweight editor that opens in any browser with no download or plug-in. You draw rooms on a canvas, drag furniture in from a library panel, then flip the same model into a 3D view and render it in the cloud. The company was founded in 2007 by three architects and a civil engineer, and it now reports more than 30 million registered accounts.
The people it fits best are the ones who need a readable plan rather than a buildable one. A landlord documenting an apartment, an interior decorator testing a sofa against a bay window, a real estate agent adding a layout to a listing, a teacher setting a classroom exercise. If you are still learning how plans are read and annotated, the illustrarch architecture floor plan guide covers the drawing conventions that Floorplanner quietly handles for you.
The people it does not fit are equally clear. Nothing produced here is construction documentation. There is no dimensioning discipline enforced, no layer standard, no coordination with structure or services. Treat the output as a communication drawing, not a permit set.
🔢 Quick Numbers
- Over 30 million registered accounts and more than 50 million plans created (Floorplanner, About page, 2026)
- Founded in 2007 by three architects and a civil engineer, with a team of around 30 people in Rotterdam (Floorplanner, About page, 2026)
- Credit packs are priced flat at $163 for 100 credits, working out to $1.63 per credit with no volume discount (Floorplanner pricing page, 2026)
What the Free Tier Actually Allows
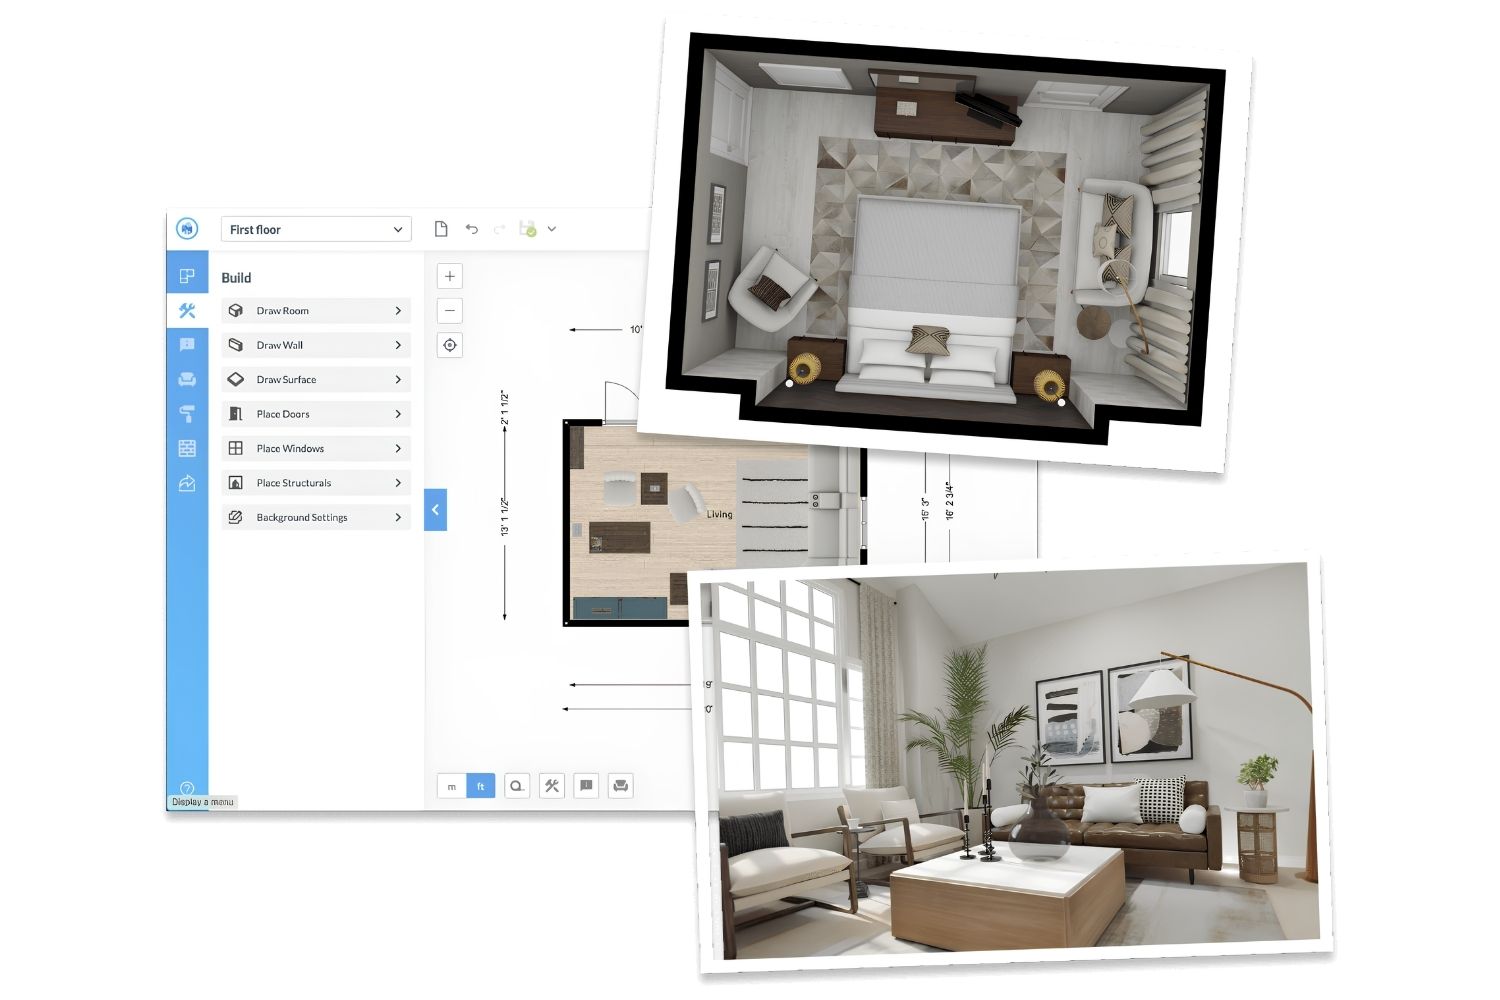
A free Basic account gives you up to five projects, kept in the account for as long as you want them. Every new project starts at a level Floorplanner calls SD Lite. That level opens the full editor and the whole furniture library, so nothing about the drawing experience is crippled. The limits sit on the output side instead.
An SD Lite project is capped at three floors with three designs in total, and every image you export comes out at 960 by 540 pixels with a Floorplanner watermark across it. Basic accounts also sit through a ten minute cooldown between exports, which is the single most irritating restriction in daily use. You can plan a one bedroom flat end to end without paying anything. You cannot hand the result to a client and expect it to look professional.
That structure is unusual and worth understanding before you start. Most tools in this category gate features. Floorplanner gates resolution. The editor you get for free is the same editor a paying user gets, which is why the free tier is a genuinely useful place to learn the tool rather than a demo designed to frustrate you into upgrading. You can compare that approach against the wider set of no-cost options in our roundup of free tools for architectural design and planning.
Floorplanner Tutorial: Drawing a Plan From Scratch
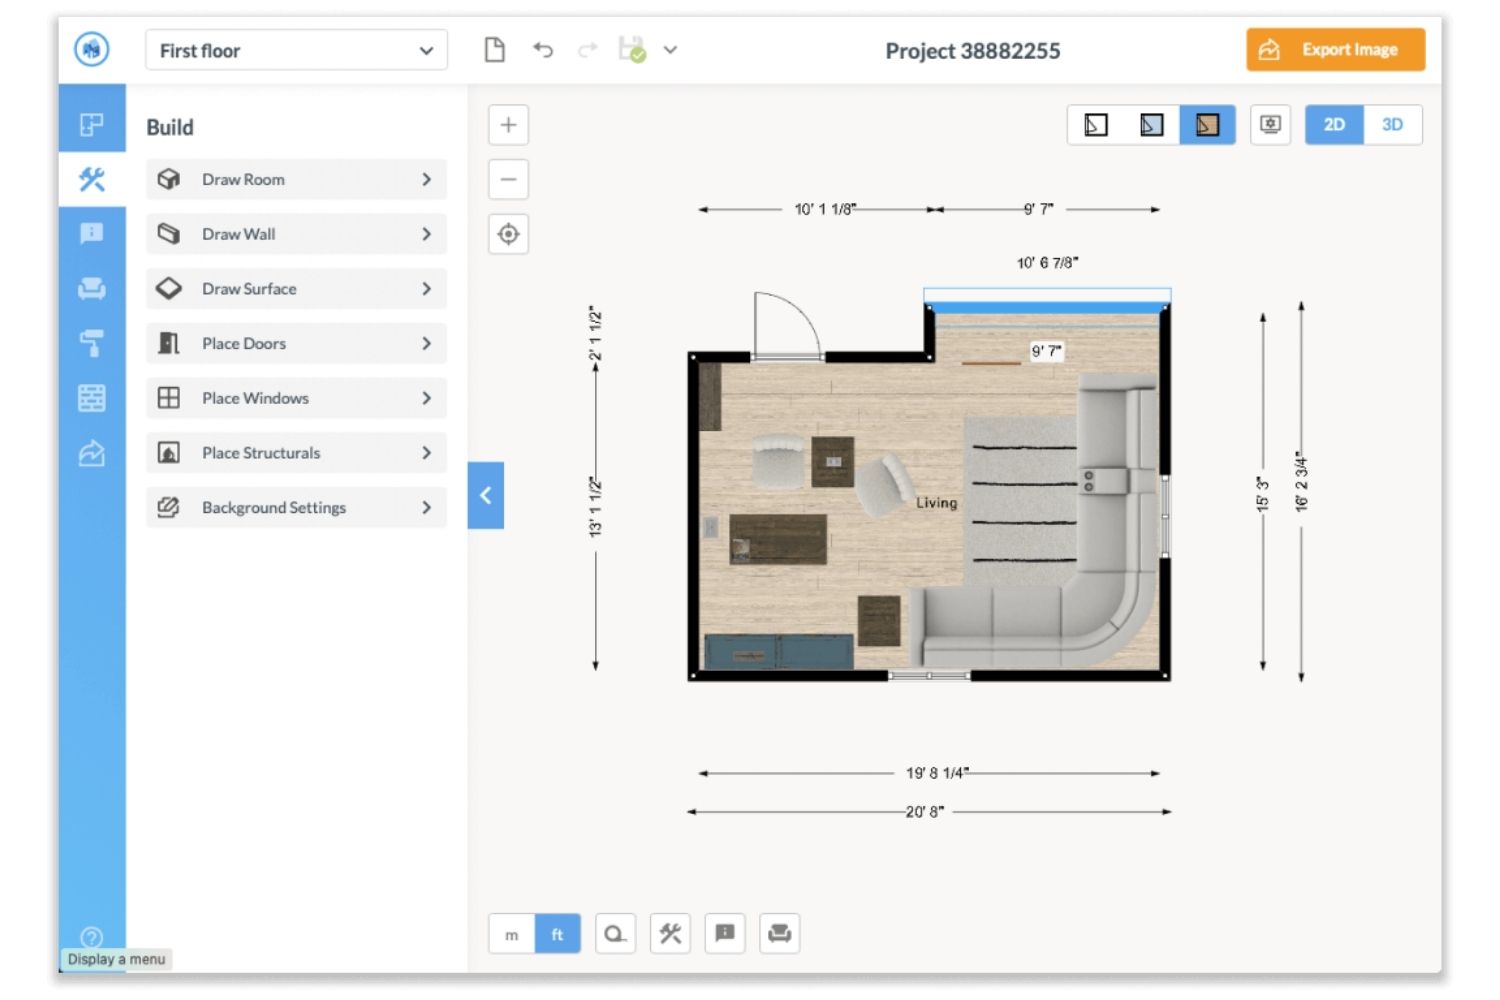
The drawing sequence rewards doing things in the right order. Start with the exterior envelope using the room tool, which creates a closed shape with walls already attached. Then use the wall by wall tool to subdivide the interior, starting and finishing each new wall on an existing exterior wall so the corners actually connect. Guidelines appear as you drag to help you land on horizontal, vertical, and existing endpoints.
Doors and windows are dragged from the library directly onto a wall, where they cut their own opening. Each one carries an elevation property, which is the height above finished floor, so sill heights are adjustable rather than fixed. Room types, text labels, and dimension lines all live in a separate information toolset, and adding room types matters more than it looks, since it drives the colour coding and the area calculations.
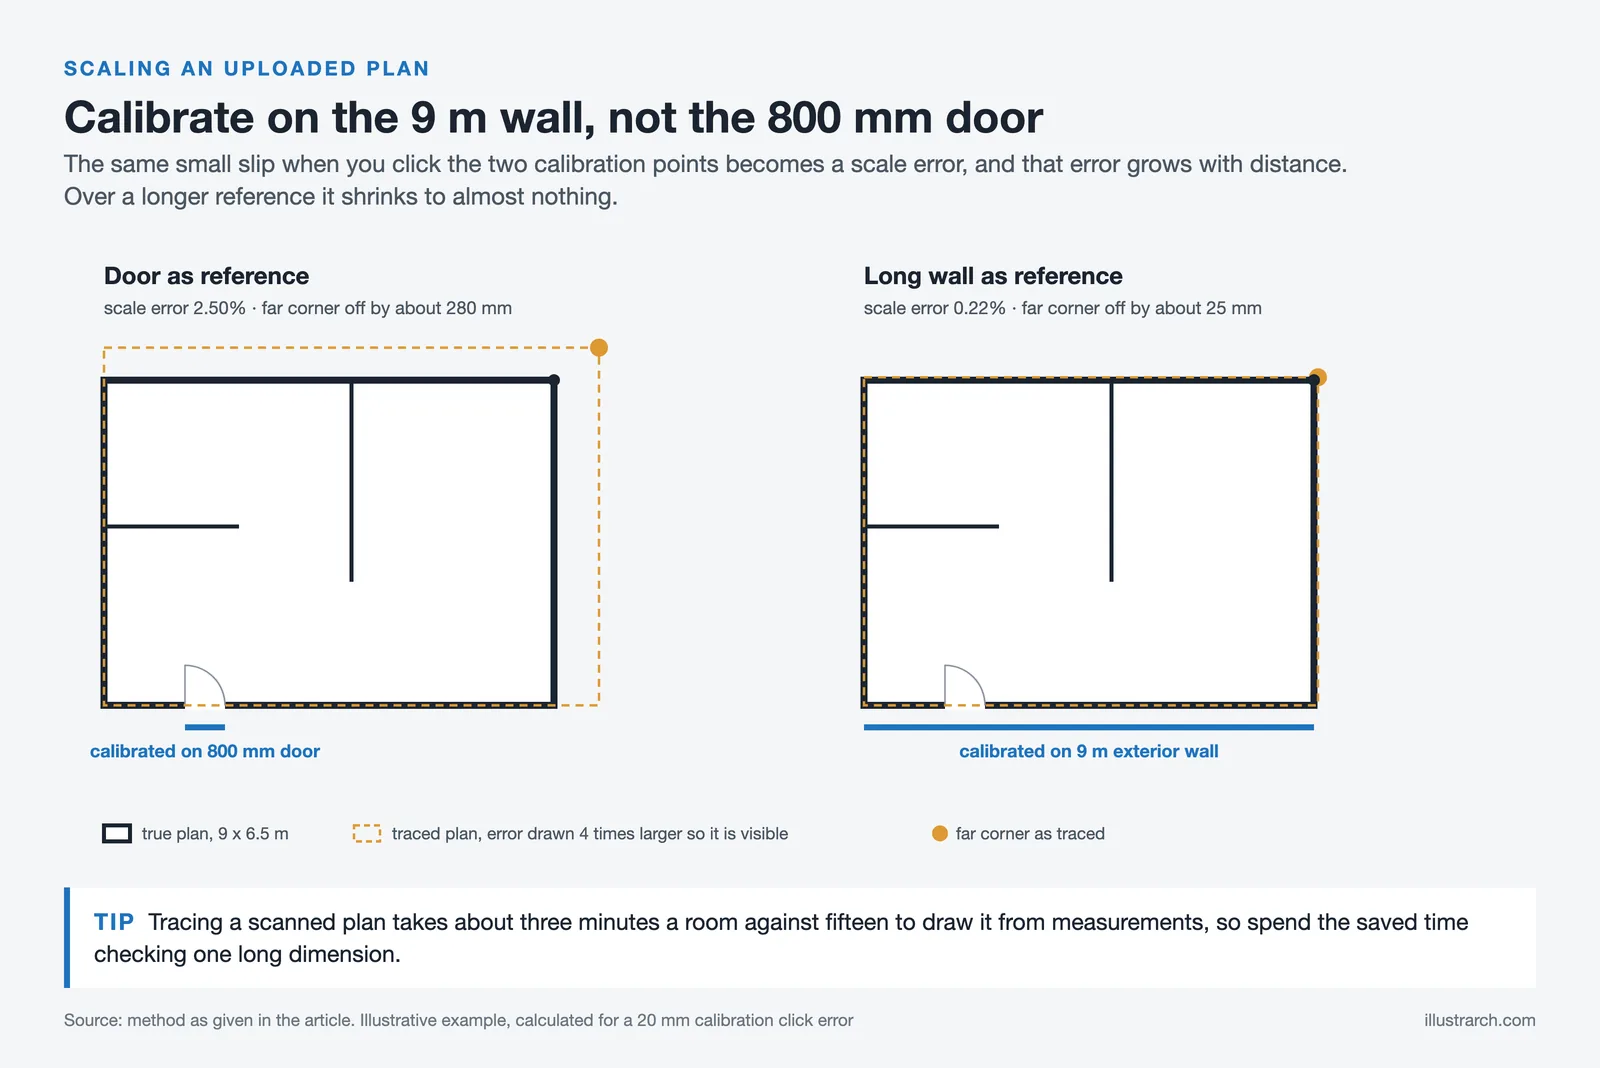
The fastest route for an existing building is not to draw at all. Photograph or scan the plan you already have, upload it as a background drawing, set the scale against one known dimension, then trace over it. A room that takes fifteen minutes to draw from measurements takes about three to trace. For a broader comparison of tools that handle this same job, see the illustrarch walkthrough on drawing a house blueprint with software yourself. Floorplanner’s own help centre documents each tool in the editor in more detail.
💡 Pro Tip
When tracing an uploaded plan, set the scale against the longest measurement you trust rather than a door or a single room. Scale error compounds along the whole drawing, so calibrating against a 9 metre exterior wall leaves you far less off at the far corner than calibrating against an 800 mm door leaf.
Moving From 2D to 3D
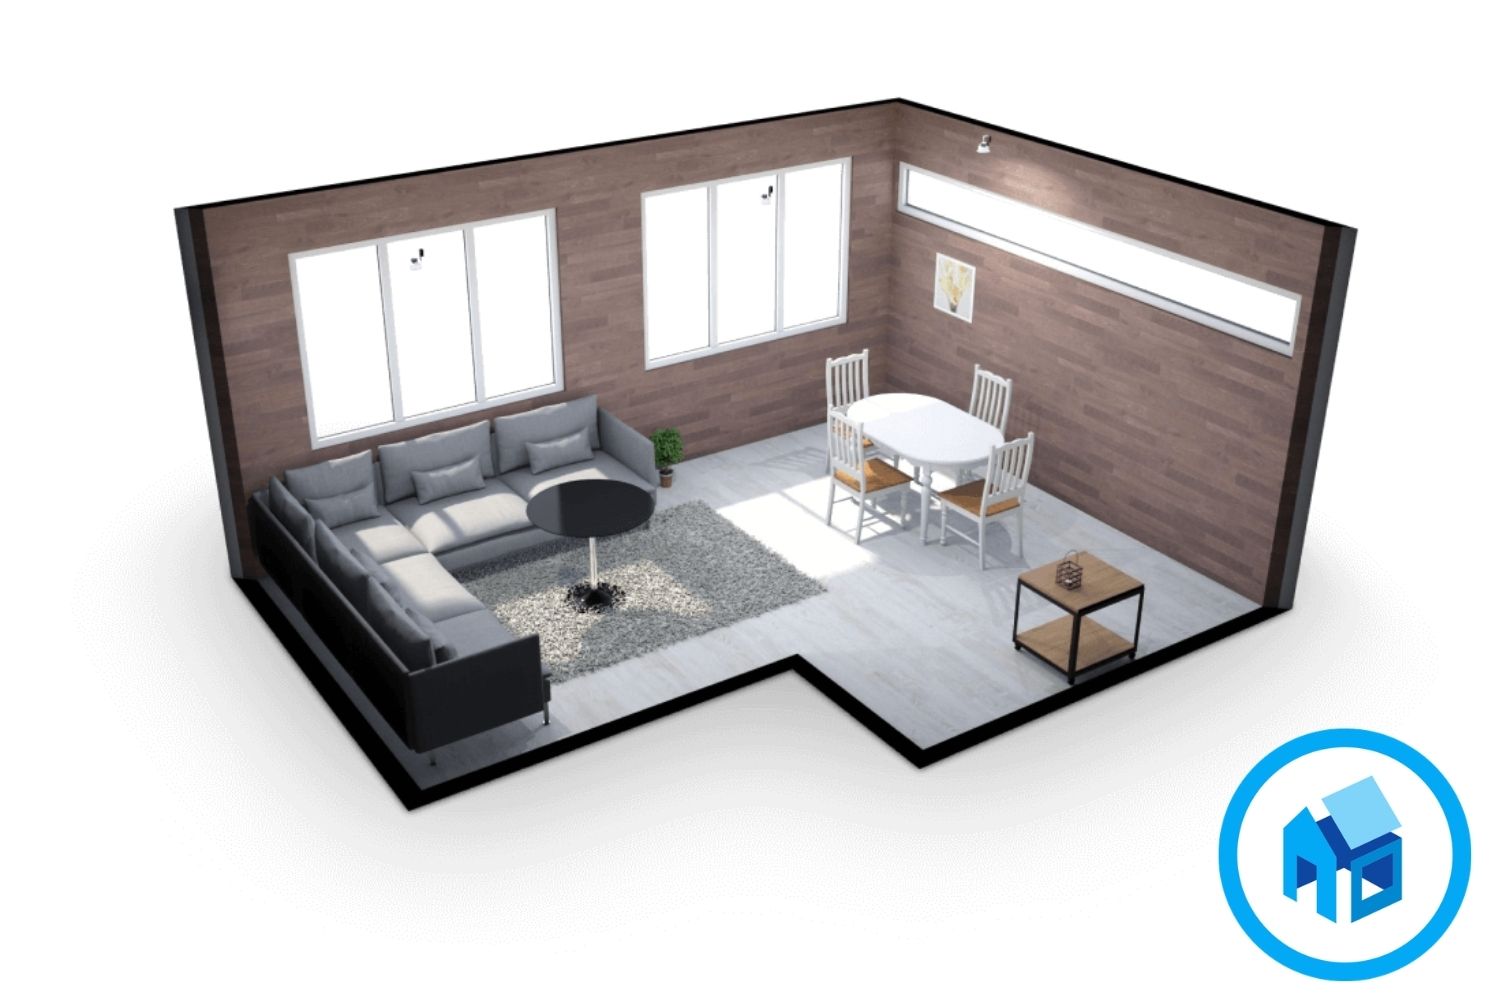
Switching to the 3D view is a single click, and the model is already there. Floorplanner builds the third dimension from the walls, openings, and furniture you placed in 2D, so there is no separate modelling step to learn. You get an orbital dollhouse view for overall reading and a first person walkthrough for checking sightlines and clearances at eye level.
Cloud rendering is where the tool separates itself from simple layout apps. You place cameras in the scene, adjust lighting and the scenery image that appears outside the windows, then send the frame off to be rendered on Floorplanner’s servers rather than on your machine. That is why an old laptop produces the same image quality as a workstation, and it is the main reason the platform works for people with no rendering hardware at all.
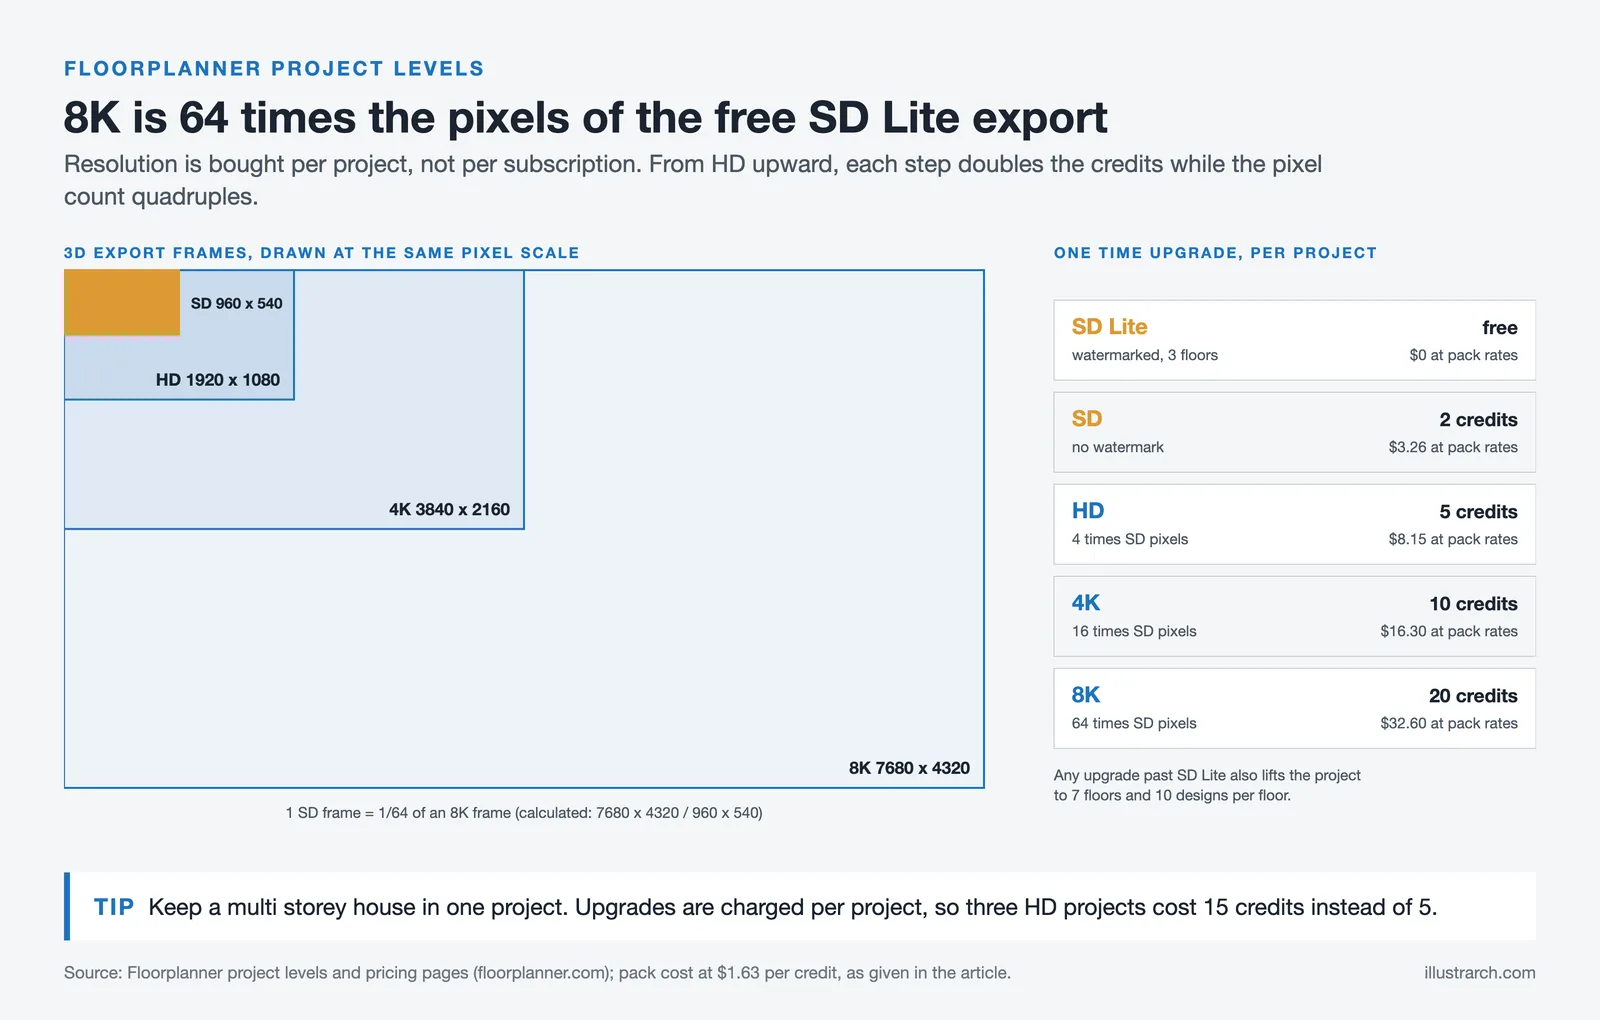
The output quality, though, is not set by your subscription. It is set by the project level, a one-time upgrade applied per project. This catches nearly everyone out on their first paid render, and it is the single most important thing to understand before you start work you intend to sell.
📐 Technical Note
Project levels set the maximum 3D export resolution: SD at 960 by 540, HD at 1920 by 1080, 4K at 3840 by 2160, and 8K at 7680 by 4320 pixels. Upgrading any project past SD Lite also raises the ceiling to seven floors with up to ten designs per floor, removes the watermark, and adds PDF, FML, and DXF export. Note that DXF is offered, not DWG, so a round trip into AutoCAD involves a format conversion.
How Much Does Floorplanner Cost?
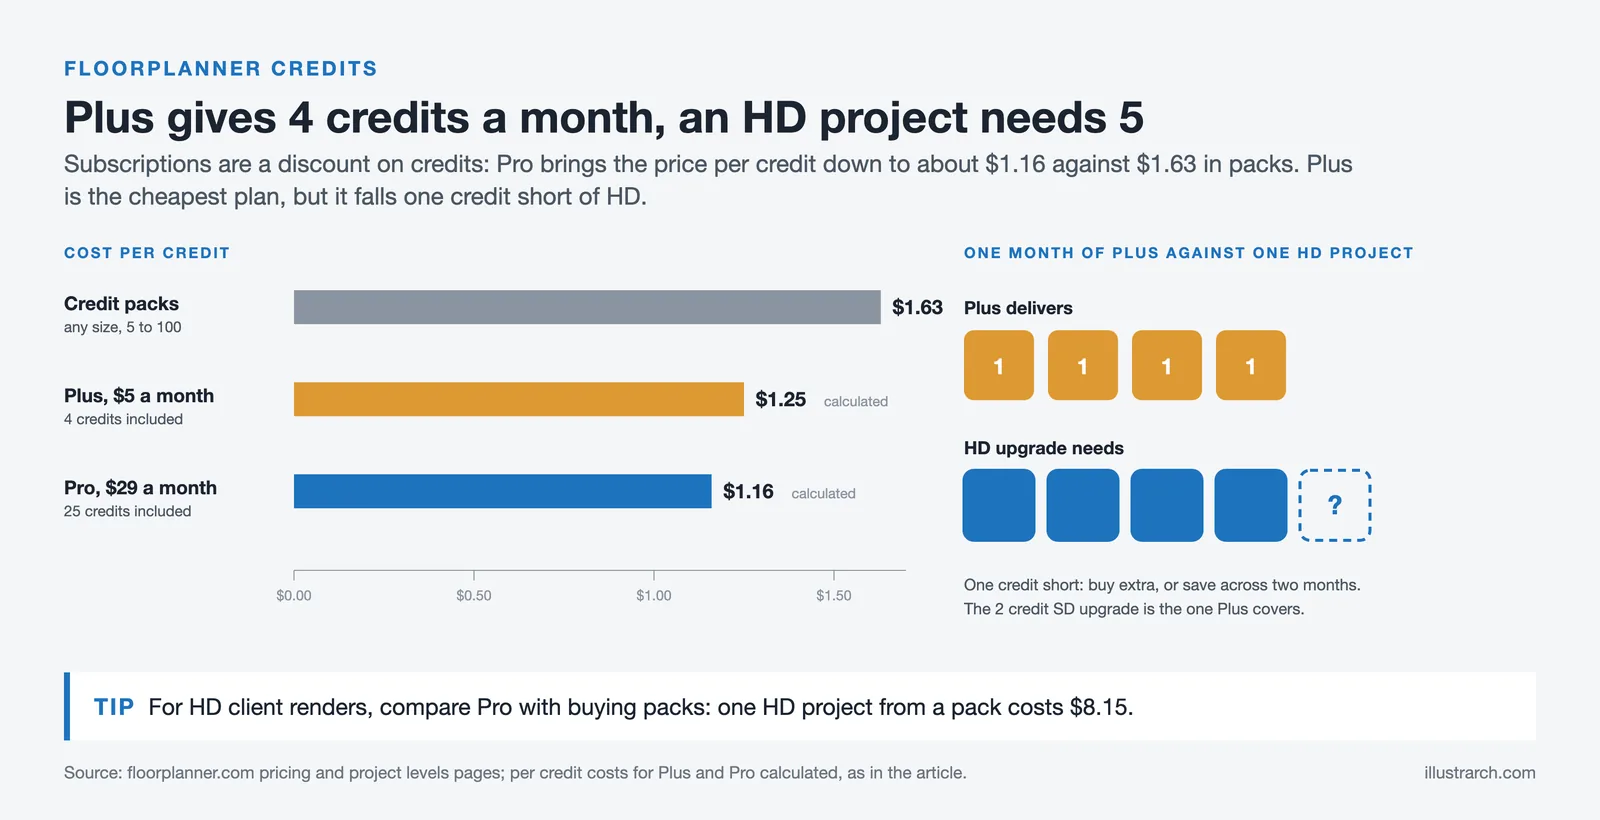
Floorplanner is free for casual use and charges through credits rather than a straight feature paywall. Credits buy project level upgrades, and they can be bought outright in packs or received monthly through a subscription. Packs run from 5 credits at $8.15 to 100 credits at $163, which is a flat $1.63 per credit at every pack size.
On the subscription side, Basic is free, Plus is $5 per month and includes 4 credits, and Pro is $29 per month with 25 credits and no export cooldown. Team plans start at $59 per month and rise to $599 for enterprise use. Running the arithmetic, Pro credits land around $1.16 each and Plus credits around $1.25, so a subscription is effectively a discount on credits plus the removal of the cooldown.
Project Level Upgrade Costs at a Glance
The table below shows what each one-time project upgrade gives you and roughly what it costs if you are buying credits in packs rather than through a subscription.
| Project Level | 3D Export Resolution | Credits (one-time) | Approx. Pack Cost |
|---|---|---|---|
| SD Lite (default) | 960 x 540, watermarked | Free | $0 |
| SD | 960 x 540, no watermark | 2 | $3.26 |
| HD | 1920 x 1080 | 5 | $8.15 |
| 4K | 3840 x 2160 | 10 | $16.30 |
| 8K | 7680 x 4320 | 20 | $32.60 |
Put those two sets of numbers side by side and an awkward gap appears. The Plus plan at $5 a month supplies 4 credits, while a single HD project upgrade costs 5. A Plus subscriber therefore cannot fund one HD project in a month without buying extra credits or saving up across two months. The plan that genuinely suits Plus is the 2 credit SD upgrade, which removes the watermark and raises 2D exports to HD while leaving 3D at 960 by 540. If your renders need to look sharp on a client screen, the useful entry point is Pro, not Plus. Full current figures are published on the Floorplanner pricing page and the project levels page.
⚠️ Common Mistake to Avoid
Splitting one building across several projects to get around the three floor cap is an expensive mistake, because project level upgrades are charged per project rather than per account. A three storey house drawn as three separate SD Lite projects and then upgraded to HD costs 15 credits instead of 5. Upgrade one project first, which lifts it to seven floors and ten designs per floor, then keep everything inside it.
Pricing and credit costs are set by Floorplanner and change over time. Figures here reflect the published rates at the time of writing and exclude VAT, so confirm current prices before subscribing.
Where Floorplanner Falls Short
Precision is the recurring complaint in user reviews, and it is a fair one. Setting exact room dimensions often means typing values manually rather than drawing to a snapped grid, and reviewers on Capterra repeatedly mention that adjusting a dimension late in a project can disturb geometry elsewhere in the plan. If your workflow depends on drawing to tolerance, this is the wrong tool.
Material and finish control is the second limit. The library is large, with the project levels page citing more than 180,000 items while the homepage claims over 260,000, but the items are what they are. You can change colours and apply materials from the supplied sets; you cannot author a custom material with real reflectance values, and imported 3D assets are reserved for business tiers. TechRadar’s review of Floorplanner reaches a similar conclusion about the ceiling on customisation.
The third limit is structural rather than technical. Floorplanner sits in the visualisation half of the design process and never crosses into documentation. There is no site or context modelling of any depth, which is why a project that needs the building placed properly on its lot still calls for a separate architectural site plan. It also has no generative layout engine, so anyone hoping the software will propose arrangements should look instead at the tools covered in our guide to the best AI floor plan generators.
💡 Pro Tip
On a Basic account, place and check every camera angle you want before you export anything. The ten minute cooldown applies between exports, so a set of six views taken one at a time as you notice problems burns an hour of waiting. Reviewing all cameras in the 3D view first, then exporting in sequence, turns that hour into a coffee break.
Floorplanner Against Other Easy Floor Plan Makers
Choosing an easy floor plan maker usually comes down to where the friction sits: installation, learning curve, or output quality. The table compares Floorplanner with three tools that beginners commonly weigh against it.
| Tool | Runs In | Free Tier | Best For |
|---|---|---|---|
| Floorplanner | Browser, no install | 5 projects, watermarked SD exports | Fast client-facing 2D and 3D of a real space |
| Planner 5D | Browser plus mobile apps | Free with a limited item catalogue | Home interior styling on a phone or tablet |
| SketchUp Free | Browser, no install | Free for personal use | 3D massing and modelling rather than plans |
| Sweet Home 3D | Desktop install, offline | Fully free and open source | Working without an account or internet |
Floorplanner’s advantage over the desktop options is that a plan lives at a URL, so a client or contractor opens it with nothing installed. Its advantage over the phone first tools is that the drawing surface is a real canvas, which matters as soon as a layout has more than four rooms. Its disadvantage against all of them is the metered output. If you are weighing browser based planners generally, the illustrarch beginner’s guide to Arcadium 3D walks through a comparable five step workflow, and our Interior AI review covers the photo based alternative for people who already have the room and only want it restyled.
FreeRoomPlanner is a free browser-based room planner that requires no sign-up or email login. Users can draw rooms, arrange furniture and view their layouts in 3D, helping them explore different arrangements before moving or buying furniture. Disclosure: this is a paid, sponsored mention.
Where to Go From Here
Judged on what it set out to do in 2007, Floorplanner delivers. A person with no drafting background can produce a legible plan and a presentable 3D view in an afternoon, on any machine, with nothing to install. What this Floorplanner review keeps returning to is that the pricing model asks you to make a decision early, before you have drawn anything, about how good the final images need to look.
✅ Key Takeaways
- The free tier limits resolution, not features, so the whole editor and library are available for learning the tool at no cost.
- Export quality is controlled by the per-project level upgrade, not by your subscription tier, and that upgrade is a one-time credit charge per project.
- Plus at $5 a month supplies 4 credits while an HD upgrade costs 5, so Pro is the realistic plan for anyone who needs sharp renders regularly.
- Keep a whole building in a single upgraded project rather than splitting floors across projects, which multiplies the credit cost.
- Tracing an uploaded plan and calibrating the scale against a long known dimension is faster and more accurate than drawing from measurements.
- Output is a communication drawing. Construction documentation, code compliance, and coordination still belong in CAD or BIM.
If you are testing it this week, draw one real room you can measure, upgrade that single project to SD for 2 credits, and compare the watermark-free export against what you actually need to send someone. That one small test answers the subscription question better than any feature list. You can start on the Floorplanner site without a card.








Notion Alternatives for Architects: 7 Tools That Fit Studio Work
Notion works until a studio needs fee tracking, phase budgets and timesheets....
 Furkan Sen7 Mins read

Why Every Practice Ends Up With Five Versions of the Same Revit Family
Let’s learn why Revit family libraries accumulate duplicates, break schedules and slow...
 illustrarch Editoral Team5 Mins read
Visualizing Renovation Projects From Photographs: A Workflow for Existing-Building Work
Photo-based visualization turns a photograph of a building that already exists into...
illustrarch Editoral Team7 Mins read

Best Free CAD Blocks and Resources for Architects
A working guide to free CAD blocks for architects, covering ARCAT, CAD-Blocks.net,...
Furkan Sen7 Mins read


Leave a comment